Glider rocker woodworking plans offer a chance to craft a piece of furniture that combines classic charm with modern comfort. These plans guide you through building a glider rocker that not only provides a soothing rocking motion but also adds a touch of rustic elegance to any space. Whether you’re a seasoned woodworker or a beginner eager to learn, the detailed instructions and helpful tips will help you create a glider rocker that you’ll cherish for years to come.
Imagine sinking into a handcrafted glider rocker, its gentle sway lulling you into relaxation. This isn’t just a piece of furniture; it’s an invitation to unwind, to read a book, or simply enjoy the quiet moments of life. The journey from raw materials to a finished glider rocker is both rewarding and fulfilling, allowing you to create something truly unique and personal.
Building a Glider Rocker Step-by-Step: Glider Rocker Woodworking Plans
This guide will walk you through the process of building a glider rocker, providing detailed instructions, safety tips, and visual illustrations to help you create a comfortable and stylish piece of furniture for your home.
Cutting the Wood
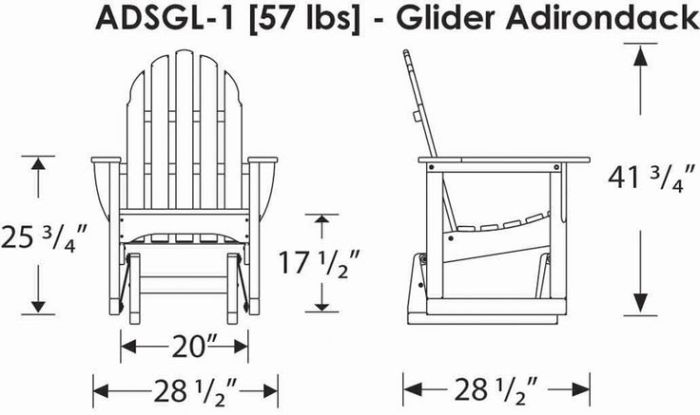
Cutting the wood accurately is crucial for the glider rocker’s stability and appearance. Begin by carefully measuring and marking the wood according to your plans. Use a sharp saw, such as a circular saw or table saw, for precise cuts. Remember to wear safety glasses and hearing protection when operating power tools.
Always double-check your measurements before cutting, and use a clamp to secure the wood for safe and accurate cutting.
Assembling the Frame, Glider rocker woodworking plans
Once the wood is cut, you can start assembling the frame. This step involves joining the pieces together using wood glue and screws. Use a drill to create pilot holes before driving in screws to prevent wood splitting.
Pilot holes should be slightly smaller than the screw diameter to ensure a snug fit.
Adding the Glider Mechanism
The glider mechanism allows the rocker to move smoothly back and forth. This step involves attaching the glider tracks to the frame. The tracks should be positioned correctly to ensure the rocker glides smoothly.
Check that the tracks are securely fastened to the frame and that they are aligned properly.
Installing the Seat and Backrest
After the frame is assembled, you can attach the seat and backrest. These pieces can be made from plywood or solid wood, depending on your preference. Use wood glue and screws to secure them to the frame.
Ensure the seat and backrest are properly aligned and attached to the frame for a comfortable and sturdy rocker.
Finishing the Glider Rocker
Once the glider rocker is assembled, you can sand it smooth and apply a finish. Sanding removes any rough edges and prepares the wood for staining or painting.
Use progressively finer grits of sandpaper for a smooth finish.
Adding Upholstery
The final step is adding upholstery to the seat and backrest. This can be done using foam padding, fabric, and staples.
Measure and cut the fabric carefully to ensure a professional-looking finish.
Finishing Touches and Refinement
The final stage of building your glider rocker involves applying finishing touches that enhance its appearance, durability, and protection. This involves sanding, staining, and painting, each with its own nuances and techniques.
Sanding
Sanding is essential for achieving a smooth and even surface before applying any finish. Start with coarse-grit sandpaper (80-120 grit) to remove any imperfections or rough edges. Gradually progress to finer grits (150-220 grit) for a smoother finish. Remember to sand with the grain of the wood to avoid scratches.
Staining
Staining adds color and depth to the wood, enhancing its natural grain patterns. Choose a stain that complements the wood species and your desired aesthetic. Apply stain evenly using a brush or cloth, following the manufacturer’s instructions. Allow the stain to dry completely before proceeding to the next step.
Painting
Painting provides a protective layer and allows for a wider range of colors and finishes. Choose a paint specifically designed for outdoor use to withstand weather elements. Apply multiple thin coats of paint, allowing each coat to dry completely before applying the next.
Finishes for Outdoor Use
Outdoor finishes need to be durable and resistant to UV rays, moisture, and temperature fluctuations. Some popular options include:
- Polyurethane: A clear, durable finish that protects against moisture and UV damage. It’s available in gloss, semi-gloss, and satin finishes.
- Oil-based finishes: Offer excellent protection and a natural look. However, they take longer to dry and may emit strong fumes.
- Water-based finishes: Easier to apply and clean up, but may not be as durable as oil-based finishes.
Tips for a Durable and Aesthetically Pleasing Finish
- Prepare the surface thoroughly: Sanding and cleaning the wood before applying any finish is crucial for a smooth and long-lasting result.
- Apply thin coats: Multiple thin coats are better than one thick coat, allowing the finish to penetrate the wood and dry evenly.
- Use a quality brush or sprayer: A good brush or sprayer will help achieve a smooth and even finish.
- Allow ample drying time: Ensure each coat of finish dries completely before applying the next.
- Apply a sealant: A sealant can further enhance the durability of the finish and protect against moisture and UV damage.
Variations and Customizations
The beauty of woodworking lies in its flexibility. A glider rocker is a blank canvas, allowing you to personalize it with your own unique touches. Whether you’re aiming for a rustic farmhouse feel or a sleek modern aesthetic, there’s a world of customization options to explore.
Design Variations
The basic glider rocker design can be adapted in numerous ways to create a piece that perfectly complements your style and space.
- Shape and Size: Experiment with the overall shape of the rocker. Consider a wider, more generous seat for added comfort or a narrower design for a more compact look. You can also play with the height and depth of the back for a customized fit.
- Armrests: Vary the style and shape of the armrests. You could opt for traditional rounded arms, sleek straight arms, or even incorporate decorative details like curves or carvings. The choice is yours!
- Backrest: Think beyond the standard straight backrest. Consider a curved backrest for a more ergonomic design or a slightly angled backrest for a more modern feel. Adding decorative elements like slatted panels or intricate carvings can further enhance the visual appeal.
Material Choices
Beyond the traditional hardwoods, there are many other materials you can explore to achieve your desired look and feel.
- Reclaimed Wood: Using reclaimed wood adds character and sustainability to your project. Look for salvaged barn wood, old beams, or even repurposed pallets for a unique and eco-friendly touch.
- Painted Finishes: A fresh coat of paint can completely transform the look of your glider rocker. Choose a vibrant color for a bold statement or a subtle hue for a more understated feel. You can even experiment with different paint techniques like distressing or two-tone finishes.
- Metal Accents: Incorporate metal accents like decorative hardware, hinges, or even metal legs for a touch of industrial chic. This can add a modern twist to a traditional design.
Functional Additions
For added practicality and convenience, consider incorporating functional elements into your glider rocker.
- Storage Compartments: Add built-in storage compartments beneath the seat or within the arms to keep your reading materials, blankets, or other essentials within easy reach. These compartments can be hidden behind doors or left open for easy access.
- Cup Holders: For the ultimate relaxation experience, integrate cup holders into the armrests. This is a perfect solution for enjoying your favorite beverage while you unwind in your glider rocker.
- Side Tables: Attach small side tables to the arms of the rocker for a convenient place to set down your book, coffee cup, or other items. These can be designed to match the overall style of the glider rocker.
Upholstery and Cushions
For ultimate comfort and style, consider adding upholstery or cushions to your glider rocker.
- Fabric Choices: A wide range of fabrics are available, from durable cotton and linen to luxurious velvet and leather. Choose a fabric that complements your style and provides the desired level of comfort and durability.
- Cushion Designs: Play with different cushion shapes and sizes to create a customized look and feel. You can opt for plush, oversized cushions for a luxurious feel or slim, tailored cushions for a more minimalist aesthetic.
- Color and Pattern: Use color and pattern to create a unique and personal style. Choose a solid color for a classic look or incorporate patterns and textures for a more vibrant and eclectic feel.
Last Recap
Building a glider rocker from woodworking plans is a project that combines practicality and artistry. It’s a chance to delve into the world of woodworking, learning new skills and techniques along the way. The satisfaction of creating a piece of furniture that you can enjoy for years to come is unmatched. As you bring your glider rocker to life, you’ll be creating a piece of furniture that not only adds beauty and comfort to your home but also stands as a testament to your craftsmanship.
FAQ Insights
What type of wood is best for a glider rocker?
Hardwoods like oak, maple, and cherry are excellent choices for glider rockers due to their strength and durability.
How do I ensure my glider rocker is stable?
Accurate measurements and sturdy joinery are crucial for stability. Refer to the plans carefully and use strong wood glue and screws for secure connections.
Can I customize the design of my glider rocker?
Absolutely! You can adjust the dimensions, add storage compartments, or even incorporate different wood finishes to create a unique design.
Glider rocker woodworking plans are a great starting point for building your own custom piece of furniture. If you’re looking for a more personalized approach, you can always explore the world of custom woodworking , where you can create a glider rocker that perfectly matches your style and needs.
Whether you’re following a pre-made plan or designing your own, the satisfaction of building a glider rocker yourself is unmatched.
