Rocking horse woodworking plans offer a rewarding journey into crafting a timeless toy that will bring joy for generations. The allure of building a rocking horse from scratch goes beyond just creating a beautiful piece; it’s about connecting with the rich history of this beloved toy and experiencing the satisfaction of bringing your own design to life.
Woodworking, as a hobby, is a journey of skill development, creative expression, and tangible results. Whether you’re a seasoned woodworker or just starting out, building a rocking horse is a project that allows you to learn new techniques, refine your skills, and create something truly special. This guide will walk you through the process, from choosing the right wood to applying the finishing touches, ensuring you have everything you need to create a rocking horse that’s both safe and beautiful.
Introduction to Rocking Horse Woodworking

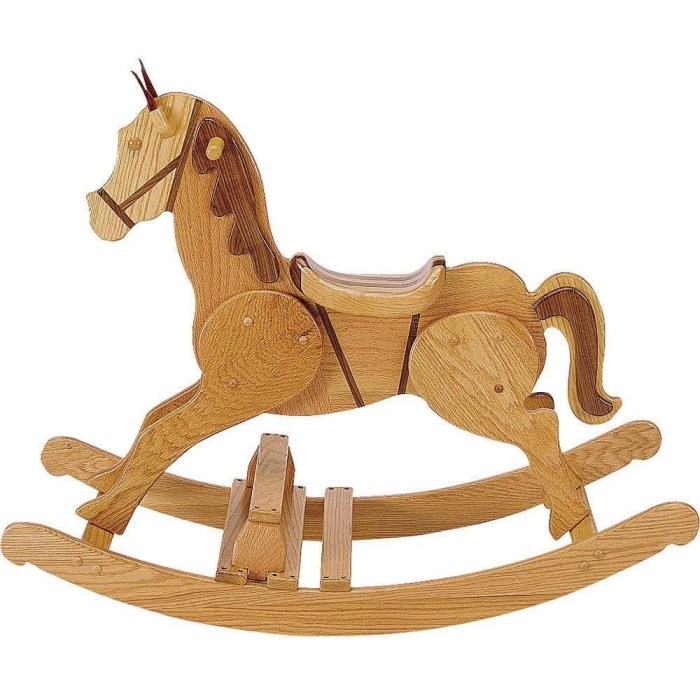
Rocking horses have been a beloved children’s toy for centuries, captivating imaginations and providing hours of fun. From simple wooden designs to intricately carved masterpieces, these whimsical creatures have become a cherished part of childhood memories. Building a rocking horse from scratch offers a rewarding and unique experience, allowing you to create a personalized heirloom that will be treasured for generations to come.
The Appeal of Building a Rocking Horse
The process of crafting a rocking horse from wood is an engaging and fulfilling endeavor. It allows you to tap into your creativity, transforming raw materials into a beautiful and functional piece of art. The satisfaction of completing a project from start to finish is unparalleled, leaving you with a sense of accomplishment and pride in your handiwork.
Benefits of Woodworking as a Hobby, Rocking horse woodworking plans
Woodworking offers a plethora of benefits, both physical and mental. It encourages patience, precision, and attention to detail, honing your hand-eye coordination and problem-solving skills. The process itself is therapeutic, allowing you to escape the stresses of daily life and immerse yourself in a creative outlet.
Choosing the Right Wood: Rocking Horse Woodworking Plans
Selecting the right wood for your rocking horse is crucial, as it will influence the overall durability, appearance, and even the rocking motion. Different wood species offer unique characteristics that make them suitable for specific purposes.
Wood Species for Rocking Horses
When choosing wood for a rocking horse, consider factors like hardness, grain, workability, and aesthetic appeal. Here are some popular wood species:
- Hardwoods: Hardwoods are known for their strength and durability, making them ideal for rocking horse construction. They can withstand the rigors of repeated rocking and are less likely to warp or crack over time.
- Maple: Maple is a hard, strong, and durable wood with a beautiful grain pattern. It is relatively easy to work with and takes a fine finish. Maple is a popular choice for rocking horses because of its strength and aesthetic appeal.
- Oak: Oak is another strong and durable hardwood known for its distinctive grain pattern and rich color. It is a bit harder to work with than maple, but it is very stable and will hold up well over time. Oak is a good choice for rocking horses that will receive heavy use.
- Cherry: Cherry is a beautiful hardwood with a rich reddish-brown color that deepens with age. It is a relatively hard wood and takes a beautiful finish. Cherry is a good choice for rocking horses that are intended to be a decorative piece.
- Walnut: Walnut is a strong and durable hardwood with a beautiful grain pattern and a rich brown color. It is a bit more expensive than other hardwoods, but it is well worth the price for its beauty and durability. Walnut is a good choice for rocking horses that are intended to be a heirloom piece.
- Softwoods: Softwoods are generally lighter and easier to work with than hardwoods. While they may not be as strong or durable, they are often more affordable.
- Pine: Pine is a softwood that is readily available and affordable. It is easy to work with and takes a variety of finishes. Pine is a good choice for rocking horses that are intended to be a beginner project or for those who are on a budget.
- Cedar: Cedar is a softwood that is known for its pleasant aroma and natural insect-repelling properties. It is also a relatively lightweight wood, which makes it easier to work with. Cedar is a good choice for rocking horses that will be used outdoors.
Factors to Consider When Choosing Wood
- Hardness: Hardness refers to the wood’s resistance to denting and scratching. Harder woods are more durable and will withstand the rigors of repeated rocking.
- Grain: Grain refers to the pattern of the wood’s fibers. Some woods have a straight grain, while others have a more intricate grain pattern. The grain pattern can affect the appearance of the finished rocking horse.
- Workability: Workability refers to how easily the wood can be cut, shaped, and sanded. Some woods are easier to work with than others.
- Aesthetics: The appearance of the wood is also an important factor to consider. Some woods have a more natural beauty, while others can be stained or painted to achieve a desired look.
- Durability: Durability refers to the wood’s ability to withstand wear and tear. Some woods are more durable than others and will last longer.
Essential Tools and Materials
Building a rocking horse requires a set of essential woodworking tools and materials. Having the right tools ensures accuracy, safety, and efficiency during the construction process. The materials chosen will determine the durability, aesthetics, and overall quality of your rocking horse.
Essential Woodworking Tools
The following tools are crucial for constructing a rocking horse.
- Table Saw: A table saw is a powerful tool used for making precise cuts in wood. It has a rotating blade that cuts through the wood as it passes over a table. The table saw is essential for cutting the main parts of the rocking horse, such as the body, legs, and rockers.
- Circular Saw: A circular saw is a portable saw that can be used for making cuts in wood. It is useful for making curved cuts and cuts that are difficult to make with a table saw. The circular saw is useful for cutting the curved parts of the rocking horse, such as the head and the tail.
- Router: A router is a tool that uses a spinning bit to create various shapes and designs in wood. It can be used for shaping the edges of the rocking horse, creating grooves for the rockers, and adding decorative details.
- Drill Press: A drill press is a tool used for drilling holes in wood. It is important for creating precise holes for attaching the rockers, the head, and the tail.
- Hand Plane: A hand plane is a tool used for smoothing and shaping wood. It is useful for smoothing the surfaces of the rocking horse and for creating a smooth finish.
- Sandpaper: Sandpaper is used to smooth and refine the surface of the wood. Different grit sandpaper is used for different stages of the sanding process, from rough sanding to fine sanding.
- Clamps: Clamps are used to hold pieces of wood together while they are being glued or assembled. They are essential for ensuring that the joints are strong and secure.
- Measuring Tape: A measuring tape is used to measure the wood before cutting and to ensure that the pieces are cut to the correct size.
- Pencil: A pencil is used to mark the wood before cutting and to draw the shapes of the rocking horse.
- Safety Glasses: Safety glasses are essential for protecting your eyes from flying debris when using power tools.
- Dust Mask: A dust mask is essential for protecting your lungs from wood dust when sanding or using power tools.
- Ear Protection: Ear protection is essential for protecting your hearing from the loud noise of power tools.
Essential Materials
The materials required for building a rocking horse are:
- Wood: The type of wood used for the rocking horse will determine its durability, aesthetics, and overall quality. Popular choices include:
- Hardwoods: Oak, maple, cherry, walnut, and mahogany are known for their strength, durability, and beautiful grain patterns. These woods are ideal for the main body of the rocking horse.
- Softwoods: Pine, cedar, and fir are lighter and easier to work with. They are suitable for the less-stressed parts of the rocking horse, such as the head and tail.
- Hardware: Hardware includes screws, nails, bolts, washers, and nuts. These are used to assemble the rocking horse and to attach the rockers, the head, and the tail.
- Finishes: Finishes are used to protect the wood and to enhance its appearance. Popular choices include:
- Paint: Paint provides a durable and colorful finish. It can be used to create a variety of designs and patterns.
- Stain: Stain penetrates the wood and enhances its natural grain pattern. It is available in a variety of colors and finishes.
- Polyurethane: Polyurethane is a clear finish that protects the wood from scratches, water damage, and UV rays.
Rocking Horse Design Considerations
The design of your rocking horse is more than just aesthetics; it significantly impacts its stability, safety, and overall appeal. Choosing the right design involves considering various factors, from the horse’s proportions and features to the rocking mechanism. Let’s explore the design elements that play a crucial role in creating a rocking horse that is both delightful and safe.
Horse Anatomy and Proportions
The proportions of your rocking horse are crucial for its stability and visual appeal. A well-proportioned rocking horse should have a balanced stance, with its head and tail positioned appropriately to avoid tipping. The horse’s legs should be sturdy and well-supported, ensuring a stable rocking motion.
- Head and Neck: The head and neck should be proportionally sized to the body, with a graceful curve. A head that is too heavy or too far forward can make the horse prone to tipping.
- Body: The body should be well-defined, with a distinct chest, back, and rump. The body’s shape influences the overall look and feel of the horse.
- Legs: The legs should be strong and well-supported, with a slight taper towards the hooves. Sturdy legs ensure stability during rocking motion.
- Tail: The tail should be proportionally sized and positioned to maintain balance. A tail that is too long or too heavy can also affect the horse’s stability.
Rocking Mechanism
The rocking mechanism is the heart of your rocking horse, dictating its smooth and safe rocking motion. It’s important to choose a design that ensures stability and prevents the horse from tipping over.
- Rocker Shape: The shape of the rockers significantly impacts the rocking motion. Rounded rockers provide a gentle, smooth rocking experience, while flatter rockers offer a more pronounced and faster rocking motion. Consider the intended age group and the desired rocking intensity when choosing the rocker shape.
- Rocker Placement: The placement of the rockers is crucial for stability. They should be positioned to provide a balanced rocking motion without tilting or tipping. Typically, the rockers are placed near the bottom of the horse’s legs, creating a wider base for stability.
- Rocker Material: The material used for the rockers should be strong and durable, capable of withstanding repeated rocking motions. Common choices include hardwood, plywood, or metal.
Additional Design Features
Beyond the core anatomy and rocking mechanism, several other design features can enhance the rocking horse’s appeal and functionality.
- Saddle: A saddle adds a touch of realism and provides a comfortable seat for the rider. Consider using a saddle that is appropriately sized for the horse and the intended rider.
- Bridle and Reins: A bridle and reins add to the horse’s realism and allow for a bit of interactive play. Ensure that the bridle and reins are securely attached and made of safe materials.
- Mane and Tail: A mane and tail made from yarn, fabric, or real horsehair can add a touch of whimsy and detail to the rocking horse.
- Painting and Decoration: Painting and decorating your rocking horse allows for creative expression and personalization. Choose colors and patterns that are appropriate for the intended age group and the overall style of the horse.
Choosing the Right Design
When choosing a rocking horse design, consider the intended age group, the desired level of complexity, and the available tools and materials.
- Simplicity vs. Complexity: A simple rocking horse design might be ideal for beginners or those with limited woodworking experience. More complex designs offer greater creative freedom but require more time and skill.
- Age Group: The intended age group influences the design choices. A rocking horse for a toddler will have different design considerations than one for an older child. For toddlers, focus on simple designs with rounded edges and a stable rocking motion. For older children, more intricate designs with additional features like saddles and reins can be considered.
- Personal Style: Ultimately, the best rocking horse design is one that reflects your personal style and preferences. Consider the overall theme and aesthetic you want to achieve for your project.
Detailed Construction Steps
Now that you have all the necessary materials and tools, let’s dive into the actual construction process of your rocking horse. The steps are broken down into manageable sections, ensuring a smooth and enjoyable build. Remember to take your time, follow the instructions carefully, and prioritize safety throughout the process.
Cutting and Shaping the Wooden Pieces
This initial step involves cutting the wood to the required dimensions for each part of the rocking horse. Precision is key here to ensure a well-balanced and aesthetically pleasing final product.
- Use a measuring tape to accurately mark the wood according to your chosen rocking horse plan.
- Employ a saw, preferably a circular saw or a jigsaw, to cut the wood along the marked lines. Ensure you have a stable and secure work surface.
- Sand the cut edges of the wood using sandpaper to smooth out any rough edges and prepare the surfaces for further processing.
Always wear safety goggles and ear protection when operating power tools.
| Step | Materials | Tools |
|---|---|---|
| Cutting the wood | Wood, measuring tape | Circular saw, jigsaw, safety goggles, ear protection |
| Sanding the cut edges | Sandpaper | Sanding block, dust mask |
Assembling the Horse’s Body
Once you have all the wooden pieces cut and shaped, you can begin assembling the horse’s body. This involves joining the various components to form the recognizable shape of a horse.
- Start by attaching the horse’s legs to the body using wood glue and screws. Ensure the legs are positioned symmetrically and at the correct angle.
- Next, attach the head to the neck using wood glue and screws. Make sure the head is aligned correctly and at the desired angle.
- Add the tail to the horse’s rear using wood glue and screws.
- Use clamps to secure the joints while the glue dries, ensuring a strong and stable connection.
Remember to use wood glue that is specifically designed for woodworking projects.
| Step | Materials | Tools |
|---|---|---|
| Attaching legs to body | Wood glue, screws | Screwdriver, clamps |
| Attaching head to neck | Wood glue, screws | Screwdriver, clamps |
| Attaching tail to rear | Wood glue, screws | Screwdriver, clamps |
Creating the Rocking Base
The rocking base is the foundation that allows the horse to rock back and forth. It’s crucial to construct this part with precision and strength.
- Cut two pieces of wood for the rocking base, ensuring they are identical in size and shape.
- Use a router or a chisel to create a smooth curve on the underside of each base piece. This curve will determine the rocking motion of the horse.
- Attach the rocking base pieces to the horse’s body using wood glue and screws. Ensure the bases are positioned symmetrically and at the correct angle for a balanced rocking motion.
Use a template or a jig to create a consistent curve on both base pieces.
| Step | Materials | Tools |
|---|---|---|
| Cutting rocking base pieces | Wood | Circular saw, jigsaw, measuring tape |
| Creating the curve | Router, chisel, template or jig | Safety goggles, dust mask |
| Attaching rocking bases to body | Wood glue, screws | Screwdriver, clamps |
Adding Finishing Touches
Once the basic structure is complete, you can add the finishing touches that will transform your rocking horse from a wooden frame to a delightful toy.
- Sand the entire surface of the rocking horse using sandpaper, smoothing out any rough edges and preparing it for painting.
- Apply a coat of primer to the rocking horse, ensuring even coverage. This will create a smooth surface for the paint to adhere to.
- Paint the rocking horse in your desired color, using high-quality paint suitable for wooden toys.
- Add details like eyes, a nose, and a mouth using paint or craft supplies. You can also add a mane and tail using yarn or fabric.
- Apply a clear coat of sealant to protect the paint and enhance its durability.
Use non-toxic paint and sealant that are safe for children.
| Step | Materials | Tools |
|---|---|---|
| Sanding the surface | Sandpaper | Sanding block, dust mask |
| Applying primer | Primer | Paintbrush |
| Painting the horse | Paint | Paintbrush |
| Adding details | Paint, craft supplies, yarn, fabric | Paintbrush, scissors |
| Applying sealant | Sealant | Paintbrush |
Finishing Touches
The final stage of your rocking horse project is applying a finish that enhances its beauty and protects the wood. This involves choosing the right finish, applying it correctly, and letting it cure properly.
Staining
Staining is a great way to add color and depth to the wood. It’s a versatile option that can be used to create a natural look or a more dramatic effect.
- Water-based stains are easy to apply and clean up, but they can raise the grain of the wood, requiring sanding before applying a topcoat.
- Oil-based stains penetrate the wood deeply, creating a richer color and a more durable finish. However, they can be more difficult to apply and clean up.
- Gel stains offer the best of both worlds, combining the ease of application of water-based stains with the deep penetration of oil-based stains.
Painting
Painting is a popular option for rocking horses, allowing you to create a wide range of colors and designs.
- Acrylic paints are water-based, making them easy to clean up and quick to dry. They also offer excellent adhesion and durability.
- Oil-based paints provide a durable and long-lasting finish, but they can be more difficult to apply and clean up.
Varnishing
Varnishing provides a protective layer over the wood, enhancing its natural beauty and protecting it from scratches, spills, and moisture.
- Polyurethane varnishes are durable and water-resistant, making them a popular choice for rocking horses. They are available in both gloss and satin finishes.
- Lacquer varnishes are known for their durability and gloss, but they can be more difficult to apply and require special ventilation.
- Oil-based varnishes provide a warm, natural finish and are easy to apply. However, they can take longer to dry.
Tips for Achieving a Professional Finish
- Prepare the surface properly. Sand the wood smooth, removing any dust or debris. Fill any holes or imperfections with wood filler.
- Apply thin, even coats. Too much finish can cause drips and runs. Let each coat dry completely before applying the next.
- Use a quality brush or sprayer. A good brush or sprayer will help you apply the finish evenly and prevent streaks or bubbles.
- Protect the finished surface. Avoid placing the rocking horse in direct sunlight or near heat sources. Clean it regularly with a damp cloth.
Safety Considerations for Applying Finishes
- Work in a well-ventilated area. Many finishes contain volatile organic compounds (VOCs) that can be harmful if inhaled.
- Wear gloves and a respirator. Protect your skin and lungs from exposure to the finish.
- Store finishes properly. Keep them in a cool, dry place away from children and pets.
Safety and Stability
A rocking horse is a beloved toy, but safety and stability are paramount for ensuring a joyful and secure experience. Designing and building a rocking horse with these factors in mind is crucial for creating a sturdy and safe ride.
Safety Features
Incorporating safety features into the rocking horse design is crucial to prevent potential hazards. These features contribute to a safe and enjoyable riding experience.
- Rounded Edges and Corners: All edges and corners should be rounded to prevent sharp points that could cause injury. This includes the base, seat, and any decorative elements.
- Secure Fasteners: All fasteners, including screws, bolts, and nails, should be secured tightly to prevent loosening and potential hazards. Use appropriate fasteners for the wood type and weight capacity.
- Strong Rocking Mechanism: The rocking mechanism should be robust and securely attached to the base. Use high-quality wood and strong fasteners for the rockers to ensure stability and durability.
- Stable Base: The base of the rocking horse should be wide and stable, providing a solid foundation for the rocking motion. This helps prevent tipping and ensures a safe riding experience.
Weight Distribution and Balance
Proper weight distribution and balance are crucial for a stable and safe rocking horse. This ensures the horse rocks smoothly and prevents tipping.
- Center of Gravity: The center of gravity should be low and centered, ensuring stability during rocking. This can be achieved by positioning the heavier parts, such as the head and body, closer to the base.
- Rocker Placement: The rockers should be positioned symmetrically and at an appropriate distance from the center of gravity. This ensures a smooth and balanced rocking motion.
- Weight Capacity: Consider the weight capacity of the rocking horse, especially if it is intended for children. The horse should be strong enough to support the weight of the child without compromising stability.
Testing Stability
Before allowing a child to ride the rocking horse, it is essential to thoroughly test its stability. This ensures that the horse is safe and will not tip over during use.
- Rocking Test: Gently rock the horse back and forth, observing its movement and stability. The horse should rock smoothly and predictably without any signs of wobbling or tipping.
- Weight Test: If possible, place a weight similar to the child’s weight on the seat to simulate actual use. Observe the horse’s stability and rocking motion under this load.
- Visual Inspection: Carefully inspect the horse for any signs of weakness or instability. Check for loose fasteners, cracks in the wood, or any other issues that could compromise safety.
Inspiring Rocking Horse Designs

Beyond the traditional rocking horse design, a world of unique and creative designs awaits. These designs push the boundaries of imagination, showcasing the versatility of woodworking and the beauty of handcrafted creations.
Design Principles for Unique Rocking Horses
The key to creating an inspiring rocking horse design lies in understanding the design principles that shape its appeal. These principles include:
- Proportion and Balance: The rocking horse should have a harmonious balance between its parts, ensuring a visually pleasing and stable form. This involves considering the size and shape of the head, body, legs, and rockers.
- Character and Personality: The rocking horse’s design should evoke a distinct personality, whether it’s playful, majestic, or whimsical. This can be achieved through the use of unique features, expressive details, and even the choice of wood.
- Functionality and Safety: The rocking horse must be safe and functional, ensuring smooth and stable rocking motion. This requires careful attention to the design of the rockers, the strength of the construction, and the use of appropriate materials.
Examples of Unique Rocking Horse Designs
Here are some examples of unique and creative rocking horse designs that illustrate these design principles:
- The Steampunk Rocking Horse: This design incorporates elements of steampunk aesthetics, such as gears, cogs, and brass accents. The horse’s body might be crafted from reclaimed wood, with intricate details added using metalwork and leather. The rockers could be fashioned from repurposed gears, creating a unique and whimsical rocking experience.
- The Art Deco Rocking Horse: This design draws inspiration from the Art Deco movement, characterized by geometric patterns, bold colors, and luxurious materials. The horse’s body could be crafted from polished wood with inlaid geometric patterns. The rockers could be designed in a streamlined, angular style, complementing the Art Deco aesthetic.
- The Fantasy Rocking Horse: This design embraces the world of fantasy, incorporating mythical creatures and fantastical elements. The horse might have wings, horns, or other fantastical features, crafted from wood, fabric, or even resin. The rockers could be designed to resemble a dragon’s tail or a magical cloud, enhancing the whimsical nature of the design.
Materials and Techniques for Unique Designs
The materials and techniques used in crafting unique rocking horse designs play a crucial role in achieving the desired aesthetic and functionality:
- Wood Selection: The choice of wood can significantly impact the look and feel of the rocking horse. Hardwoods like oak, maple, and cherry offer durability and a rich grain pattern. Softwoods like pine and cedar can be easier to work with, providing a lighter and more rustic look.
- Woodworking Techniques: Techniques like carving, turning, and inlay can be used to create intricate details and unique features. Carving can add expressive details to the horse’s head, body, and legs. Turning can be used to create smooth and elegant curves for the rockers and legs. Inlay can be used to add decorative accents using different wood species or materials like mother-of-pearl.
- Finishing Touches: Finishing touches like paint, stain, and varnish can enhance the rocking horse’s appearance and protect the wood. A natural wood finish can highlight the wood’s grain, while paint can be used to create vibrant colors and patterns. Varnish can provide a protective layer and enhance the wood’s shine.
Final Review

Building a rocking horse is a project that combines practicality with creativity. With careful planning, the right tools, and a touch of imagination, you can create a unique and cherished heirloom that will be treasured for years to come. So, gather your materials, unleash your inner craftsman, and embark on this fulfilling woodworking adventure!
Detailed FAQs
What are the best woods for a rocking horse?
Hardwoods like maple, oak, and cherry are excellent choices for rocking horse construction due to their strength and durability. They also offer beautiful grain patterns and can be finished to a high shine.
How do I ensure the rocking horse is safe for children?
Safety is paramount. Use smooth, rounded edges and avoid sharp corners. Ensure the rocking motion is controlled and the horse is stable. Test the horse’s stability before use.
What are some unique design ideas for a rocking horse?
Consider incorporating details like carved details, custom paint jobs, or even adding a saddle and reins. The possibilities are endless!
Rocking horse woodworking plans can be a fun project for both beginners and experienced woodworkers. If you’re looking for a good starting point, you can find a ton of printable woodworking plans online. These plans often come with detailed instructions and diagrams, making it easy to follow along.
Once you’ve got the basics down, you can start experimenting with different designs and finishes for your rocking horse.
