Shelf woodworking plans are your gateway to creating custom storage solutions that perfectly fit your space and style. Imagine shelves that showcase your favorite books, display treasured mementos, or organize your tools – all built by your own hands. You’ll discover the joy of crafting practical and beautiful pieces that enhance your home and reflect your personal touch.
This guide will walk you through the process of designing, building, and finishing your own shelves. From choosing the right wood to mastering basic woodworking techniques, we’ll equip you with the knowledge and confidence to tackle any shelf project. So, grab your tools, gather your materials, and let’s embark on this rewarding journey of woodworking.
Introduction to Shelf Woodworking Plans

Building your own shelves offers numerous advantages. It allows you to create custom storage solutions perfectly tailored to your space and needs. You can choose the size, shape, style, and materials to match your existing décor and preferences. Plus, woodworking projects can be a rewarding and enjoyable hobby.
Types of Shelves
There are various types of shelves you can build, each with its own unique design and purpose.
- Floating Shelves: These shelves are mounted directly to the wall, giving a minimalist and contemporary look. They are ideal for displaying decorative items, books, or small plants.
- Bookcases: These shelves are designed specifically for storing books, often featuring multiple tiers and closed compartments. They can be built in various sizes and styles to fit any room.
- Wall Shelves: These shelves are attached to the wall using brackets or supports. They offer a versatile option for displaying items, storing books, or creating a decorative focal point.
Essential Tools and Materials
Before embarking on your shelf woodworking project, it’s important to gather the necessary tools and materials.
- Tools: A basic set of woodworking tools is essential, including a saw, drill, screwdriver, measuring tape, level, and sandpaper. For more complex projects, you may need additional tools like a router, planer, or miter saw.
- Materials: The type of wood you choose will depend on the style and purpose of your shelves. Common options include plywood, pine, oak, and maple. You will also need fasteners like screws, nails, and glue, as well as finishing materials like paint, stain, or varnish.
Choosing the Right Wood for Shelves
Choosing the right wood for your shelves is crucial for both aesthetics and functionality. It’s essential to consider factors like durability, cost, and the overall style you’re aiming for.
Wood Types and Their Characteristics
The type of wood you choose will significantly impact the appearance, strength, and longevity of your shelves. Here’s a breakdown of some popular wood types and their pros and cons:
- Pine: Pine is a softwood that’s relatively inexpensive and easy to work with. It’s often used for rustic or farmhouse-style shelves.
- Pros: Affordable, lightweight, easy to cut and shape, readily available.
- Cons: Soft and prone to scratches and dents, not as durable as hardwoods, can be susceptible to moisture damage.
- Oak: Oak is a hardwood known for its strength, durability, and beautiful grain patterns. It’s a popular choice for traditional and contemporary shelves.
- Pros: Strong and durable, resistant to scratches and dents, beautiful grain patterns, adds a touch of elegance.
- Cons: More expensive than pine, can be heavy, requires more care and maintenance.
- Maple: Maple is another hardwood known for its strength and beautiful grain patterns. It’s often used for modern and minimalist shelves.
- Pros: Strong and durable, beautiful grain patterns, often has a warm, inviting color.
- Cons: More expensive than pine, can be heavy, requires more care and maintenance.
- Cherry: Cherry is a hardwood with a rich reddish-brown color and beautiful grain patterns. It’s often used for traditional and elegant shelves.
- Pros: Strong and durable, beautiful grain patterns, rich color, adds a touch of elegance.
- Cons: More expensive than pine, can be heavy, requires more care and maintenance.
- Walnut: Walnut is a hardwood with a rich dark brown color and beautiful grain patterns. It’s often used for contemporary and modern shelves.
- Pros: Strong and durable, beautiful grain patterns, rich color, adds a touch of elegance.
- Cons: More expensive than pine, can be heavy, requires more care and maintenance.
- Birch: Birch is a hardwood that’s known for its strength and durability. It’s often used for contemporary and modern shelves.
- Pros: Strong and durable, relatively affordable, beautiful grain patterns.
- Cons: Can be prone to scratches and dents, not as resistant to moisture as other hardwoods.
Choosing the Right Wood for Different Shelf Styles
- Rustic Shelves: Pine, cedar, or reclaimed wood are great choices for rustic shelves. These woods have a natural, weathered look that complements the rustic aesthetic.
- Modern Shelves: Maple, walnut, or birch are good choices for modern shelves. These woods have a clean, contemporary look that complements the modern aesthetic.
- Minimalist Shelves: Maple, birch, or even plywood can be used for minimalist shelves. These woods have a simple, clean look that complements the minimalist aesthetic.
Basic Shelf Woodworking Techniques

Building shelves involves a series of essential woodworking techniques that ensure both functionality and aesthetics. Mastering these techniques will empower you to create sturdy, attractive shelves that meet your specific needs.
Cutting Wood for Shelves
Cutting wood accurately is crucial for creating well-fitting shelves. The most common tools for cutting wood are saws, with different types suited for specific tasks.
- Hand Saws: Hand saws are versatile and suitable for making rough cuts and shaping wood. They are particularly useful for cutting smaller pieces or when working in tight spaces.
- Circular Saws: Circular saws offer greater power and precision for straight cuts. They are ideal for cutting larger pieces of wood, such as shelf boards.
- Table Saws: Table saws provide the most accuracy and control for cutting wood. They are essential for making precise cuts and creating consistent dimensions.
- Jigsaw: Jigsaws are excellent for making curved cuts and intricate shapes in wood. They are also useful for cutting out complex patterns.
When using any saw, safety should be a top priority. Always wear eye protection and use a push stick to guide the wood safely through the saw blade. Additionally, ensure the saw blade is sharp and properly secured to prevent kickback.
Shaping Wood for Shelves
Shaping wood for shelves allows for a personalized look and can add decorative elements. Common tools for shaping wood include:
- Sandpaper: Sandpaper is used to smooth wood surfaces and remove imperfections. Different grit levels are available, ranging from coarse for initial shaping to fine for finishing.
- Planer: A planer is a power tool that removes a thin layer of wood from a surface, creating a smooth and even finish.
- Router: A router is a versatile tool used for creating various shapes and profiles in wood. It can be used to create edges, moldings, and decorative details.
When using a router, it’s crucial to use a router table for greater accuracy and safety. Ensure the router bit is sharp and securely fastened to prevent accidents.
Shelf woodworking plans are great for adding storage and style to any room. But if you’re looking to build something a bit more ambitious, you might want to check out some furniture woodworking plans. These plans can help you create everything from coffee tables to dressers, and they often include detailed instructions and diagrams.
Once you’ve mastered building furniture, you can easily apply those skills to more complex shelf designs.
Joining Wood for Shelves, Shelf woodworking plans
Joining wood pieces securely is essential for creating strong and durable shelves. Different methods are available, each offering unique advantages:
- Butt Joint: This is the simplest joint, where two pieces of wood are butted together and secured with glue and screws. It’s suitable for simple shelves, but not as strong as other joints.
- Dado Joint: A dado joint involves cutting a groove in one piece of wood to receive the other piece. It creates a strong and flush connection.
- Mortise and Tenon Joint: This traditional joint involves cutting a mortise (rectangular hole) in one piece and a tenon (rectangular projection) on the other. It’s a very strong and durable joint, but requires more precision.
- Pocket Hole Joint: This modern technique involves drilling angled holes in one piece of wood and using special screws to connect to the other piece. It’s quick and easy, but requires specialized tools.
- Dovetail Joint: This intricate joint involves interlocking tapered pieces of wood, creating a very strong and decorative connection.
Choosing the appropriate joint depends on the shelf’s intended use, the desired strength, and the level of woodworking expertise. It’s essential to practice and refine your skills in each technique to achieve professional-quality results.
Designing and Planning Your Shelf Project
Before you grab your tools and start cutting wood, it’s crucial to have a clear vision for your shelf project. This involves carefully considering your space, needs, and aesthetic preferences to create a design that’s both functional and pleasing to the eye. A well-planned shelf project ensures a successful outcome and avoids costly mistakes or rework.
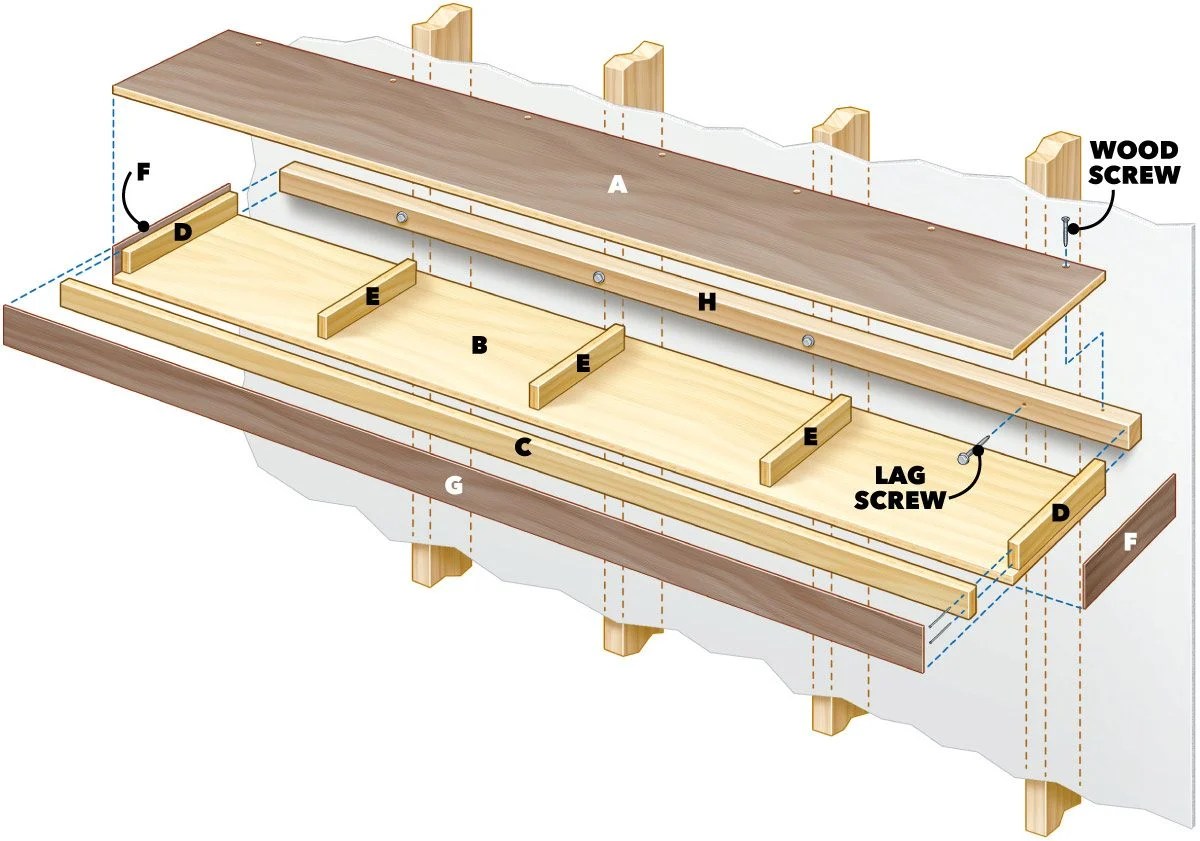
Creating a Detailed Shelf Plan
A detailed shelf plan is your roadmap to success. It Artikels every aspect of your project, from the overall dimensions to the specific materials needed. Here’s how to create a comprehensive plan:
- Measure your space: Accurately measure the area where you’ll install your shelves. Consider the available wall space, the height you want your shelves, and the depth you need for your items.
- Determine shelf dimensions: Based on your space measurements, decide on the width, depth, and number of shelves you need. Consider the size of the items you’ll be storing. For example, if you’re building a bookshelf, you’ll need shelves deep enough to accommodate books.
- Choose your materials: Select the type of wood that best suits your project. Consider factors like strength, durability, and appearance. For example, hardwoods like oak or maple are strong and durable, while softer woods like pine are easier to work with but may not be as sturdy.
- Create a materials list: Once you’ve chosen your wood, create a detailed list of all the materials you’ll need, including fasteners, wood glue, finish, and any decorative elements.
- Draw a detailed diagram: Sketch a detailed diagram of your shelves, including the dimensions, the number of shelves, and the placement of any supports or brackets. This diagram will be your visual guide throughout the project.
- Create a step-by-step plan: Artikel each step of the project in detail, from cutting the wood to assembling the shelves and finishing them. This will ensure a smooth and organized workflow.
Designing Functional and Aesthetically Pleasing Shelves
Beyond practicality, your shelves should also enhance the aesthetics of your space. Here are some tips to create shelves that are both functional and visually appealing:
- Consider the style of your room: Match the style of your shelves to the overall décor of your room. For example, if you have a modern space, you might opt for sleek, minimalist shelves. In a traditional setting, you might choose shelves with decorative details or a more rustic finish.
- Play with different shapes and sizes: Don’t be afraid to experiment with different shelf sizes and shapes. You can create a dynamic and interesting design by incorporating shelves of varying widths and depths.
- Add decorative elements: Enhance the visual appeal of your shelves with decorative elements like moldings, trim, or decorative brackets. These details can add a touch of elegance and personality to your project.
- Choose a suitable finish: Select a finish that complements the style of your shelves and the overall décor of your room. Consider options like paint, stain, or varnish.
- Incorporate lighting: Lighting can dramatically enhance the appearance of your shelves and highlight your belongings. Consider adding recessed lighting or installing LED strips underneath the shelves.
Popular Shelf Woodworking Plans
Now that you have a good understanding of the basics of shelf woodworking, let’s dive into some popular shelf woodworking plans. These plans cover a range of styles and difficulty levels, so you can find something that fits your skill level and project goals.
Popular Shelf Woodworking Plans
Here are some popular shelf woodworking plans, categorized by type, along with their difficulty level and estimated time to complete:
| Plan Name | Type | Difficulty | Time | Link to Plan |
|---|---|---|---|---|
| Floating Shelves | Floating Shelves | Beginner | 2-4 hours | [Link to Plan] |
| Simple Bookcase | Bookcase | Intermediate | 8-12 hours | [Link to Plan] |
| Wall-Mounted Shelves | Wall Shelves | Beginner | 4-6 hours | [Link to Plan] |
| Corner Shelves | Wall Shelves | Intermediate | 6-8 hours | [Link to Plan] |
| L-Shaped Shelves | Wall Shelves | Intermediate | 8-10 hours | [Link to Plan] |
Finishing Touches for Your Shelves
The final step in your shelf woodworking project is applying a finish. This step not only enhances the appearance of your shelves but also protects the wood from wear and tear. The right finish can bring out the natural beauty of the wood, create a specific look, and add durability.
Choosing the Right Finish
The type of finish you choose depends on several factors, including the wood type, the desired look, and the intended use of the shelves.
- Wood Type: Some woods, like oak or cherry, have a beautiful grain pattern that can be enhanced with a clear finish like varnish or polyurethane. Others, like pine or maple, may benefit from a stain to add color and depth.
- Desired Look: Do you want a natural wood look, a painted finish, or a distressed look? The finish you choose will determine the final appearance of your shelves.
- Intended Use: If your shelves will be used in a high-traffic area, a durable finish like polyurethane is recommended. For shelves that will be used for decorative purposes, a more delicate finish like wax or oil may be sufficient.
Popular Finishing Techniques
Here are some of the most common finishing techniques used for shelves:
- Staining: Staining adds color and depth to wood. It can be used to enhance the natural grain or to create a completely different color. Stain comes in a wide range of colors and finishes, from natural wood tones to vibrant hues.
- Painting: Painting is a great way to add color and personality to your shelves. You can use any color you like, and you can even create different effects, such as distressed or textured finishes.
- Varnishing: Varnish is a clear finish that protects wood from scratches, stains, and water damage. It also enhances the natural beauty of the wood by adding a glossy or satin finish.
- Polyurethane: Polyurethane is a durable, water-resistant finish that is often used for furniture and other items that receive heavy use. It is available in both oil-based and water-based formulas.
- Wax: Wax is a natural finish that provides a protective layer and a soft sheen. It is easy to apply and can be refreshed as needed.
- Oil: Oil finishes, such as tung oil or linseed oil, penetrate the wood and provide a natural, water-resistant finish. They can enhance the color and grain of the wood and provide a durable, protective layer.
Applying Finishes Evenly
Here are some tips for applying finishes evenly and achieving a professional look:
- Prepare the surface: Before applying any finish, make sure the surface is clean, dry, and free of dust and debris. Sand the wood with progressively finer grit sandpaper to create a smooth surface.
- Use a brush or sprayer: A brush is the most common tool for applying finishes. Choose a brush with soft bristles and a size that is appropriate for the size of your project. For large projects, a sprayer can be more efficient.
- Apply thin coats: Apply thin, even coats of finish. Too much finish will result in drips and runs. Allow each coat to dry completely before applying the next.
- Sand between coats: Sand lightly between coats with fine-grit sandpaper to smooth out any imperfections and prepare the surface for the next coat.
- Apply a final coat: After the last coat of finish has dried, you can apply a sealant or topcoat to provide additional protection.
Tips for a Professional Finish
- Work in a well-ventilated area: Many finishes release fumes that can be harmful if inhaled. Work in a well-ventilated area or wear a respirator.
- Use gloves: Wear gloves to protect your hands from the finish.
- Clean up spills immediately: If you spill any finish, clean it up immediately to prevent staining.
- Practice on scrap wood: Before applying finish to your project, practice on a scrap piece of wood to get a feel for the finish and the application technique.
Safety Precautions for Shelf Woodworking

Shelf woodworking is a rewarding hobby that allows you to create beautiful and functional pieces for your home. However, it’s essential to prioritize safety while working with wood and power tools. Following proper safety precautions can help prevent accidents and ensure a safe and enjoyable woodworking experience.
Eye Protection
Eye protection is crucial when working with wood and power tools. Wood dust, flying debris, and tool malfunctions can all pose risks to your eyes.
- Always wear safety glasses or goggles that meet ANSI Z87.1 standards, which ensure they provide adequate protection against impact and dust.
- Consider using a face shield for added protection, especially when working with power tools like saws or routers.
- Ensure your eye protection is clean and free of scratches or damage before use.
Hearing Protection
Power tools generate loud noise that can damage your hearing over time. Wearing hearing protection is essential to protect your ears from this noise.
- Use earplugs or earmuffs that meet ANSI S3.19 standards for noise reduction.
- Choose hearing protection that fits comfortably and provides adequate noise reduction for the specific tools you are using.
- Wear hearing protection even for short periods of time, as even brief exposure to loud noise can damage your hearing.
Hand Protection
Gloves can help protect your hands from splinters, cuts, and abrasions while working with wood.
- Wear work gloves that are made of durable material and provide a good grip.
- Choose gloves that are appropriate for the specific task you are performing. For example, you might need different gloves for sanding than for cutting wood.
- Inspect your gloves regularly for wear and tear and replace them as needed.
Tool Safety
Proper tool handling and maintenance are essential for safe woodworking.
- Always use tools that are in good working condition. Inspect tools for damage or wear before use and repair or replace them as needed.
- Follow the manufacturer’s instructions for using and maintaining each tool.
- Keep your tools sharp and clean. Dull tools are more likely to slip or bind, which can lead to accidents.
- Store tools properly when not in use to prevent damage and accidents.
Work Area Safety
A safe work area is essential for preventing accidents.
- Ensure your work area is well-lit and free of clutter.
- Use a work surface that is stable and secure. Avoid working on uneven or slippery surfaces.
- Keep your work area clean and free of debris. Wood dust and other debris can create slip hazards.
- Use safety equipment, such as a dust collector or respirator, to reduce exposure to dust and other airborne particles.
Material Handling
Properly handling wood and other materials can help prevent injuries.
- Use lifting techniques to avoid straining your back or other muscles when lifting heavy pieces of wood.
- Avoid dropping wood or other materials. Dropped objects can cause injury or damage to tools or equipment.
- Store wood and other materials properly to prevent them from becoming a safety hazard.
Emergency Preparedness
It’s important to be prepared for emergencies in your workshop.
- Have a first-aid kit readily available in case of minor injuries.
- Know how to use a fire extinguisher and have one available in your workshop.
- Have a plan for evacuating your workshop in case of an emergency.
Ending Remarks
With a little planning, the right tools, and a dash of creativity, you can transform ordinary wood into extraordinary shelves that elevate your home’s functionality and aesthetics. Whether you’re a seasoned woodworker or a curious beginner, these shelf woodworking plans offer a fulfilling and rewarding experience. So, embrace the satisfaction of building something beautiful and useful, and let your imagination guide you as you create shelves that truly reflect your style.
Clarifying Questions
What are the best woods for shelf construction?
Popular choices include pine (affordable and easy to work with), oak (durable and elegant), and maple (strong and beautiful). The best wood for your project depends on your desired look, budget, and the intended use of the shelves.
How do I determine the right shelf size and placement?
Consider the space you have available, the items you’ll be storing, and the overall aesthetic of the room. Measure carefully and sketch out your design before you start cutting wood.
What safety precautions should I take when woodworking?
Always wear eye protection, hearing protection, and gloves. Use sharp tools with care and follow proper handling procedures. Never work with wood or tools when you’re tired or distracted.
