Woodworking design plans are more than just blueprints; they’re your roadmap to crafting stunning and functional pieces. Whether you’re a seasoned woodworker or just starting out, these plans offer a wealth of benefits, from simplifying complex projects to ensuring accuracy and precision. Imagine transforming a simple sketch into a beautiful, handcrafted creation – that’s the power of woodworking design plans.
From free, downloadable options to comprehensive paid plans, there’s a world of resources available to suit your needs and skill level. This guide will explore the ins and outs of woodworking design plans, helping you find the right ones for your projects and unleash your inner craftsman.
The Appeal of Woodworking Design Plans
Woodworking design plans are a valuable tool for both beginners and experienced woodworkers. They offer a clear and concise guide to building projects, helping to ensure success and satisfaction.
Benefits of Woodworking Design Plans
Woodworking design plans offer numerous benefits that make them an essential resource for any woodworking enthusiast. These benefits include:
- Detailed Instructions: Woodworking plans provide step-by-step instructions that guide you through every stage of the project, from cutting and shaping to assembly and finishing. This ensures that you have all the necessary information to complete the project accurately.
- Accurate Measurements and Dimensions: Woodworking plans include precise measurements and dimensions for every component of the project. This eliminates the need for guesswork and ensures that all pieces fit together perfectly.
- Material Lists: Woodworking plans typically include a comprehensive list of materials needed for the project, including wood types, sizes, hardware, and finishes. This helps you plan your purchases efficiently and avoid unnecessary trips to the lumberyard.
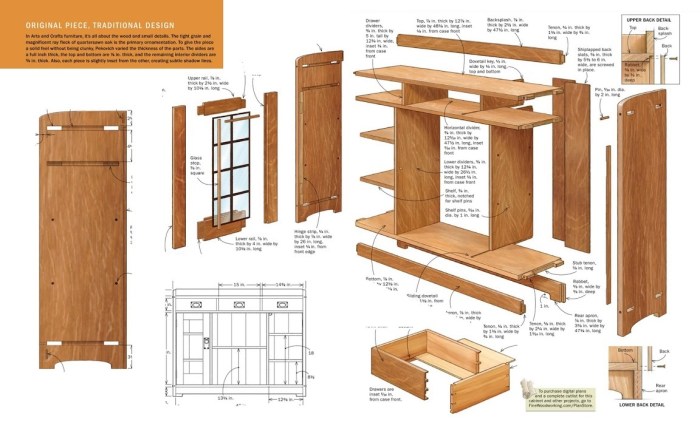
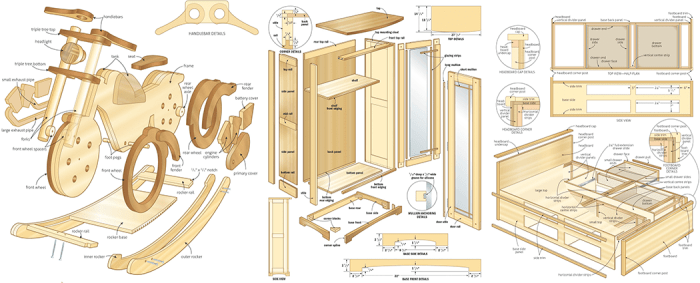
- Visual Representations: Woodworking plans often include diagrams, drawings, and photographs that illustrate the project’s design and construction process. These visuals help you understand the project’s overall layout and the relationship between different components.
- Simplified Complexity: Woodworking plans break down complex projects into manageable steps, making them easier to understand and execute. This is especially beneficial for beginners who may be intimidated by intricate designs.
- Enhanced Accuracy: Following woodworking plans helps ensure accuracy in cutting, shaping, and assembly, reducing the risk of mistakes and ensuring a professional-looking finished product.
- Increased Confidence: Using woodworking plans provides a sense of structure and guidance, which can boost confidence and encourage experimentation with more challenging projects.
Types of Woodworking Design Plans
Woodworking design plans are available in various formats and levels of detail, catering to different needs and preferences. Here are some common types:
- Free Plans: Numerous websites and online communities offer free woodworking design plans. These plans often cover basic projects and may not always include detailed instructions or comprehensive material lists.
- Paid Plans: Paid woodworking design plans are typically available from professional woodworking designers and publishers. These plans often offer more detailed instructions, comprehensive material lists, and high-quality visuals.
- Downloadable Plans: Downloadable woodworking design plans are available in digital formats, such as PDF or CAD files. These plans can be easily stored and printed for convenient access.
- Printable Plans: Printable woodworking design plans are available in physical formats that can be printed at home or purchased from woodworking supply stores. These plans are ideal for those who prefer a tangible copy to work from.
Finding the Right Woodworking Design Plans

Choosing the right woodworking design plans is crucial for a successful project. The plans should match your skills, budget, and desired outcome.
Factors to Consider When Choosing Woodworking Design Plans
When selecting woodworking design plans, several key factors should be considered. These factors ensure that the chosen plans are suitable for your skill level, budget, and project goals.
- Project Complexity: Assess your woodworking experience and choose plans that align with your skill level. Starting with simpler projects and gradually progressing to more complex ones is a good approach.
- Skill Level: Woodworking design plans often specify the required skill level, ranging from beginner to advanced. Choosing plans that match your skill level ensures a manageable and enjoyable project.
- Materials: Consider the materials needed for the project, including wood types, hardware, and finishes. The availability and cost of these materials should be factored into your decision.
- Budget: Woodworking projects can range in cost. Determine your budget before choosing plans, taking into account the cost of materials, tools, and any potential professional assistance.
- Time Commitment: Estimate the time required to complete the project. Consider your available time and choose plans that fit your schedule.
Identifying Reputable Sources of Woodworking Design Plans
Reliable sources of woodworking design plans are essential for ensuring accurate instructions, detailed diagrams, and a successful project.
- Online Woodworking Communities: Many online forums and communities dedicated to woodworking offer free and paid plans. These communities often feature experienced woodworkers who can provide guidance and feedback.
- Woodworking Magazines: Popular woodworking magazines frequently publish plans for a wide range of projects, ranging from furniture to decorative items. These plans are often well-tested and include detailed instructions and diagrams.
- Bookstores and Libraries: Local bookstores and libraries offer a selection of woodworking books containing plans for various projects. These books can provide valuable information and inspiration for your woodworking endeavors.
Advantages and Disadvantages of Free vs. Paid Woodworking Plans
Woodworking design plans are available in both free and paid formats. Each option has its advantages and disadvantages.
Free Woodworking Plans
- Advantages: Free woodworking plans offer a cost-effective way to access project ideas and instructions. They can be a great starting point for beginners or those looking to explore different woodworking styles.
- Disadvantages: Free plans may lack the detail and accuracy of paid plans. They might also be less comprehensive, potentially leading to confusion or errors during construction.
Paid Woodworking Plans
- Advantages: Paid woodworking plans often provide detailed instructions, precise measurements, and high-quality diagrams. They are typically created by experienced woodworkers and may include helpful tips and techniques.
- Disadvantages: The cost of paid plans can be a factor, especially for larger or more complex projects. However, the investment can be worthwhile for ensuring accuracy and a successful outcome.
Understanding Woodworking Design Plan Components
Woodworking design plans are your blueprint for success. They guide you through every step of your project, from gathering materials to finishing the final product. To fully understand and utilize these plans, it’s crucial to grasp the components they include.
Materials List
The materials list is the foundation of your project. It Artikels every piece of wood, hardware, and finishing supplies you’ll need. This list is essential for accurate budgeting, ensuring you have all the necessary components before you begin.
- Wood Species and Dimensions: The list specifies the type of wood (e.g., oak, pine, maple) and its exact dimensions (length, width, thickness) for each piece. This ensures you purchase the correct amount of wood and that your project fits together seamlessly.
- Hardware: The list includes fasteners like screws, nails, dowels, and glue. It may also include hinges, drawer slides, or other hardware specific to your project.
- Finishing Supplies: The list details the stains, paints, varnishes, or other finishes you’ll need to achieve the desired look and protection for your project.
Cutting Diagrams
Cutting diagrams are visual guides that illustrate the precise cuts you need to make on each piece of wood. They often include dimensions, angles, and specific details for each cut. These diagrams ensure accuracy and consistency in your woodworking.
- Dimensions and Angles: The diagrams clearly show the length, width, and any angles required for each cut. This eliminates guesswork and ensures that all pieces fit together correctly.
- Notations: Cutting diagrams often use symbols or abbreviations to indicate specific details, such as the type of cut (e.g., miter, bevel), the direction of the grain, or the location of any special features.
Assembly Instructions
Assembly instructions provide a step-by-step guide for putting all the pieces together. They often include illustrations or diagrams to clarify the process and ensure you assemble the project correctly.
- Sequence of Steps: The instructions clearly Artikel the order in which to assemble the project, ensuring you build it in the most logical and efficient way.
- Joints and Fasteners: The instructions specify the types of joints (e.g., mortise and tenon, dovetail, dado) to use and the appropriate fasteners for each step. This ensures the project is structurally sound and holds together securely.
- Safety Precautions: Some instructions may include safety warnings or tips for handling specific tools or materials. It’s crucial to pay close attention to these precautions for your own safety.
Finishing Techniques
Finishing techniques are the final steps that give your project its desired look and protection. The plans may include instructions on sanding, staining, painting, or applying a protective finish.
- Sanding: The instructions may specify the type of sandpaper to use, the grit levels, and the sanding sequence to achieve a smooth and even surface.
- Staining and Painting: The plans may detail the type of stain or paint to use, the application techniques, and the number of coats needed.
- Protective Finishes: The instructions may Artikel the use of varnishes, polyurethanes, or other protective finishes to seal and protect the wood from scratches, moisture, or other damage.
Interpreting Woodworking Design Plan Diagrams
Woodworking design plans often use various types of diagrams to illustrate the project. Understanding these diagrams is essential for successful execution.
- Orthographic Projections: These diagrams show the project from multiple views (front, side, top) to provide a complete understanding of its shape and dimensions.
- Exploded Views: Exploded views show the individual components of the project assembled but slightly separated to reveal the construction details.
- Cross-Sections: Cross-sections illustrate a specific cut through the project, revealing the internal structure and details of joints or other features.
Notations and Symbols
Woodworking design plans often use various notations and symbols to convey information concisely.
- Dimensions: Dimensions are usually indicated with numbers and units of measurement (e.g., 12″ for 12 inches, 30mm for 30 millimeters).
- Angles: Angles are typically marked with degrees (e.g., 45° for a 45-degree angle).
- Lines and Arrows: Different types of lines and arrows may be used to indicate specific details, such as cutting lines, centerlines, or directions of movement.
- Symbols: Symbols may be used to represent specific features, such as screws, nails, or joints.
“Understanding the components of woodworking design plans is essential for success. By carefully studying the materials list, cutting diagrams, assembly instructions, and finishing techniques, you can ensure that your project is accurate, structurally sound, and aesthetically pleasing.”
Implementing Woodworking Design Plans

Now that you’ve chosen the perfect woodworking design plan, it’s time to put it into action! Implementing your plans effectively involves careful preparation, understanding the steps, and paying attention to safety.
Preparing for the Project
Before you dive into cutting and assembling, take the time to prepare your workspace and gather all the necessary materials and tools. This will make the process smoother and less stressful.
- Clear your workspace: Ensure you have ample space to work comfortably and safely. Remove any obstacles and clutter to prevent accidents.
- Gather your materials: Double-check your design plan to ensure you have all the required wood, hardware, and finishing materials. Consider purchasing extra wood to account for any potential mistakes or imperfections.
- Prepare your tools: Make sure all your tools are sharp, clean, and in good working order. This includes saws, drills, sanders, clamps, and measuring tools.
- Safety first: Always wear appropriate safety gear, such as safety glasses, ear protection, and a dust mask. Also, be aware of the potential hazards associated with power tools and sharp objects.
Understanding the Design Plan, Woodworking design plans
A well-designed woodworking plan will guide you through each step of the project. Take the time to carefully study the plan before you begin.
- Read the instructions thoroughly: Familiarize yourself with the entire project, including the materials list, cutting diagrams, assembly instructions, and finishing steps. This will help you understand the overall process and identify any potential challenges.
- Visualize the project: Imagine the finished product and how each component fits together. This will help you visualize the steps and anticipate any potential problems.
- Don’t be afraid to ask questions: If you have any questions or need clarification on any aspect of the plan, don’t hesitate to seek guidance from experienced woodworkers or online resources.
Step-by-Step Implementation
With your workspace prepared and your design plan understood, you can now start building!
- Cut the wood: Carefully measure and cut the wood according to the dimensions provided in the design plan. Use a saw that is appropriate for the type of wood and the desired cut. Remember to always double-check your measurements and make precise cuts to ensure accurate assembly.
- Assemble the components: Follow the assembly instructions in the design plan carefully. Use clamps to secure the pieces together while you drive screws or nails. Ensure that all joints are aligned and secure before proceeding to the next step.
- Sand and finish: Once the project is assembled, sand the surface smooth using progressively finer grit sandpaper. This will remove any rough edges and prepare the wood for finishing. Apply a sealant, stain, or paint to protect the wood and enhance its appearance.
Adapting Woodworking Design Plans
While following a design plan is crucial, don’t be afraid to adapt it to suit your individual needs and preferences.
- Adjust the dimensions: If you need to change the size or scale of the project, adjust the dimensions accordingly. Remember to recalculate the cuts and ensure all components will fit together properly.
- Modify the design: Feel free to add your own personal touches to the project. For example, you could change the shape of a piece, add decorative elements, or choose different hardware.
- Experiment with materials: If you want to use different types of wood or other materials, consider the properties of each material and ensure they are compatible with the design plan.
Essential Tools for Woodworking
Having the right tools is essential for successful woodworking.
- Measuring tools: A tape measure, ruler, and combination square are essential for accurate measurements.
- Cutting tools: A handsaw, circular saw, jigsaw, and table saw are useful for cutting wood to size.
- Drilling tools: A drill and drill bits are needed for creating holes for screws, dowels, and other fasteners.
- Fasteners: Screws, nails, and dowels are used to join pieces of wood together.
- Clamps: Clamps are essential for holding pieces of wood together while you work.
- Sanding tools: Sandpaper, a sanding block, and a random orbital sander are used to smooth the surface of the wood.
- Finishing tools: Brushes, rollers, and sprayers are used to apply finishes, such as stains, paints, and sealants.
Safety Precautions
Safety is paramount when working with wood and power tools.
- Always wear safety glasses: Protect your eyes from flying debris.
- Use ear protection: Power tools can generate loud noise that can damage your hearing.
- Wear a dust mask: Wood dust can be harmful to your lungs.
- Keep your workspace clean: A cluttered workspace increases the risk of accidents.
- Be aware of the dangers of power tools: Always follow the manufacturer’s instructions and use caution when operating power tools.
- Never operate power tools when you are tired or under the influence of alcohol or drugs.
Inspiration and Resources for Woodworking Design Plans

Finding inspiration and accessing the right resources can significantly impact your woodworking journey. Whether you’re a seasoned craftsman or a beginner, having a well-stocked toolkit of resources can spark creativity, enhance your skills, and guide you through every project.
Exploring a Diverse Range of Resources
A plethora of resources are available to fuel your woodworking passion. Websites, books, magazines, and online communities offer a diverse range of woodworking design plans and inspiration. Let’s delve into some of the most popular and valuable resources.
| Resource Type | Examples | Description | Unique Features |
|---|---|---|---|
| Websites | Ana White, Woodworking for Mere Mortals, Popular Woodworking, Fine Woodworking | Websites provide a vast collection of woodworking plans, tutorials, articles, and community forums. They often offer free and paid plans, catering to various skill levels and project types. | Easy accessibility, diverse content, interactive forums, and regular updates. |
| Books | “The Complete Illustrated Guide to Woodworking,” “Woodworking for Dummies,” “The Woodworker’s Bible,” “The Complete Book of Woodworking Projects” | Books offer comprehensive guides to woodworking techniques, project plans, and detailed instructions. They provide in-depth explanations, visual aids, and expert tips. | Detailed explanations, comprehensive coverage of techniques, and timeless reference materials. |
| Magazines | “Woodworking Magazine,” “American Woodworker,” “Fine Woodworking,” “Popular Woodworking” | Magazines feature project plans, articles on woodworking techniques, product reviews, and inspiring woodworking projects. They often showcase the work of renowned woodworkers and provide practical advice. | High-quality photography, insightful articles, and current trends in woodworking. |
| Online Communities | Woodworking forums, Reddit communities (r/woodworking, r/DIY), Facebook groups | Online communities provide a platform for woodworkers to connect, share their projects, ask questions, and receive feedback. They offer a valuable resource for inspiration, problem-solving, and learning from others. | Interactive discussions, collaborative learning, and a sense of community. |
Inspirational Woodworking Projects
Seeing the results of other woodworkers’ projects can be a powerful source of inspiration. Here are a few examples of projects that demonstrate the diverse possibilities of woodworking design plans:
“The intricate details and craftsmanship of a hand-carved wooden chest showcase the artistry and skill of woodworking.”
“A beautifully crafted dining table, built from reclaimed wood, exemplifies the sustainability and creativity that woodworking can achieve.”
“A custom-made bookshelf, designed to perfectly fit a specific space, highlights the practical and functional aspects of woodworking.”
“A whimsical birdhouse, crafted with colorful wood and intricate details, demonstrates the playful and artistic side of woodworking.”
Closure: Woodworking Design Plans

With the right woodworking design plans, you can unlock a world of creative possibilities. Whether you’re building a simple bookshelf or a complex dining table, these plans provide the foundation for success. So, gather your tools, choose your plans, and let the journey of woodworking begin! The satisfaction of creating something beautiful and functional with your own hands is truly rewarding.
Top FAQs
What are the best resources for finding woodworking design plans?
There are many great resources available, including websites like Ana White, Woodworking for Mere Mortals, and popular online communities like Reddit’s r/woodworking.
How do I choose the right woodworking design plan for my skill level?
Look for plans that clearly state the difficulty level. Start with beginner projects and gradually work your way up as you gain experience.
What are some essential tools for woodworking projects?
Basic tools include a saw, drill, sander, measuring tape, and a set of chisels. The specific tools you need will depend on the project.
Woodworking design plans can help you create anything from furniture to home decor. If you’re looking for a fun and functional project, why not try building a mailbox? You can find some great mailbox woodworking plans online that will guide you through the process step-by-step.
Once you’ve mastered the mailbox, you can move on to more complex woodworking projects, like building a birdhouse or a small table.
