Woodworking plans guitar, a phrase that sparks a desire to create something beautiful and functional, offers a journey into the world of handcrafted instruments. The allure of building your own guitar from scratch is undeniable, a testament to the artistry and craftsmanship that has captivated music lovers for centuries.
From selecting the perfect wood to meticulously shaping the body and neck, each step in the process is a testament to the dedication and skill required to bring a guitar to life. This comprehensive guide delves into the world of woodworking guitar plans, offering a step-by-step journey that takes you from novice to accomplished guitar builder.
Introduction to Woodworking Guitar Plans
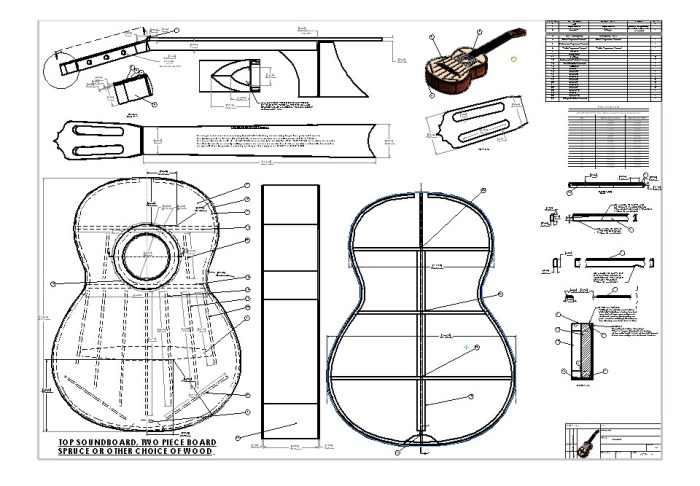
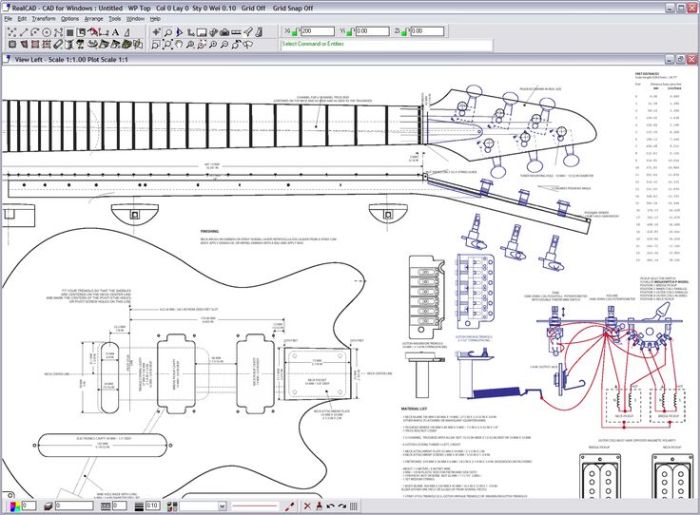
Woodworking guitar plans are detailed blueprints that guide you through the process of building your own guitar. They provide precise measurements, step-by-step instructions, and diagrams to help you create a unique and personalized instrument.
Using woodworking guitar plans offers numerous advantages. You can save money by building your own guitar instead of purchasing one. It allows you to customize the guitar to your preferences, choosing the type of wood, finish, and design elements. The process of building a guitar from scratch is a rewarding and fulfilling experience, offering a sense of accomplishment and a deeper appreciation for the craftsmanship involved.
The History of Guitar Making
The history of guitar making spans centuries, with the instrument evolving through various forms and styles. The earliest known ancestor of the modern guitar is the lute, a stringed instrument that originated in Persia around the 10th century. The lute was brought to Europe by Arab traders in the 12th century and gained popularity throughout the continent.
During the Renaissance period, the lute evolved into the guitar, with the addition of a neck and a soundboard. The first guitars were typically made of wood, with a simple construction and a limited number of strings. Over time, the guitar underwent significant improvements, with the introduction of new materials, design features, and playing techniques.
The 19th century saw the development of the modern guitar, with the invention of the steel-string guitar and the standardization of the six-string layout. The development of new manufacturing techniques, such as the use of mass production, made guitars more affordable and accessible to a wider audience.
Today, guitars continue to evolve, with advancements in technology and materials leading to new designs and innovations. From acoustic to electric guitars, the variety of guitar types available today caters to diverse musical styles and preferences.
Types of Woodworking Guitar Plans

There are many different types of guitars, each with its own unique construction and sound. Choosing the right guitar plan for your woodworking project depends on your skill level, the tools you have available, and the type of guitar you want to build.
Guitar Types and Their Construction
This section will classify and categorize different guitar types based on their construction. It will describe the unique characteristics of each guitar type and its suitability for woodworking.
| Guitar Type | Description | Skill Level | Typical Materials |
|---|---|---|---|
| Acoustic Guitar | An acoustic guitar produces sound through the vibration of its strings, amplified by the hollow body of the instrument. They are typically made of wood, with a soundboard that vibrates to produce sound. | Intermediate to Advanced | Spruce, cedar, mahogany, rosewood, maple |
| Electric Guitar | An electric guitar uses pickups to convert the vibration of its strings into electrical signals, which are then amplified through an amplifier. Electric guitars are often made of a variety of woods, including mahogany, alder, basswood, and maple. | Beginner to Intermediate | Mahogany, alder, basswood, maple |
| Classical Guitar | A classical guitar is a type of acoustic guitar with a wider neck and nylon strings. It is often used for classical music, flamenco, and other genres. | Intermediate to Advanced | Cedar, cypress, rosewood, maple |
| Ukulele | A ukulele is a small, four-stringed instrument with a high-pitched sound. It is often used for Hawaiian music, but it can also be used for other genres. | Beginner to Intermediate | Mahogany, koa, spruce |
| Mandolin | A mandolin is a stringed instrument with eight strings, usually tuned in pairs. It is known for its bright, ringing sound. | Intermediate to Advanced | Spruce, maple, walnut |
Choosing the Right Woodworking Guitar Plans
Selecting the perfect woodworking guitar plans is crucial for a successful project. It’s not just about finding a plan that looks good; it’s about finding one that aligns with your skills, goals, and available resources.
Factors to Consider When Choosing Woodworking Guitar Plans
Before diving into any plan, it’s essential to consider several key factors. These factors will help you narrow down your choices and ensure you pick a plan that’s right for you.
- Skill Level: Beginners should start with simpler plans that involve fewer intricate details and complex joinery. Intermediate and advanced woodworkers can tackle more challenging projects with intricate designs and complex construction techniques.
- Desired Guitar Type: Different guitar types have varying levels of complexity. Acoustic guitars, for example, are often more intricate than electric guitars. Consider the specific guitar type you want to build and choose a plan accordingly.
- Available Resources: Evaluate your access to tools, materials, and workspace. Ensure the plan you choose is compatible with your resources. If you lack certain tools, you may need to adjust the plan or find an alternative that aligns with your capabilities.
Importance of Skill Level
Your skill level is a significant factor when selecting woodworking guitar plans. Starting with a plan that’s too challenging can lead to frustration and potentially a disappointing outcome. It’s better to start with a simpler project and gradually progress to more complex ones as your skills improve.
Importance of Desired Guitar Type
Different guitar types have varying levels of complexity. Acoustic guitars, for example, often involve more intricate designs and complex construction techniques compared to electric guitars. Understanding the specific type of guitar you want to build is crucial in selecting the right plan.
Importance of Available Resources
The resources you have available will also influence your plan selection. If you lack access to certain tools or materials, you may need to adjust the plan or find an alternative. It’s essential to be realistic about your resources and choose a plan that aligns with your capabilities.
Essential Woodworking Tools and Materials
Building a guitar requires a range of tools and materials. Having the right tools and materials is crucial for success. Here’s a comprehensive guide to essential woodworking tools and materials, along with information on wood selection and preparation.
Essential Woodworking Tools
- Hand Tools: Hand tools provide precision and control in woodworking.
- Hand Plane: Used to smooth and shape wood surfaces.
- Chisels: Used for carving, shaping, and removing wood.
- Saw: A saw is essential for cutting wood to the desired dimensions. Different types of saws are available, including a handsaw, coping saw, and backsaw.
- Screwdriver: Used for assembling and securing parts.
- Hammer: A hammer is essential for driving nails and assembling parts.
- Clamps: Clamps are used to hold pieces of wood together while they are being glued or assembled.
- Measuring Tape: Essential for accurate measurements.
- Combination Square: Used to check for squareness and to mark angles.
- Pencil: Used for marking wood and transferring measurements.
- Power Tools: Power tools provide speed and efficiency in woodworking.
- Power Drill: Used for drilling holes and driving screws.
- Router: Used for shaping and cutting edges.
- Sander: Used for smoothing and finishing wood surfaces.
- Table Saw: Used for making precise cuts in wood.
- Band Saw: Used for making curved cuts in wood.
Selecting the Right Wood Species
Choosing the right wood species for different guitar parts is crucial for sound quality and durability.
- Top: The top of the guitar is responsible for producing sound.
- Spruce: A popular choice for guitar tops due to its bright, clear tone.
- Cedar: Offers a warmer, mellow tone.
- Redwood: Known for its rich, resonant tone.
- Back and Sides: The back and sides of the guitar provide structural support and contribute to the overall tone.
- Mahogany: A popular choice for back and sides due to its warm, balanced tone and good strength.
- Rosewood: Offers a rich, complex tone with excellent strength.
- Maple: Provides a bright, clear tone and excellent strength.
- Neck: The neck of the guitar is responsible for holding the strings and allowing the player to fret the notes.
- Mahogany: A common choice for necks due to its stability and good strength.
- Maple: Offers a bright, clear tone and excellent strength.
- Walnut: Known for its rich, warm tone and good stability.
- Fingerboard: The fingerboard is the surface on which the player presses down on the strings.
- Rosewood: A popular choice for fingerboards due to its smooth, durable surface and warm tone.
- Ebony: Offers a very hard and dense surface with a rich, dark tone.
- Maple: Can also be used for fingerboards, providing a bright, clear tone and good durability.
Wood Preparation, Drying, and Storage
Proper wood preparation, drying, and storage are essential for building a high-quality guitar.
- Drying: Wood needs to be dried to a specific moisture content before it can be used for guitar building.
- Kiln Drying: A controlled process that uses heat and humidity to remove moisture from wood.
- Air Drying: A slower process that involves storing wood in a well-ventilated area to allow moisture to evaporate naturally.
- Storage: Properly storing wood is crucial to prevent warping, cracking, and other problems.
- Temperature and Humidity Control: Wood should be stored in a cool, dry environment with stable temperature and humidity levels.
- Protection from Pests: Wood should be protected from insects and other pests.
Step-by-Step Guide to Woodworking Guitar Construction
Now that you have your woodworking plans, tools, and materials ready, it’s time to embark on the exciting journey of building your own guitar. This step-by-step guide will walk you through the process, providing detailed instructions and safety precautions to ensure a successful and enjoyable build.
Preparing the Wood
Before you begin assembling the guitar, it’s crucial to prepare the wood. This involves sanding, shaping, and finishing the wood to achieve the desired look and feel.
- Sanding: Use a variety of sandpaper grits to smooth out the wood and remove any imperfections. Start with a coarse grit and gradually progress to finer grits.
- Shaping: Depending on the guitar plans, you may need to shape the wood using tools like a band saw, jigsaw, or router. Always wear safety glasses and hearing protection when using power tools.
- Finishing: Apply a sealant or finish to protect the wood from moisture and enhance its appearance. You can choose from various finishes, such as oil, varnish, or lacquer.
Assembling the Guitar Body
The guitar body is the foundation of the instrument, and its construction requires careful attention to detail.
- Cutting and Joining: Cut the body pieces according to the plans and join them using glue and clamps. Use a good quality wood glue and ensure a tight fit between the pieces.
- Routing: Use a router to create the sound hole and any other necessary cavities in the body.
- Sanding and Finishing: Sand the body smooth and apply the desired finish.
Constructing the Neck
The neck is responsible for holding the fretboard and providing the player with a comfortable grip.
- Gluing the Neck: Glue the neck pieces together, ensuring a tight fit.
- Shaping the Neck: Shape the neck using a plane, sandpaper, and other tools.
- Installing the Truss Rod: Install the truss rod to adjust the neck’s curvature and prevent warping.
- Attaching the Fretboard: Glue the fretboard to the neck, ensuring proper alignment.
Installing the Fretboard
The fretboard is where the frets are installed, determining the guitar’s tuning and playing characteristics.
- Cutting and Installing Frets: Cut the frets to the correct length and install them using a hammer and fretting tool.
- Leveling and Dressing: Level the frets using a fret leveling tool and dress them to create a smooth playing surface.
Assembling the Guitar, Woodworking plans guitar
Now that the body, neck, and fretboard are ready, it’s time to assemble the guitar.
- Attaching the Neck to the Body: Attach the neck to the body using a neck joint.
- Installing the Bridge and Tailpiece: Install the bridge and tailpiece, which are responsible for transferring string tension to the body.
- Installing the Tuners: Install the tuners on the headstock, allowing the player to tune the strings.
Stringing and Tuning
The final step is to string the guitar and tune it to the desired pitch.
- Stringing: Install the strings according to the guitar’s design and specifications.
- Tuning: Tune the guitar using a tuner or other tuning method.
Finishing and Polishing a Woodworking Guitar
The final step in crafting your woodworking guitar is finishing and polishing. This process protects the wood, enhances its natural beauty, and gives your guitar a professional look. There are several techniques and materials available, each with its own advantages and disadvantages.
Choosing the Right Finishing Material
The choice of finishing material depends on the desired look, durability, and ease of application. Here’s a comparison of common finishing materials:
- Varnish: Varnish is a durable and protective finish that creates a hard, glossy surface. It’s available in various finishes, from satin to high gloss. Varnish is typically applied in multiple thin coats, allowing each coat to dry completely before applying the next.
- Lacquer: Lacquer is another durable finish that dries quickly and creates a hard, smooth surface. It’s often used on guitars due to its ability to produce a high-gloss finish. Lacquer is typically applied in thin coats, and it’s important to avoid dust and humidity during the drying process.
- Oil: Oil finishes, such as tung oil or linseed oil, penetrate the wood and enhance its natural grain. They create a more natural look than varnish or lacquer and are less likely to crack or chip. Oil finishes require multiple applications and can take longer to cure.
Applying Finishing Coats
The application process involves several steps, including sanding, cleaning, and applying the finishing material:
- Sanding: Before applying any finish, it’s important to sand the wood to a smooth surface. Start with coarse sandpaper and gradually progress to finer grits. This removes any imperfections and prepares the wood for the finish.
- Cleaning: Once the wood is sanded, it’s important to clean it thoroughly with a tack cloth to remove any dust or debris. This ensures a smooth and even finish.
- Applying the Finish: Apply the finish in thin, even coats, following the manufacturer’s instructions. Allow each coat to dry completely before applying the next.
- Polishing: After the final coat of finish has dried, you can polish the guitar to a high shine. Use a polishing compound and a soft cloth to buff the surface.
Achieving a Professional Look
To achieve a professional-looking finish, it’s important to pay attention to detail:
“Practice makes perfect.”
Practice applying the finish on scrap wood before applying it to your guitar. This will help you get a feel for the application process and ensure a smooth, even finish.
Troubleshooting and Repairing Woodworking Guitars
Even the most skilled woodworker can encounter challenges during guitar construction. This section delves into common issues, providing practical solutions and troubleshooting tips for addressing these problems. It also guides you through repairing minor damages or imperfections in a finished guitar.
Identifying Common Issues During Guitar Construction
During the guitar construction process, several issues can arise, impacting the final product’s quality and playability. Identifying and addressing these problems early can save time and effort in the long run.
- Wood Warping or Cracking: Wood, especially when exposed to fluctuating humidity or temperature, can warp or crack. This can affect the guitar’s structural integrity and alignment.
- Glue Joints Failing: Improper glue application or insufficient clamping pressure can lead to weak glue joints, compromising the guitar’s stability.
- Neck Alignment Issues: The neck’s alignment with the body is crucial for playability. Problems like a misaligned neck or a poorly cut neck pocket can cause intonation issues and affect the overall feel of the guitar.
- Bridge and Nut Problems: The bridge and nut play a vital role in string height and intonation. Improperly cut or installed bridge and nut can result in buzzing, fretting out, and other playability issues.
- Fretwork Problems: Unevenly leveled frets, protruding frets, or improperly installed frets can cause buzzing, fretting out, and other problems that hinder playability.
- Finishing Defects: Poorly applied finishes, such as uneven coats, runs, or dust inclusions, can affect the guitar’s appearance and durability.
Troubleshooting and Repairing Common Issues
This section provides practical solutions and troubleshooting tips for addressing common issues encountered during guitar construction.
Addressing Wood Warping or Cracking
- Prevention: Acclimate wood to the environment where the guitar will be built, ensuring consistent temperature and humidity levels.
- Repairing Cracks: For minor cracks, use wood glue and clamps to secure the pieces together. For larger cracks, consider using a wood filler or a dowel to reinforce the area.
- Warping: If the wood has warped, you can try to bend it back into shape using a humidifier or a steam iron. If the warping is severe, it may be necessary to replace the affected piece.
Troubleshooting Glue Joint Failures
- Prevention: Use the correct type of glue for the wood being joined. Apply a thin, even coat of glue to both surfaces and clamp the joint firmly and evenly. Allow sufficient drying time before removing clamps.
- Repair: If a glue joint fails, carefully separate the pieces, clean the surfaces, and re-apply glue. Clamp the joint securely and allow it to dry completely.
Addressing Neck Alignment Issues
- Prevention: Ensure the neck pocket is cut accurately and that the neck is properly aligned with the body before gluing it in place.
- Repair: If the neck is misaligned, it may be possible to adjust the neck angle using shims or by re-cutting the neck pocket. If the neck is severely misaligned, it may need to be replaced.
Troubleshooting Bridge and Nut Problems
- Prevention: Ensure the bridge and nut are cut accurately and properly installed. Use a bridge and nut filing tool to adjust the string height and intonation.
- Repair: If the bridge or nut is improperly installed, it can be removed and re-installed correctly. If the bridge or nut is damaged, it may need to be replaced.
Addressing Fretwork Problems
- Prevention: Ensure the frets are properly installed and leveled during the initial fretwork process. Use a fret leveling tool to address any unevenness.
- Repair: Protruding frets can be filed down to level with the other frets. Unevenly leveled frets can be addressed using a fret leveling tool. If a fret is damaged, it can be replaced.
Repairing Minor Damages or Imperfections
Even with careful construction, minor damages or imperfections can occur. This section provides guidance on repairing these issues.
Fixing Dents and Scratches
- Minor Dents: Use a damp cloth to gently steam the dent, then apply pressure to carefully push it out. For deeper dents, consider using a wood filler.
- Scratches: For minor scratches, use a fine-grit sandpaper to lightly sand the area. For deeper scratches, use a wood filler or a touch-up pen to match the finish.
Addressing Finish Imperfections
- Uneven Coats: Lightly sand the uneven areas with fine-grit sandpaper and reapply a thin coat of finish. Allow it to dry completely before sanding and polishing.
- Runs: Carefully scrape off the excess finish using a razor blade. Sand the area smooth and reapply a thin coat of finish.
- Dust Inclusions: Lightly sand the affected area with fine-grit sandpaper. If the dust inclusions are deep, use a wood filler to fill them in. Sand the area smooth and reapply a thin coat of finish.
Resources and Further Learning

You’ve successfully built your first guitar, but the journey doesn’t end there. There’s always more to learn and explore in the world of guitar making. This section will guide you to valuable resources that can help you refine your skills, delve into advanced techniques, and discover new possibilities in guitar construction.
Online Resources and Communities
The internet is a treasure trove of information for guitar makers. Here are some reputable online resources and woodworking communities that can provide guidance, inspiration, and a sense of community:
- Resource Type: Online Forum
- Name: Luthiers’ Forum
- Description: A vibrant online community dedicated to guitar making, offering discussions on various topics, from design and construction to finishing and repair.
- Link: https://www.luthiersforum.com/
- Resource Type: Online Forum
- Name: The Acoustic Guitar Forum
- Description: A forum specifically focused on acoustic guitar making, covering topics like tonewood selection, bracing design, and instrument setup.
- Link: https://www.acousticguitarforum.com/
- Resource Type: Online Resource
- Name: The Guitar Making Academy
- Description: An online platform offering comprehensive courses and tutorials on guitar making, covering various aspects from basic woodworking to advanced lutherie techniques.
- Link: https://www.guitarmakingacademy.com/
Recommended Books and Articles
For those who prefer a more traditional approach to learning, books and articles offer in-depth knowledge and practical insights into guitar making.
- Resource Type: Book
- Name: “The Guitar Maker’s Handbook” by David Rubio
- Description: A comprehensive guide to building acoustic guitars, covering all aspects from design and construction to finishing and setup.
- Link: https://www.amazon.com/Guitar-Makers-Handbook-David-Rubio/dp/0966578803
- Resource Type: Book
- Name: “The Complete Book of Acoustic Guitar Making” by C.F. Martin IV
- Description: A detailed guide to building acoustic guitars, featuring insights from the renowned Martin Guitar company.
- Link: https://www.amazon.com/Complete-Book-Acoustic-Guitar-Making/dp/0879306534
- Resource Type: Article
- Name: “Building a Guitar” by Fine Woodworking Magazine
- Description: An in-depth article published in Fine Woodworking Magazine, offering a detailed guide to building a guitar, from choosing materials to finishing techniques.
- Link: https://www.finewoodworking.com/2012/05/building-a-guitar
Recommended Videos
Video tutorials can be a great way to visualize techniques and learn from experienced guitar makers.
- Resource Type: Video Series
- Name: “Build a Guitar with John C. Baggs” by John C. Baggs
- Description: A series of videos by renowned guitar maker John C. Baggs, guiding viewers through the process of building a guitar from start to finish.
- Link: https://www.youtube.com/playlist?list=PLj77d411c6a862996
- Resource Type: Video Series
- Name: “The Guitar Making Course” by Steve Klein
- Description: A comprehensive video course covering various aspects of guitar making, from design and construction to finishing and setup.
- Link: https://www.youtube.com/playlist?list=PL2vQ118X4o7wF8p3j6uQ5oX_f0qK58e00
End of Discussion: Woodworking Plans Guitar

With the right plans, tools, and a passion for woodworking, you can embark on a rewarding journey of building your own guitar. The process is not just about creating a musical instrument but also about embracing the rich history and artistry that has shaped the world of guitar making. So, grab your tools, choose your wood, and let the journey begin!
Clarifying Questions
What kind of wood is best for building a guitar?
The choice of wood depends on the type of guitar you’re building and your desired sound. Common choices include spruce for the top, mahogany for the back and sides, and maple for the neck.
How long does it take to build a guitar from woodworking plans?
The time required varies depending on your skill level, the complexity of the plan, and the amount of time you dedicate to the project. It can range from a few weeks to several months.
Are there woodworking plans available for different guitar styles?
Yes, you can find plans for various guitar styles, including acoustic, electric, classical, and even bass guitars.
Building a guitar from scratch is a rewarding challenge, and you’ll need detailed woodworking plans to guide you through the process. Just like you’d need plans for woodworking plans cabinets , guitar plans are essential for ensuring accurate cuts, joints, and overall construction.
So, whether you’re crafting a classic acoustic or a modern electric, having the right plans is crucial for success.
