Woodworking plans kitchen: Imagine transforming your kitchen into a masterpiece, crafted with your own hands. From elegant countertops to functional storage solutions, woodworking offers endless possibilities to personalize your culinary haven. With the right plans and a touch of creativity, you can build a kitchen that reflects your style and meets your needs.
This guide delves into the world of woodworking plans for kitchens, providing everything you need to embark on your own woodworking journey. We’ll explore different project categories, essential tools and materials, and practical tips for creating a kitchen that’s both beautiful and functional.
The Allure of Woodworking Kitchen Projects
There’s a unique satisfaction that comes with crafting kitchen elements from wood. Beyond the functional aspect, woodworking in the kitchen adds a touch of warmth, character, and a sense of craftsmanship that’s hard to replicate with other materials.
Aesthetic Benefits
Woodworking projects in the kitchen offer a range of aesthetic advantages. The natural beauty of wood grain patterns creates a unique visual appeal, adding warmth and character to the space. The diverse range of wood species, finishes, and styles allows for personalized expression, reflecting the homeowner’s taste and preferences.
- Unique Character: Wood grain patterns are naturally diverse, making each piece unique and visually interesting. No two pieces of wood are exactly alike, creating a one-of-a-kind look for your kitchen.
- Warmth and Comfort: The natural warmth of wood creates a welcoming and inviting atmosphere in the kitchen. This contrasts with the sterile feel that can sometimes be associated with other materials like metal or plastic.
- Versatility in Style: Wood can be stained, painted, or left natural, allowing for a wide range of styles, from rustic to modern. You can choose a wood species and finish that complements your existing kitchen decor or create a completely new look.
Practical Benefits
Beyond aesthetics, woodworking in the kitchen offers practical advantages. Wood is durable and long-lasting, making it a sustainable choice for kitchen elements that will be used daily. It’s also a relatively easy material to work with, allowing for customization and repairs.
- Durability: Wood is known for its strength and durability, making it suitable for high-traffic areas like kitchens. Well-crafted wooden cabinets and countertops can withstand years of use and remain beautiful for a long time.
- Sustainability: Wood is a renewable resource, making it a more environmentally friendly option compared to other materials like plastic or metal. Choosing sustainably sourced wood further enhances the environmental benefits.
- Customization: Woodworking allows for greater customization compared to pre-made kitchen components. You can tailor the dimensions, design, and functionality of your kitchen elements to perfectly suit your needs and preferences.
Popular Woodworking Kitchen Projects, Woodworking plans kitchen
Woodworking projects in the kitchen encompass a wide range of possibilities. Some popular projects include:
- Countertops: Wooden countertops are a popular choice for their natural beauty and durability. They can be made from various wood species, such as maple, cherry, or walnut, and finished with oil, wax, or polyurethane for protection.
- Cabinets: Custom-made cabinets offer a perfect fit for your kitchen space and design preferences. You can choose from a variety of styles, finishes, and hardware to create a unique look.
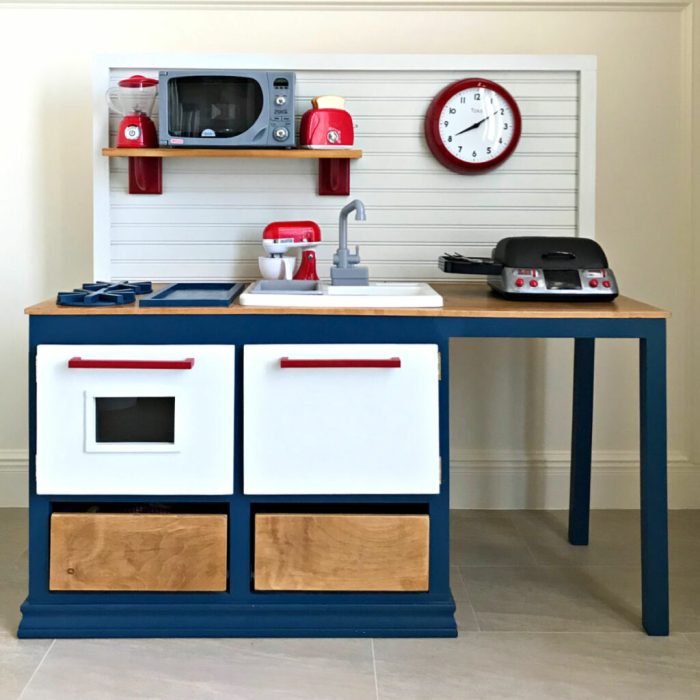
- Islands: A wooden kitchen island can be a focal point of the kitchen, providing additional storage and work space. It can be designed to match the existing cabinetry or have a unique style of its own.
- Shelves: Open shelving is a popular trend in modern kitchens. Wood shelves can be used to display dishes, cookbooks, or other decorative items. They can also be used for storage in pantries or other areas of the kitchen.
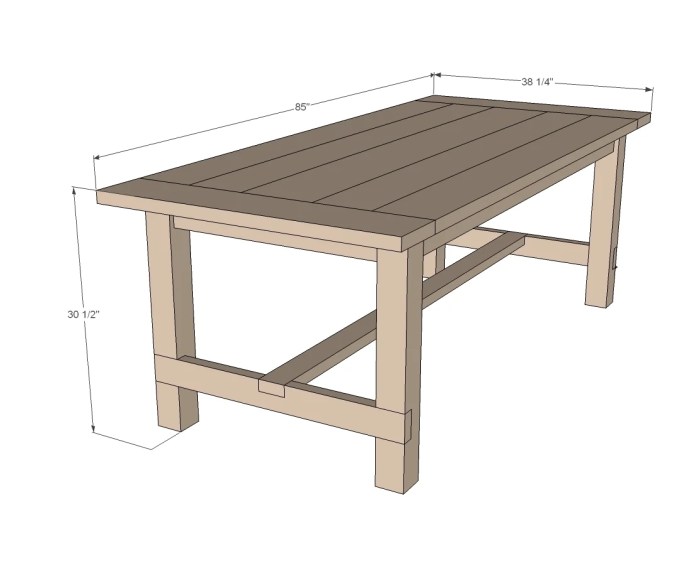
- Table and Chairs: A custom-made dining table and chairs can add a unique touch to the kitchen. They can be made from a variety of wood species and finishes to match the existing decor.
Types of Woodworking Plans for Kitchens
Kitchen woodworking projects can range from simple to complex, catering to different skill levels and budgets. Choosing the right project depends on your experience, available tools, and desired outcome.
Beginner Kitchen Woodworking Projects
Beginner woodworking projects are ideal for those new to woodworking or seeking simple, satisfying projects. These projects typically involve basic techniques and tools, allowing you to gain confidence and experience.
- Cutting boards: Cutting boards are a practical and popular beginner project. They involve basic cuts, sanding, and finishing techniques. You can experiment with different wood species and designs.
- Spice racks: Spice racks are another beginner-friendly project that adds functionality to your kitchen. They involve simple joinery and require minimal tools. You can customize the size and design to suit your needs.
- Small shelves: Small shelves can be used to store dishes, books, or decorative items. They involve simple cuts, joinery, and finishing techniques. You can experiment with different wood species and finishes.
The tools needed for these projects include a saw, a drill, a sander, and basic hand tools.
Intermediate Kitchen Woodworking Projects
Intermediate projects require more experience and advanced techniques. They often involve more complex joinery, intricate designs, and specialized tools.
- Kitchen islands: Kitchen islands are a popular addition to kitchens, providing extra counter space and storage. They involve complex joinery, precise measurements, and finishing techniques.
- Custom cabinets: Custom cabinets offer personalized storage solutions and enhance the aesthetic of your kitchen. They involve advanced joinery, detailed design, and finishing techniques.
- Kitchen tables: Kitchen tables are a focal point of the kitchen, and custom-made tables can add a unique touch. They involve complex joinery, intricate designs, and finishing techniques.
The tools needed for these projects include a table saw, a router, a planer, and a variety of hand tools.
Advanced Kitchen Woodworking Projects
Advanced kitchen woodworking projects are for experienced woodworkers with a high level of skill and expertise. These projects often involve intricate designs, complex joinery, and specialized tools.
- Custom kitchen cabinets: Custom cabinets are a challenging project that requires advanced woodworking skills. They involve intricate designs, complex joinery, and specialized tools.
- Built-in kitchen furniture: Built-in kitchen furniture, such as a breakfast nook or a wine rack, requires advanced woodworking skills. They involve complex joinery, intricate designs, and specialized tools.
- Kitchen doors and windows: Kitchen doors and windows require advanced woodworking skills. They involve intricate designs, complex joinery, and specialized tools.
The tools needed for these projects include a jointer, a thickness planer, a shaper, and a variety of specialized hand tools.
Essential Tools and Materials for Kitchen Woodworking

Kitchen woodworking projects require a combination of tools and materials to achieve successful outcomes. Understanding the necessary tools and materials will ensure that you have everything you need to embark on your kitchen woodworking journey.
Essential Tools
Having the right tools is crucial for any woodworking project. Here’s a comprehensive list of essential tools for common kitchen woodworking projects:
- Power Tools:
- Circular Saw: Used for making precise, straight cuts in wood, particularly for cutting sheet goods and creating large workpieces.
- Jigsaw: Ideal for making intricate cuts, curves, and shapes in wood, useful for creating custom cabinet doors or shelves.
- Router: Used for shaping edges, creating grooves, and making decorative cuts in wood, allowing for precise and intricate details.
- Drill: Essential for drilling holes in wood for various purposes, including attaching hardware, creating pilot holes, and installing dowels.
- Belt Sander: Provides fast and efficient sanding for large surfaces, achieving smooth finishes on cabinets and countertops.
- Random Orbital Sander: Ideal for achieving a fine finish on smaller areas, removing imperfections and sanding between coats of paint or stain.
- Hand Tools:
- Measuring Tape: Essential for accurate measurements to ensure precise cuts and proper fit.
- Carpenter’s Pencil: Used for marking wood and transferring measurements, allowing for accurate cuts and layout.
- Chisels: Used for shaping and removing wood, particularly for creating intricate details or smoothing edges.
- Hammers: Essential for driving nails, securing hardware, and assembling wooden components.
- Screwdrivers: Used for driving screws, securing hardware, and assembling wooden components.
- Clamps: Used to hold wood pieces securely in place during assembly, ensuring proper alignment and stability.
- Level: Ensures that surfaces are level and aligned, crucial for creating a stable and visually appealing kitchen.
- Safety Equipment:
- Safety Glasses: Protect eyes from flying debris and sawdust, essential for all woodworking activities.
- Dust Mask: Prevents inhaling harmful wood dust, crucial for protecting respiratory health.
- Hearing Protection: Protects ears from loud noises generated by power tools, essential for maintaining hearing health.
- Work Gloves: Provide protection for hands from sharp tools and splinters, ensuring a safe working environment.
Types of Wood for Kitchen Construction
The choice of wood for kitchen woodworking projects is essential, considering its properties, durability, and aesthetic appeal. Here’s a table showcasing different types of wood suitable for kitchen construction:
| Wood Type | Properties | Uses |
|---|---|---|
| Maple | Hard, durable, and resistant to scratches and dents, with a light color and fine grain. | Cabinets, countertops, drawer fronts, and furniture. |
| Cherry | Strong, with a rich reddish-brown color that darkens with age, known for its beautiful grain pattern. | Cabinets, furniture, and decorative elements. |
| Oak | Durable, strong, and resistant to wear, with a distinctive grain pattern and warm color. | Cabinets, flooring, furniture, and decorative elements. |
| Walnut | Strong, with a dark brown color and intricate grain pattern, known for its rich and elegant appearance. | Cabinets, furniture, and decorative elements. |
| Birch | Hard, durable, and affordable, with a light color and fine grain. | Cabinets, drawer fronts, and furniture. |
Safety Precautions and Best Practices
Safety is paramount when working with woodworking tools in a kitchen setting. Here are some essential precautions and best practices to ensure a safe working environment:
- Always wear safety glasses, a dust mask, and hearing protection when using power tools.
- Keep your work area clean and free of clutter.
- Use clamps to secure wood pieces during cutting and assembly.
- Avoid using power tools near water or other liquids.
- Never operate power tools while tired or under the influence of drugs or alcohol.
- Always unplug power tools before making adjustments or changing blades.
- Keep your fingers away from the blade or cutting area of power tools.
- Use the appropriate tools for the job and follow the manufacturer’s instructions.
- Be aware of your surroundings and avoid distractions while using power tools.
- Store all tools and materials safely when not in use.
Finding and Utilizing Woodworking Plans

The right woodworking plan can be your guide to crafting a beautiful and functional kitchen. Whether you’re a seasoned woodworker or a beginner, finding and understanding woodworking plans is a crucial step in any kitchen project.
Resources for Finding Woodworking Plans
A plethora of resources exist to help you discover the perfect woodworking plan for your kitchen.
- Online Platforms: Websites like Ana White, Woodworking for Mere Mortals, and The Wood Whisperer offer a wealth of free and paid woodworking plans, covering a wide range of kitchen projects. These platforms often provide detailed instructions, cutting lists, and diagrams to guide you through the process.
- Books: Woodworking books are a valuable source of inspiration and practical guidance. Look for books specifically focused on kitchen woodworking, as they’ll contain plans tailored to this area. Popular authors include Woodsmith, Fine Woodworking, and Popular Woodworking.
- Magazines: Woodworking magazines, like Fine Woodworking and Woodworking Magazine, frequently feature kitchen projects. These magazines offer detailed plans, expert advice, and stunning examples of kitchen woodworking.
Interpreting and Adapting Woodworking Plans
Once you’ve found a plan, take time to understand its components.
- Cutting List: The cutting list Artikels the dimensions and quantity of each piece of wood needed for the project. Carefully review the list and ensure you have the correct materials before starting.
- Assembly Instructions: These instructions will guide you through the steps of assembling the project. Read them carefully, noting any specific techniques or tools required.
- Diagrams: Woodworking plans often include diagrams to illustrate the construction process. Study the diagrams to visualize how the pieces fit together.
Creating a Detailed Woodworking Plan
If you have a specific kitchen design in mind, you can create a detailed woodworking plan from scratch.
- Sketching: Begin by sketching your kitchen design. Include dimensions, layout, and desired features. This initial sketch will serve as a visual guide for your woodworking plan.
- Material Selection: Choose the wood species best suited for your project. Consider factors like durability, appearance, and cost.
- Cutting List and Assembly: Develop a detailed cutting list for each piece of wood needed. Artikel the steps involved in assembling the project, including joinery techniques and finishing details.
Building a Kitchen Island with Woodworking
A kitchen island is a valuable addition to any kitchen, offering extra counter space, storage, and even seating. Building your own kitchen island using woodworking techniques gives you the freedom to customize it to fit your specific needs and style.
Designing a Kitchen Island
The first step in building a kitchen island is to design it. This involves considering the size, shape, and features of your island.
- Size: The size of your island should be determined by the available space in your kitchen and the intended use. A smaller island might be sufficient for additional counter space and storage, while a larger island can accommodate seating and additional appliances.
- Shape: Kitchen islands can be rectangular, square, round, or even L-shaped. The shape you choose will influence the layout of your kitchen and the overall style.
- Features: Consider the features you want to include in your island, such as a sink, cooktop, storage drawers, shelves, or a breakfast bar. These features will impact the design and construction process.
Building the Kitchen Island
Once you have a design, you can start building the island. Here’s a step-by-step guide:
Cutting the Wood
- Cutting the Base: Start by cutting the pieces of wood for the base of the island. You will need four pieces for the sides and two pieces for the top and bottom. Measure carefully and use a saw to cut the wood to the desired dimensions.
- Cutting the Top: Cut the pieces of wood for the countertop. If you are using a solid wood top, you may need to join multiple pieces together. Use a router to create a smooth edge for the countertop.
- Cutting the Shelves and Drawers: Cut the pieces of wood for any shelves or drawers you plan to include. Use a saw and router to create the desired shapes and sizes.
Assembling the Island
- Attaching the Base: Attach the sides of the base using wood glue and screws. Make sure the sides are square and level.
- Attaching the Top and Bottom: Attach the top and bottom of the base to the sides using wood glue and screws.
- Adding Shelves and Drawers: Install any shelves or drawers you have cut. Use drawer slides for smooth operation.
Finishing the Island
- Sanding: Sand the entire island using progressively finer grit sandpaper. This will create a smooth surface for painting or staining.
- Painting or Staining: Apply paint or stain to the island according to your preference. Use multiple coats for a durable finish.
- Sealing: Seal the island with a polyurethane or varnish to protect it from moisture and spills.
Customizing Your Kitchen Island
- Size and Shape: You can customize the size and shape of your island to fit the available space and your needs.
- Materials: You can choose from a variety of materials for your island, such as solid wood, plywood, or even metal.
- Style: You can choose a style that complements your kitchen decor, such as rustic, modern, or traditional.
- Features: You can add features to your island, such as a sink, cooktop, storage drawers, shelves, or a breakfast bar.
Woodworking for Kitchen Storage Solutions
Kitchen storage is essential for maintaining a functional and organized space. Woodworking offers a unique opportunity to craft custom storage solutions that perfectly fit your kitchen’s layout and needs. By incorporating woodworking techniques, you can maximize space utilization and create a more efficient and aesthetically pleasing kitchen environment.
Benefits of Woodworking for Kitchen Storage
Woodworking offers several advantages when designing and building kitchen storage solutions:
- Customization: Woodworking allows you to tailor storage solutions to your specific needs and preferences. You can design shelves, drawers, and cabinets of varying sizes and configurations to accommodate your existing kitchen layout and the items you need to store. This flexibility ensures that your storage system perfectly meets your requirements, unlike generic pre-made options.
- Durability: Wood is a robust and durable material that can withstand the wear and tear of everyday kitchen use. Well-constructed wooden storage units are designed to last for years, offering long-term value for your investment.
- Aesthetics: Wood brings warmth and character to any kitchen. You can choose from a wide variety of wood species, finishes, and hardware to create a storage system that complements your kitchen’s overall design and style. The natural beauty of wood adds a touch of elegance and sophistication to your kitchen space.
- Value: Custom-built wooden storage solutions often increase the overall value of your kitchen. The craftsmanship and uniqueness of these pieces make them desirable features that can enhance your home’s appeal and resale value.
Examples of Woodworking Kitchen Storage Projects
Here are some examples of woodworking projects that can enhance kitchen organization:
- Shelves: Building custom shelves allows you to maximize vertical space and create additional storage areas. You can design shelves to fit specific needs, such as displaying cookbooks, storing dishes, or creating a spice rack.
- Drawers: Woodworking enables you to build drawers of various sizes and configurations. This allows you to organize utensils, cookware, and other kitchen items efficiently. You can also incorporate drawer dividers and organizers to further enhance organization within the drawers.
- Pantry Systems: Woodworking can be used to create custom pantry systems that optimize storage space. You can design shelves, drawers, and pull-out baskets to organize food items, pantry supplies, and appliances. A well-designed pantry system helps you stay organized and easily find what you need.
- Kitchen Islands: Woodworking is crucial for building custom kitchen islands. These versatile pieces can provide additional countertop space, storage, and seating. You can incorporate drawers, shelves, and cabinets into the island design to meet your specific storage needs.
Planning and Designing Kitchen Storage Solutions
- Measure your space: Before starting any woodworking project, accurately measure the available space where you plan to install your storage solutions. This ensures that your design fits seamlessly into the existing layout and avoids any potential issues with dimensions.
- Consider your needs: Determine what items you need to store and how much space each item requires. This will help you plan the size and configuration of your storage units.
- Sketch your design: Create a simple sketch or drawing of your planned storage solution. This visual representation will help you visualize the final product and ensure that all elements are properly integrated.
- Choose the right materials: Select wood species and finishes that complement your kitchen’s style and meet your durability requirements. Consider factors such as moisture resistance, scratch resistance, and ease of maintenance when making your choice.
- Consider hardware: Choose high-quality hinges, drawer slides, and other hardware components for your storage units. These elements play a crucial role in the functionality and longevity of your project.
Finishing Techniques for Kitchen Woodworking Projects
The final step in any woodworking project is finishing, and it’s a crucial one for kitchen projects, where durability and aesthetics are paramount. A well-chosen finish protects your wood from stains, scratches, and moisture, while enhancing its natural beauty or creating a desired look.
Sanding
Sanding is the foundation of any good finish. It smooths out imperfections, creates a uniform surface, and prepares the wood to accept stain or paint.
- Start with coarse grit sandpaper (80-120 grit) to remove major imperfections and create a smooth surface.
- Progress to finer grits (150-220 grit) to remove scratches from the coarser sandpaper and create a smoother finish.
- Finish with very fine grit sandpaper (240-400 grit) to achieve a polished look.
For kitchen projects, it’s important to sand with the grain to avoid creating scratches that will be visible in the final finish.
Staining
Staining adds color and depth to wood, enhancing its natural beauty.
- Oil-based stains are known for their rich color and deep penetration, but they can be messy and require more drying time.
- Water-based stains are easier to apply and clean up, but they may not penetrate as deeply as oil-based stains.
- Gel stains are thicker and more opaque than oil-based stains, making them ideal for covering knots and imperfections.
When applying stain, use a brush, cloth, or sponge, working in the direction of the grain. Multiple thin coats are better than one thick coat, allowing for even color and deeper penetration.
Painting
Painting provides a durable and versatile finish for kitchen projects, allowing you to create a variety of colors and styles.
- Latex paints are water-based and offer excellent durability, ease of application, and low odor.
- Oil-based paints provide a more durable finish and better resistance to moisture, but they require more drying time and can be more difficult to clean up.
For kitchen projects, it’s important to use a primer to create a smooth surface for the paint to adhere to. Multiple thin coats of paint will provide a more even finish than one thick coat.
Finishing Techniques
There are several techniques you can use to achieve professional-looking finishes on your kitchen woodworking projects.
- Wiping on a finish is a simple technique that involves applying a thin coat of finish with a cloth or sponge.
- Spraying is a more advanced technique that allows for even application and a smoother finish.
- Brushing is a versatile technique that can be used to apply a variety of finishes.
It’s important to practice on scrap wood before applying any finish to your project.
Advantages and Disadvantages of Different Finishes
- Oil finishes (such as tung oil, linseed oil, and Danish oil) are known for their durability and water resistance. They penetrate deeply into the wood, enhancing its natural beauty. However, they can be messy and require more drying time.
- Polyurethane finishes are very durable and offer excellent protection against scratches, water, and stains. They come in both oil-based and water-based formulations. However, they can be difficult to apply evenly and may yellow over time.
- Varnish finishes are similar to polyurethane finishes, but they are typically less durable. They are often used for projects that will not be subjected to heavy wear and tear.
- Lacquer finishes are very durable and provide a hard, glossy finish. They dry quickly and are easy to apply. However, they can be flammable and require careful handling.
- Wax finishes provide a natural, low-luster finish that enhances the wood’s grain. They are easy to apply and maintain. However, they are not as durable as other finishes and require frequent reapplication.
When choosing a finish, consider the intended use of the project, the desired look, and the level of durability required.
Tips for Achieving Professional-Looking Finishes
- Prepare the surface carefully. Sanding, cleaning, and filling any imperfections will ensure a smooth and even finish.
- Apply thin coats. Multiple thin coats will provide a better finish than one thick coat.
- Allow each coat to dry completely before applying the next. This will prevent problems with adhesion and finish quality.
- Use the right tools and techniques. The right tools and techniques will help you achieve a professional-looking finish.
- Practice on scrap wood. Practice applying the finish on scrap wood before applying it to your project.
Ultimate Conclusion: Woodworking Plans Kitchen
Whether you’re a seasoned woodworker or a curious beginner, woodworking plans kitchen offers a rewarding way to express your creativity and build a kitchen that truly feels like home. By following the steps Artikeld in this guide, you can confidently tackle your woodworking projects, achieving results that will be the envy of all who enter your kitchen.
FAQ Guide
What are the best types of wood for kitchen projects?
Hardwoods like maple, cherry, and oak are popular choices for kitchen projects due to their durability and beautiful grain patterns. Softwoods like pine and cedar are also suitable for certain applications, offering affordability and ease of workability.
How do I choose the right woodworking plans for my kitchen?
Consider your skill level, available tools, and desired style. Beginners might start with simpler projects, while experienced woodworkers can tackle more complex designs. Look for plans that match your kitchen’s dimensions and aesthetic preferences.
Where can I find woodworking plans for kitchens?
You can find woodworking plans online, in woodworking magazines, and at local libraries. Many websites offer free plans, while others offer paid plans with detailed instructions and cutting diagrams.
Building a kitchen from scratch? Woodworking plans can be a lifesaver! You’ll need to consider everything from cabinets to countertops. And don’t forget about the storage – you’ll need a place for all those kitchen gadgets. If you’re also a gardener, you might want to check out some woodworking plans for your garden too.
Once you’ve got your kitchen and garden sorted, you’ll be ready to enjoy the fruits of your labor (literally!).
