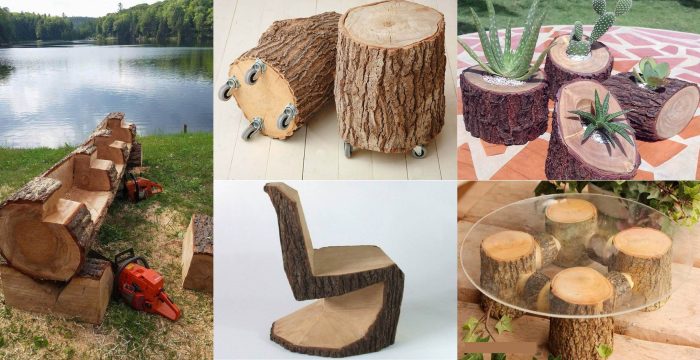
Do it yourself woodworking projects are a fantastic way to unleash your creativity, learn new skills, and build something truly unique. Whether you’re a seasoned craftsman or just starting out, the satisfaction of creating something with your own hands is unmatched.
Woodworking projects can range from simple beginner-friendly projects like a birdhouse or a small shelf to more challenging creations like a coffee table or a bench. You’ll learn essential tools and techniques, explore different types of wood, and discover the joy of transforming raw materials into beautiful and functional pieces.
Essential Tools and Materials: Do It Yourself Woodworking Projects

Having the right tools and materials is crucial for successful woodworking projects. Whether you’re a beginner or an experienced woodworker, understanding the essentials will help you create beautiful and functional pieces.
Essential Woodworking Tools
A basic set of woodworking tools will provide you with the necessary foundation for a wide range of projects.
- Measuring Tools: A tape measure, ruler, and combination square are essential for accurate measurements.
- Marking Tools: A pencil, marking gauge, and a combination square are crucial for transferring measurements and creating precise lines.
- Cutting Tools: A hand saw, jigsaw, and a circular saw are essential for cutting wood to size. A chisel and a plane are useful for shaping and smoothing wood.
- Drilling Tools: A drill, drill bits, and a countersinking bit are necessary for drilling holes and countersinking screws.
- Fastening Tools: A hammer, screwdriver, and a wrench are used for assembling and securing wood pieces.
- Safety Gear: Safety glasses, ear protection, and a dust mask are essential for protecting yourself from wood dust and potential injuries.
Selecting High-Quality Wood
The type of wood you choose for your project will significantly impact its durability, appearance, and workability.
- Hardwoods: These woods are generally denser and more durable than softwoods. They are ideal for furniture, flooring, and other projects that require strength and resistance to wear and tear. Examples include oak, maple, cherry, walnut, and mahogany.
- Softwoods: These woods are typically lighter and easier to work with than hardwoods. They are often used for construction, framing, and projects that require flexibility and affordability. Examples include pine, fir, cedar, and spruce.
- Plywood: This engineered wood product is made by layering thin sheets of wood veneer with glue. It is strong, stable, and available in various thicknesses. It is commonly used for cabinets, shelves, and other furniture components.
- MDF (Medium-Density Fiberboard): This engineered wood product is made by combining wood fibers with resin and pressing them together. It is smooth, consistent, and easy to work with. It is commonly used for furniture, cabinets, and decorative projects.
Types of Wood and Their Properties
Here’s a table that summarizes some common types of wood, their properties, and common uses:
| Wood Type | Properties | Common Uses |
|---|---|---|
| Oak | Hard, durable, strong, grain patterns | Furniture, flooring, cabinets, trim |
| Maple | Hard, strong, smooth grain, light color | Furniture, flooring, cabinets, butcher blocks |
| Cherry | Hard, strong, reddish-brown color, fine grain | Furniture, cabinets, trim, woodworking projects |
| Walnut | Hard, strong, rich brown color, distinctive grain | Furniture, cabinets, veneers, gunstocks |
| Mahogany | Hard, durable, reddish-brown color, fine grain | Furniture, cabinets, veneers, boats |
| Pine | Soft, lightweight, affordable, easy to work with | Construction, framing, trim, furniture |
| Fir | Soft, strong, affordable, good for framing | Construction, framing, trim, plywood |
| Cedar | Soft, aromatic, resistant to rot and insects | Outdoor furniture, siding, fencing |
| Spruce | Soft, lightweight, affordable, good for soundboards | Construction, framing, musical instruments |
Beginner-Friendly Projects
Starting with woodworking can be daunting, but it doesn’t have to be. Simple projects are a great way to learn the basics and build confidence. These projects are perfect for beginners because they require minimal tools and materials, and the instructions are easy to follow.
Simple Birdhouse
A birdhouse is a classic beginner project. It’s a great way to practice cutting, sanding, and assembling wood. You can customize the design to your liking and add a personal touch.
The following steps will guide you through building a simple birdhouse:
Materials
- Wood (1/2-inch thick pine or cedar)
- Screws (1-inch)
- Wood glue
- Paint or stain (optional)
Tools
- Saw (hand saw or circular saw)
- Drill
- Screwdriver
- Sandpaper
- Measuring tape
- Pencil
Steps
- Cut the wood. Using a saw, cut the wood into the following pieces:
- Two side pieces: 6 inches by 6 inches
- Two end pieces: 6 inches by 4 inches
- One bottom piece: 6 inches by 4 inches
- One roof piece: 8 inches by 6 inches
- One entrance piece: 2 inches by 3 inches
- Sand the edges. Sand all the edges of the wood pieces to remove any rough spots.
- Assemble the base. Glue and screw the side pieces, end pieces, and bottom piece together to form the base of the birdhouse.
- Attach the roof. Glue and screw the roof piece to the top of the base.
- Cut the entrance hole. Using a saw, cut a 2-inch by 3-inch hole in the front of the birdhouse for the entrance.
- Attach the entrance piece. Glue and screw the entrance piece to the front of the birdhouse, covering the entrance hole.
- Paint or stain. Paint or stain the birdhouse as desired.
Intermediate Woodworking Projects
Stepping up from beginner projects, intermediate woodworking projects involve more complex designs, joinery techniques, and finishing methods. This level allows you to create furniture and other functional items with a higher level of skill and craftsmanship.
Examples of Intermediate Woodworking Projects
Intermediate woodworking projects offer a good balance between complexity and achievable results. Some popular examples include:
- Coffee Table: A coffee table is a classic intermediate project that allows you to practice various joinery techniques and explore different wood finishes. You can choose from various designs, including simple rectangular shapes or more intricate designs with curved edges or inlays.
- Small Bench: Building a small bench is another excellent project for honing your woodworking skills. It involves creating sturdy legs and a comfortable seat, providing opportunities to practice mortise and tenon joinery, as well as applying wood finishes to protect and enhance the wood’s appearance.
- Bookshelf: A bookshelf is a practical and visually appealing project that can be customized to fit your specific needs. You can create simple shelves or more elaborate designs with built-in features, such as doors or drawers.
- Small Cabinet: A small cabinet, such as a medicine cabinet or a kitchen cabinet, is a more complex project that requires precise measurements and careful assembly. It allows you to practice working with different materials, such as plywood and solid wood, and to incorporate features like hinges and drawer slides.
Mortise and Tenon Joinery
Mortise and tenon joinery is a traditional woodworking technique that creates strong and durable joints. It involves cutting a rectangular hole (the mortise) in one piece of wood and a corresponding projection (the tenon) on the other piece. The tenon fits snugly into the mortise, creating a strong and secure connection.
Mortise and tenon joinery is a classic woodworking technique that has been used for centuries. It is a strong and durable joint that can withstand significant stress.
- Cutting the Mortise: You can use a chisel and mallet or a mortising machine to cut the mortise. If using a chisel, start by marking the mortise’s dimensions on the wood. Then, use a chisel to remove the wood in small increments, working your way down to the desired depth. Be sure to keep the mortise square and true.
- Cutting the Tenon: To cut the tenon, use a saw to cut the tenon’s width and length. Then, use a chisel to shape the tenon’s shoulders, ensuring they are square and flush with the wood. The tenon should be slightly wider than the mortise to ensure a tight fit.
- Assembling the Joint: Once the mortise and tenon are cut, you can assemble the joint by carefully fitting the tenon into the mortise. You may need to use a mallet or a hammer to gently tap the tenon into place. Once the joint is assembled, you can glue it for added strength.
Wood Finishes and Stains
Wood finishes and stains are essential for protecting and enhancing the appearance of your woodworking projects. They provide a protective layer that shields the wood from moisture, scratches, and other damage, while also adding color and depth to the wood’s natural beauty.
- Stains: Stains are pigmented liquids that penetrate the wood’s surface, adding color and depth to the grain. They are available in various colors, from natural wood tones to vibrant hues. Stains can be used to create a subtle color change or a dramatic transformation, depending on the desired effect.
- Finishes: Finishes are protective coatings that create a barrier between the wood and the environment. They can be applied in various forms, including oils, varnishes, and lacquers. Finishes can enhance the wood’s natural beauty, provide a durable protective layer, and add a touch of elegance to the finished product.
Advanced Woodworking Techniques
Advanced woodworking techniques allow you to create intricate and stunning pieces that go beyond the basics. These techniques require a higher level of skill, precision, and patience, but the results are truly rewarding.
Carving
Carving is the art of shaping wood using hand tools like chisels, gouges, and knives. This technique allows for the creation of intricate designs, three-dimensional sculptures, and detailed embellishments.
- Relief Carving: This technique involves carving a design into the surface of the wood, creating a raised image. Examples include decorative panels, picture frames, and furniture accents.
- Round Carving: This technique involves carving a three-dimensional object from a block of wood. Examples include figurines, animal sculptures, and decorative objects.
Tools and equipment for carving include:
- Chisels: Used for cutting and shaping wood.
- Gouges: Used for carving curves and hollows.
- Knives: Used for fine detail work and outlining designs.
- Mallet: Used for striking chisels and gouges.
- Carving bench: Provides a stable and comfortable work surface.
Turning
Woodturning is a technique that uses a lathe to shape wood into symmetrical objects. The lathe rotates the wood while the woodworker uses various tools to create the desired shape.
- Spindle Turning: This technique is used to create long, slender objects like legs, spindles, and bowls.
- Bowl Turning: This technique is used to create bowls, plates, and other round objects.
Tools and equipment for turning include:
- Lathe: A machine that spins the wood while you work.
- Turning Chisels: Used for shaping and smoothing the wood.
- Gouges: Used for carving curves and hollows.
- Turning Tools: Used for specific tasks like beading, coving, and parting.
Inlay
Inlay is a decorative technique that involves inserting pieces of different materials into the surface of wood to create a design. This technique is often used to create intricate patterns, images, or lettering.
- Wood Inlay: This technique uses different types of wood to create a design. It can be used to create geometric patterns, floral designs, or even portraits.
- Metal Inlay: This technique uses metal pieces like brass, copper, or silver to create a design. It can be used to create accents, borders, or even entire images.
- Stone Inlay: This technique uses stone pieces like marble, granite, or onyx to create a design. It can be used to create luxurious accents, intricate patterns, or even mosaic designs.
Tools and equipment for inlay include:
- Inlay Saw: A small saw with a fine blade used for cutting inlay pieces.
- Inlay Chisel: A chisel with a narrow blade used for carving inlay pieces.
- Inlay Hammer: A small hammer used for tapping inlay pieces into place.
- Inlay Glue: A strong adhesive used for bonding inlay pieces to the wood.
Safety in the Workshop

Woodworking is a rewarding hobby, but it’s crucial to prioritize safety in your workshop. Even simple projects can involve sharp tools and potentially dangerous machinery. By taking the necessary precautions, you can minimize risks and enjoy woodworking without any accidents.
Essential Safety Equipment
Having the right safety equipment is essential for protecting yourself from potential hazards in your workshop. Here are some key items to consider:
- Eye Protection: Safety glasses are essential for protecting your eyes from flying debris. Consider a pair of goggles for added protection.
- Ear Protection: Power tools and machinery can generate significant noise levels that can damage your hearing over time. Wear earplugs or earmuffs to protect your ears.
- Dust Mask: Woodworking creates dust, which can be harmful to your respiratory system. A dust mask can help filter out these particles.
- Gloves: Gloves can protect your hands from splinters, cuts, and other injuries.
Maintaining a Safe Workshop Environment
A well-organized and clean workshop is a safer workshop. Here are some tips for creating a safe and efficient workspace:
- Keep Your Workshop Clean and Organized: Clear clutter and debris from your workspace. Store tools and materials in designated areas.
- Adequate Lighting: Good lighting is essential for visibility, reducing the risk of accidents. Ensure your workshop has sufficient lighting, especially when working with sharp tools.
- Proper Ventilation: Ventilation is crucial for removing dust and fumes from the air. Consider installing a dust collection system or opening windows to improve air circulation.
- Secure Power Cords: Keep power cords away from traffic areas and ensure they are in good condition. Use surge protectors to prevent electrical hazards.
- Fire Extinguisher: Have a fire extinguisher readily available in your workshop. Learn how to use it in case of a fire.
Inspiration and Resources

Finding inspiration for your next woodworking project can be as simple as looking around your home or browsing through online resources. There are endless possibilities for creating beautiful and functional pieces, and with the right resources, you can bring your woodworking dreams to life.
Online Communities and Websites
Online communities and websites offer a wealth of information, inspiration, and support for woodworkers of all levels. Here are some popular resources:
- Woodworking Forums: These forums are great places to connect with other woodworkers, ask questions, share your projects, and get feedback. Some popular forums include Lumberjocks, Woodworking Talk, and The Wood Whisperer Forum.
- YouTube Channels: Many talented woodworkers share their skills and knowledge through YouTube videos. Some popular channels include The Wood Whisperer, Paul Sellers, and Steve Ramsey.
- Blogs and Websites: Numerous blogs and websites are dedicated to woodworking, offering tutorials, project plans, and inspiration. Some popular websites include Popular Woodworking, Fine Woodworking, and Woodworking for Mere Mortals.
Woodworking Magazines and Books, Do it yourself woodworking projects
Woodworking magazines and books offer a wealth of inspiration and practical information. Here are some popular examples:
- Popular Woodworking Magazine: This magazine features a variety of projects, techniques, and articles for woodworkers of all levels. It includes detailed plans, step-by-step instructions, and stunning photography.
- Fine Woodworking Magazine: This magazine focuses on high-quality woodworking projects and techniques. It features articles by renowned woodworkers and provides in-depth analysis of different woodworking styles and approaches.
- The Complete Illustrated Guide to Woodworking: This book covers a wide range of woodworking topics, from basic tools and techniques to advanced projects. It provides comprehensive information and clear illustrations to guide you through every step.
Woodworking Clubs and Workshops
Joining a woodworking club or workshop can be a great way to learn new skills, connect with other woodworkers, and gain access to tools and resources.
- Shared Workspace: Woodworking clubs often provide shared workspaces, equipped with tools and equipment that may be too expensive or impractical to purchase individually. This allows members to access a wider range of tools and experiment with different techniques.
- Community and Support: Woodworking clubs offer a supportive community where you can learn from experienced woodworkers, share your projects, and get feedback. This collaborative environment can be invaluable for learning and growing as a woodworker.
- Workshops and Classes: Many woodworking clubs and workshops offer classes and workshops taught by experienced instructors. These classes can provide specialized training in specific woodworking techniques or projects, helping you to develop your skills and knowledge.
Closing Notes
With a little patience, practice, and a passion for wood, you can create stunning woodworking projects that will be admired for years to come. The journey of learning and creating is as rewarding as the finished product itself. So, grab your tools, choose your wood, and let your imagination run wild. Happy woodworking!
Top FAQs
What are the basic tools I need for woodworking?
Essential tools for beginners include a saw, hammer, screwdriver, measuring tape, level, sandpaper, and clamps. You can gradually expand your toolkit as you gain experience and tackle more complex projects.
How do I choose the right wood for my project?
Consider the project’s purpose, size, and desired aesthetic. Hardwoods like oak and maple are durable, while softwoods like pine and cedar are easier to work with. Research different wood types to find the best fit for your needs.
Where can I find woodworking plans and inspiration?
There are numerous online resources, magazines, and books dedicated to woodworking. Websites like Pinterest and Instructables offer a wealth of project ideas and tutorials.
DIY woodworking projects are a great way to unleash your creativity and build something unique for your home. If you’re new to woodworking, it’s a good idea to start with some simple projects. There are tons of great resources available online, like beginners woodworking plans , that can guide you through the process.
With a little patience and practice, you’ll be crafting beautiful pieces in no time!
