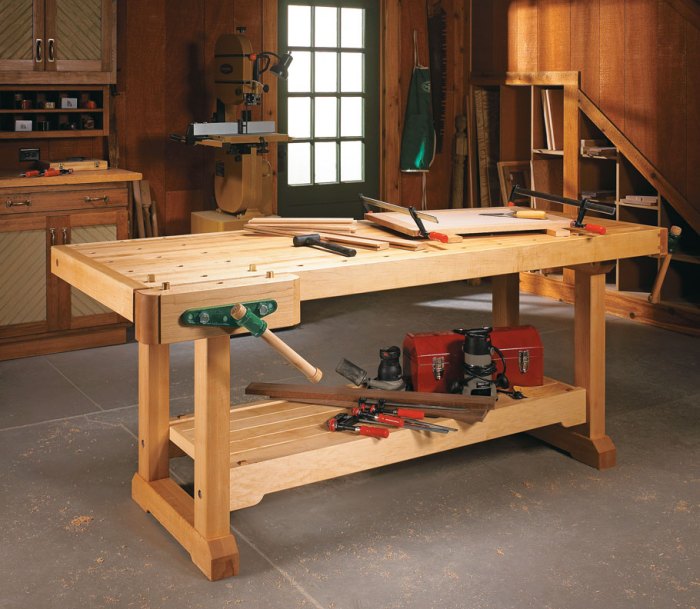
Woodworking benches are the cornerstone of any woodworker’s workshop, providing a sturdy and stable platform for crafting projects of all sizes. From their humble beginnings as simple work surfaces, woodworking benches have evolved into sophisticated tools with a wide array of features and designs.
This comprehensive guide delves into the history, construction, and uses of woodworking benches, offering insights into their essential features, types, and best practices for building and maintaining them. Whether you’re a seasoned woodworker or a curious beginner, this exploration will equip you with the knowledge to choose the right bench and utilize it to its full potential.
Introduction to Woodworking Benches
Woodworking benches have been a staple in workshops for centuries, evolving alongside the tools and techniques used by craftspeople. From simple, sturdy structures to highly specialized workbenches, these essential pieces of furniture provide a stable and versatile platform for a wide range of woodworking tasks.
The Purpose of a Woodworking Bench
A woodworking bench serves as the central hub of a workshop, providing a dedicated workspace for tasks like cutting, shaping, and assembling wood. It offers a stable and secure platform for clamping and holding workpieces, ensuring accuracy and precision during various woodworking operations.
Key Features and Components of a Woodworking Bench
The design and features of a woodworking bench can vary depending on its intended use and the preferences of the woodworker. However, certain key components are common to most woodworking benches:
- Top: The top of a woodworking bench is the primary working surface. It’s typically made of a durable hardwood, such as maple or beech, and often features a smooth, flat surface for planing and other operations.
- Base: The base of a woodworking bench provides stability and support. It can be constructed from various materials, including wood, metal, or a combination of both.
- Vise: A vise is a crucial component of a woodworking bench, allowing woodworkers to securely clamp workpieces in place. Vises come in various styles, including front, tail, and quick-release vises.
- Dog Holes: Dog holes are evenly spaced holes drilled into the top of the bench, allowing for the use of bench dogs to hold workpieces in place. Bench dogs are movable pegs that can be inserted into the dog holes to create a secure and adjustable clamping system.
- Workbench Accessories: Many woodworking benches are equipped with additional accessories, such as tool trays, storage drawers, and shelves, to enhance organization and functionality.
Types of Woodworking Benches
Woodworking benches come in a variety of designs, each tailored to specific needs and styles of woodworking. Understanding the different types helps you choose the right bench for your workshop and woodworking projects.
Traditional Woodworking Benches
Traditional woodworking benches are known for their robust construction and timeless design. They are typically made from solid wood, often with a thick top and sturdy legs. Traditional benches prioritize strength and stability, offering a solid platform for heavy-duty woodworking tasks.
Here are some common features of traditional woodworking benches:
- Heavy-duty construction: They are built to withstand the rigors of woodworking, with thick wood tops and sturdy legs.
- Vises: Traditional benches often incorporate one or two vises for securing workpieces. These vises are typically made from cast iron and provide a strong grip.
- Workbench dog holes: Bench dog holes are evenly spaced holes in the bench top that allow you to use bench dogs, which are wooden pegs used to secure workpieces in place.
- Simple design: Traditional benches are often designed with a focus on functionality and durability, rather than elaborate aesthetics.
Popular Traditional Woodworking Bench Designs
- Roubo Bench: This iconic bench, named after the 18th-century French cabinetmaker André Roubo, is a classic example of a traditional woodworking bench. It features a robust construction with a thick top, a large vise, and bench dog holes. The Roubo bench is renowned for its versatility and durability, making it a favorite among woodworkers.
- Sawbench: As the name suggests, this bench is designed specifically for sawing. It often has a narrower top and a vise located at the end for holding boards securely while sawing.
Modern Woodworking Benches
Modern woodworking benches often incorporate innovative features and materials, while still maintaining the core principles of stability and functionality. They are designed to meet the needs of contemporary woodworkers, often prioritizing ergonomics and versatility.
Key Features of Modern Woodworking Benches
- Lightweight construction: Some modern benches are made from lightweight materials, such as aluminum or composite wood, making them easier to move and adjust.
- Adjustable height: Modern benches often have adjustable legs, allowing woodworkers to customize the height to their comfort level.
- Integrated tools: Some modern benches incorporate integrated tools, such as a built-in sanding station or a power outlet, for added convenience.
- Modular design: Some modern benches are designed to be modular, allowing you to add or remove components as needed.
Popular Modern Woodworking Bench Designs
- Workbenches with integrated power tools: These benches combine the functionality of a traditional workbench with the convenience of integrated power tools. They often feature built-in power outlets, dust collection systems, and even integrated sanding stations. These benches are ideal for woodworkers who want a streamlined and efficient workspace.
- Mobile workbenches: These benches are designed to be easily moved around the workshop. They often have wheels or casters and can be folded or disassembled for storage. Mobile workbenches are perfect for woodworkers who need a flexible workspace.
Specialized Woodworking Benches
Specialized woodworking benches are designed for specific woodworking tasks or techniques. They often feature unique features that cater to the demands of these specialized applications.
Types of Specialized Woodworking Benches
- Turning benches: These benches are designed for woodturning. They feature a rotating headstock and a tailstock for securely holding the wood blank while turning.
- Shaving benches: These benches are designed for hand-plane work. They often have a smooth, flat top and a built-in shaving horse for holding the wood blank while planing.
- Cabinetmaker’s benches: These benches are designed for fine woodworking tasks, such as cabinetmaking. They often feature a narrower top and a more refined design, with features such as dovetail jigs and adjustable vises.
Essential Features and Accessories
A well-designed woodworking bench is more than just a flat surface; it’s a vital tool that provides stability, support, and functionality for a wide range of woodworking tasks. The essential features of a woodworking bench are carefully designed to ensure accuracy, efficiency, and safety during your projects.
Workbench Top
The workbench top is the primary work surface and plays a crucial role in supporting your workpieces. A sturdy and robust workbench top is essential for stability and durability. The top should be made from a durable material like solid wood, plywood, or a combination of both. It should also be flat and level to ensure accurate measurements and consistent results. Some benchtops are covered with a layer of phenolic resin, which provides a smooth, durable, and easy-to-clean surface.
Vise
A vise is a clamping device that securely holds workpieces in place, allowing for precise and controlled work. It is an essential feature of a woodworking bench, offering a variety of clamping options for different tasks.
Types of Vises
- Bench Vise: This is the most common type of vise, typically attached to the front edge of the workbench. Bench vises are available in various sizes and configurations, with different jaw widths and clamping forces. They are versatile and suitable for a wide range of woodworking projects.
- Tail Vise: A tail vise is mounted to the rear of the workbench and provides a secure hold for long workpieces. This type of vise is ideal for planing, sanding, and shaping long pieces of wood.
- Quick-Release Vise: These vises feature a lever mechanism that allows for quick and easy clamping and release. They are particularly useful for tasks that require frequent adjustments, such as drilling or routing.
- Parallel Vise: This type of vise ensures that the jaws remain parallel when clamping, making it suitable for precision work, such as joinery and assembly.
Leg Assembly
The leg assembly provides structural support and stability for the workbench. A sturdy and well-designed leg assembly is essential for a stable work surface that can withstand the forces of woodworking operations. The leg assembly can be made from various materials, including wood, metal, or a combination of both. Some woodworking benches have adjustable legs to ensure stability on uneven floors.
Accessories
Woodworking benches can be further enhanced with various accessories that improve functionality and organization.
- Tool Trays: Tool trays provide a dedicated space for storing and organizing tools, keeping them within easy reach during your projects. They are often mounted below the workbench top or on the side of the bench.
- Storage Drawers: Storage drawers offer a secure and organized space for storing tools, materials, and other supplies. They can be built into the workbench or added as separate units.
- Work Supports: Work supports are used to elevate and support workpieces, allowing for easier access and improved stability during operations like sanding, planing, or finishing. They can be fixed or adjustable, depending on the specific needs of the project.
- Outfeed Table: An outfeed table is a separate surface that is placed next to the workbench. It is used to support workpieces as they are pushed away from the workbench, providing a safe and stable platform for cutting and planing operations.
- Dust Collection System: A dust collection system helps to remove sawdust and other debris from the workbench and surrounding area. This improves air quality and keeps your workspace clean.
Building a Woodworking Bench

Building a woodworking bench from scratch can be a rewarding project, allowing you to customize the design and features to perfectly suit your needs. This guide will walk you through the steps involved in building a sturdy and functional woodworking bench.
Choosing Materials
The choice of materials for your woodworking bench is crucial for its strength, stability, and durability. Consider the following factors:
- Wood Species: Hardwoods like maple, oak, or cherry are known for their strength and durability, making them ideal for bench tops and legs. Softwoods like pine or fir can be used for less-stressed parts, such as the bench frame.
- Wood Thickness: For the bench top, a thickness of 2 inches or more is recommended for maximum stability and resistance to warping. The legs and frame can be made with 1.5-inch thick lumber.
- Fasteners: Use high-quality screws or bolts to secure the various components of the bench. Consider using wood glue for added strength and stability.
Design and Planning
Before you start cutting and assembling, carefully plan the design and dimensions of your bench. Consider the following:
- Bench Size: Determine the length and width of the bench that will fit comfortably in your workshop and accommodate your projects. A standard bench size is around 6 feet long and 2 feet wide.
- Bench Height: Adjust the height of the bench to your comfort level. A standard bench height is around 34 inches, but you can adjust it based on your height and the type of work you will be doing.
- Features: Decide on the features you want to include in your bench, such as a vise, a tool tray, or a dog hole system. Consider the specific tools and tasks you will be using the bench for.
Cutting the Lumber, Woodworking benches
Once you have your materials and design finalized, you can start cutting the lumber to the required sizes. It is recommended to use a table saw or chop saw for accurate cuts.
- Cutting List: Create a detailed cutting list for all the components of the bench, including the bench top, legs, frame, and any additional features.
- Measure Twice, Cut Once: Double-check your measurements before making each cut. It is much easier to correct a measurement error before cutting the lumber.
- Safety First: Always wear safety glasses and hearing protection when using power tools. Use a push stick to help guide the lumber through the saw.
Assembling the Bench
After cutting the lumber, you can start assembling the bench. The following steps Artikel a common method for assembling a woodworking bench:
- Assemble the Legs: Start by assembling the legs of the bench. Cut the legs to the desired height and attach them to the bench top using wood glue and screws or bolts. Make sure the legs are square and level before securing them.
- Build the Frame: Cut the frame pieces to the desired length and width. Attach the frame pieces to the legs using wood glue and screws or bolts. Ensure the frame is square and level before securing it.
- Attach the Bench Top: Once the frame is assembled, attach the bench top to the frame. Use wood glue and screws or bolts to secure the bench top to the frame. Make sure the bench top is level and flush with the frame before securing it.
- Add Features: After the main structure is assembled, you can add any desired features, such as a vise, tool tray, or dog hole system. Follow the manufacturer’s instructions for installing these features.
Finishing the Bench
Once the bench is assembled, you can finish it to your liking. Consider the following options:
- Sanding: Sand the bench thoroughly to smooth out any rough edges or imperfections. Use a variety of grits, starting with a coarse grit and finishing with a fine grit.
- Staining: If desired, stain the bench to enhance its natural beauty. Apply the stain evenly and allow it to dry completely.
- Sealing: Seal the bench with a clear finish, such as polyurethane or varnish, to protect it from scratches, water damage, and other wear and tear. Apply the sealant evenly and allow it to dry completely.
Using a Woodworking Bench
Your woodworking bench is more than just a place to put your tools and materials. It’s a vital part of your workshop, offering support, stability, and versatility for a wide range of woodworking tasks. Using it effectively and safely will enhance your woodworking experience and help you create beautiful and durable pieces.
Safety Practices
Safety should always be your top priority when working with woodworking tools. Your workbench can play a crucial role in ensuring a safe working environment.
- Secure your workpiece: Always use bench dogs and holdfasts to securely clamp your workpiece to the benchtop. This prevents the wood from shifting or moving while you’re working, reducing the risk of accidents.
- Avoid loose clothing or jewelry: Loose clothing or jewelry can easily get caught in moving machinery, leading to serious injuries. Wear snug-fitting clothing and remove any jewelry before operating power tools.
- Keep your work area clean: A cluttered work area can be a safety hazard. Clean up sawdust and debris regularly, and keep tools and materials organized.
- Use appropriate safety gear: Always wear safety glasses, hearing protection, and a dust mask when working with woodworking tools.
- Be aware of your surroundings: Pay attention to your surroundings and be mindful of potential hazards. Avoid distractions while working with power tools.
Utilizing Bench Features
Your workbench is designed with features that make woodworking easier and safer. Understanding how to use these features will significantly enhance your woodworking experience.
- Bench dogs: Bench dogs are metal or wooden pins that can be inserted into holes in the benchtop. They act as stops, providing a secure reference point for your workpiece and allowing you to clamp it securely.
- Holdfasts: Holdfasts are clamps that grip the benchtop and hold your workpiece in place. They are particularly useful for securing irregular-shaped pieces or for holding workpieces perpendicular to the benchtop.
- Vises: Vises are clamping devices that hold your workpiece securely in place. They come in various sizes and styles, and can be used for a wide range of woodworking tasks.
- Workbench top: The workbench top should be sturdy and flat, providing a stable surface for working. It’s also important to choose a material that is resistant to scratches and dents.
- Storage space: A good workbench will have storage space for tools, materials, and other supplies. This helps keep your workspace organized and efficient.
Work Organization and Efficiency
An organized workspace is essential for efficient woodworking. Here are some tips for maximizing your workbench’s functionality and keeping your work area organized:
- Use tool organizers: Tool organizers help keep your tools easily accessible and prevent them from getting lost or damaged. Consider using pegboards, tool trays, or magnetic strips to organize your tools.
- Create dedicated storage areas: Designate specific areas on your workbench for different types of materials, such as wood, hardware, and finishing supplies. This will help you find what you need quickly and easily.
- Keep your work area clean: Regularly clean up sawdust and debris, and wipe down your workbench with a damp cloth. A clean workspace is safer and more efficient.
- Plan your projects: Before starting a project, take some time to plan your steps and gather all the necessary tools and materials. This will help you avoid unnecessary delays and frustration.
Maintenance and Care
A well-maintained woodworking bench is a joy to work with. It will provide you with years of service if you take the time to care for it. This section covers essential maintenance and care techniques to keep your bench in top shape.
Cleaning Your Woodworking Bench
Regular cleaning is crucial for preventing dirt, dust, and debris from accumulating on your bench, which can damage the surface and make it difficult to work on. Here are some cleaning tips:
- Use a damp cloth to wipe down the surface of your bench after each use. This will remove any sawdust, shavings, or other debris.
- For tougher stains, you can use a mild soap and water solution. Avoid using harsh chemicals or abrasives that could damage the finish.
- Clean the vise jaws and other metal parts with a wire brush or a cloth dampened with mineral spirits.
- If your bench has a wooden top, you can apply a light coat of oil or wax to help protect the surface.
Refinishing Your Woodworking Bench
Over time, the finish on your woodworking bench may become worn or damaged. Refinishing the bench can restore its appearance and protect the wood.
- Before refinishing, clean the bench thoroughly and remove any old finish using sandpaper or a chemical stripper.
- Sand the bench with progressively finer grits of sandpaper to create a smooth surface.
- Apply a new finish, such as oil, varnish, or polyurethane, following the manufacturer’s instructions.
- Allow the finish to dry completely before using the bench.
Repairing Common Wear and Tear
Even with proper care, your woodworking bench may experience wear and tear over time. Here are some common repairs:
- Loose screws: Tighten loose screws with a screwdriver.
- Cracked or chipped wood: Repair small cracks or chips with wood filler. For larger repairs, consider using a wood patch or replacing the damaged section.
- Worn vise jaws: Replace worn vise jaws with new ones.
- Damaged legs or supports: Repair or replace damaged legs or supports as needed.
Storing Your Woodworking Bench
Proper storage can help to extend the life of your woodworking bench.
- If you are storing your bench for an extended period, cover it with a dust cover or tarp to protect it from dust and moisture.
- Store the bench in a dry, well-ventilated area to prevent mold and mildew growth.
- If possible, elevate the bench off the floor to prevent moisture from damaging the legs or supports.
Woodworking Bench Styles

Woodworking benches come in various styles, each designed to suit different woodworking needs and preferences. The choice of bench style depends on factors such as the type of woodworking you intend to do, the space available, and your budget.
Bench Styles
Here’s a table that Artikels the key features, advantages, and disadvantages of various woodworking bench styles:
| Style | Key Features | Advantages | Disadvantages |
|---|---|---|---|
| Traditional Workbench |
|
|
|
| Roubo Bench |
|
|
|
| Sawbench |
|
|
|
| Mobile Workbench |
|
|
|
| Folding Workbench |
|
|
|
Historical Context and Evolution
Woodworking benches have evolved over centuries, adapting to changing tools, techniques, and materials. The traditional workbench, with its sturdy construction and versatile features, has been a mainstay in woodworking for centuries. The Roubo bench, inspired by the work of André-Jacob Roubo, exemplifies the evolution of workbench design in the 18th century, emphasizing stability and precision. Sawbenches emerged as specialized benches for sawing tasks, while the advent of portable and folding benches addressed the need for space-saving and mobile woodworking solutions.
Woodworking benches are a must-have for any serious woodworker, providing a stable and sturdy platform for all your projects. They come in all shapes and sizes, and you can even build your own! If you’re just starting out, there are tons of resources online to help you learn the basics of woodworking , from choosing the right tools to understanding different wood types.
Once you’ve mastered the fundamentals, a well-built bench will be your constant companion as you tackle increasingly complex projects.
Woodworking Bench Projects: Woodworking Benches
A woodworking bench is a versatile tool that can be used to complete a wide range of projects, from simple to complex. It provides a stable and secure platform for working on wood, allowing you to cut, shape, and assemble pieces with precision.
Simple Woodworking Project: Cutting Board
A cutting board is a practical and useful project that can be completed using a woodworking bench. It’s a great way to practice basic woodworking techniques and learn how to use your bench effectively.
Materials
- A piece of hardwood, such as maple, cherry, or walnut, measuring approximately 12″ x 18″ x 1″ thick.
- Wood glue
- Wood finish (optional)
- Sandpaper (various grits)
Tools
- Hand saw or table saw
- Planer (optional)
- Jointer (optional)
- Chisel
- Hammer
- Clamps
- Measuring tape
- Pencil
Steps
- Cut the wood to size: Use a hand saw or table saw to cut the hardwood to the desired dimensions (12″ x 18″).
- Plane the surface: If necessary, use a planer to smooth out any rough spots on the surface of the wood. This will ensure a flat and even surface for cutting.
- Joint the edges: Use a jointer to create straight and parallel edges. This is important for ensuring that the cutting board is square and stable.
- Sand the surface: Sand the surface of the cutting board with sandpaper, starting with a coarse grit and gradually moving to a finer grit. This will create a smooth and even surface for cutting.
- Apply a wood finish: (Optional) Apply a wood finish, such as oil or varnish, to protect the cutting board and enhance its appearance.
Tips
- Choose hardwood: Hardwood is more durable and resistant to scratches and cuts than softwood. Maple, cherry, and walnut are popular choices for cutting boards.
- Use a sharp saw: A sharp saw will make cutting easier and more precise.
- Use clamps to secure the wood: Clamps will keep the wood stable and prevent it from moving while you are working on it.
- Sand with the grain: Sanding with the grain will create a smoother surface and prevent scratches.
- Apply a food-safe finish: If you plan to use the cutting board for food, make sure to use a food-safe finish.
Resources and Inspiration
Finding the right resources and inspiration can be a game-changer for woodworking enthusiasts. Whether you’re a seasoned craftsman or just starting out, exploring the wealth of information available can elevate your woodworking journey.
Recommended Books
Books provide a deep dive into woodworking techniques, history, and design. Here are a few highly recommended titles:
- The Complete Illustrated Guide to Woodworking by Bruce Hoad: This comprehensive guide covers everything from basic tools to advanced techniques, making it a valuable resource for beginners and experienced woodworkers alike.
- The Workbench Book by Scott Landis: This book offers a detailed exploration of workbench design, construction, and customization, with step-by-step instructions and insightful tips.
- Woodworking for Mere Mortals by Bob Lang: A humorous and practical guide that demystifies woodworking for those new to the craft, making it an excellent choice for beginners.
Informative Websites
Websites offer a vast array of woodworking information, tutorials, and communities. Here are some notable online resources:
- Woodworking for Mere Mortals: This website, accompanying the book, provides a wealth of free resources, including articles, videos, and project plans.
- Fine Woodworking: A renowned magazine and website featuring in-depth articles, project plans, and expert advice on woodworking techniques and design.
- Popular Woodworking: Another leading woodworking publication offering a mix of articles, project plans, and product reviews, catering to both beginners and experienced woodworkers.
Online Communities
Joining online communities can connect you with fellow woodworkers, share ideas, and seek advice. Here are some popular forums and social media groups:
- Woodworking.org: A vibrant forum with discussions on various woodworking topics, project ideas, and tool reviews.
- Reddit’s r/woodworking: A lively online community where woodworkers share their projects, ask questions, and engage in discussions.
- Facebook Groups: Several Facebook groups dedicated to woodworking offer a platform for sharing projects, asking questions, and connecting with fellow woodworkers.
Inspiring Bench Designs
Renowned craftspeople and workshops often showcase exceptional woodworking bench designs. Here are a few examples:
- Chris Schwarz’s “The Anarchist’s Workbench”: A well-respected and highly functional workbench design known for its simplicity and robust construction. This bench is often praised for its versatility and durability.
- Paul Sellers’s “Roubo Bench”: A classic workbench design based on the work of André Roubo, a renowned 18th-century French cabinetmaker. This bench features a sturdy construction with a variety of work surfaces and accessories.
- The “Workbench Chronicles” by Tage Frid: Tage Frid, a renowned woodworker, designed a series of workbench plans that emphasize functionality and durability. These plans are often considered a valuable resource for aspiring bench builders.
Manufacturers and Suppliers
Several manufacturers and suppliers specialize in woodworking bench components and accessories. Here are a few reputable options:
- Woodcraft: A leading supplier of woodworking tools, materials, and accessories, including workbench components and hardware.
- Rockler Woodworking: Another reputable supplier offering a wide range of woodworking tools, materials, and project plans, with a focus on bench-building components.
- Lee Valley Tools: Known for its high-quality tools and woodworking supplies, Lee Valley also offers a selection of workbench components and accessories.
Conclusive Thoughts

The world of woodworking benches is rich with history, innovation, and endless possibilities. By understanding the principles of design, construction, and use, you can unlock the full potential of your workbench and elevate your woodworking experience. From simple projects to complex creations, a well-chosen and well-maintained woodworking bench is an invaluable asset for any woodworker, offering a solid foundation for years of creative endeavors.
Key Questions Answered
What are the most common types of woodworking benches?
The most common types include traditional benches, modern benches, and specialized benches designed for specific tasks like metalworking or cabinetmaking.
What are the essential features of a woodworking bench?
Essential features include a sturdy top, a vise, and a leg assembly. Other features like tool trays, storage drawers, and work supports enhance functionality.
What materials are typically used for woodworking benches?
Common materials include wood, metal, and composites. The choice depends on the intended use, durability requirements, and personal preferences.
