Hey there, aspiring video wizards! Ready to turn your raw footage into cinematic masterpieces? This guide’s got you covered, breaking down Adobe Premiere Pro 2023 like it’s your favorite viral video. We’re diving deep, from the basics to the pro-level stuff, with easy-to-follow steps and tips that’ll have you editing like a boss in no time.
So grab your coffee (or maybe some energy drinks, because editing can get intense!), and let’s get this show on the road.
This guide is your all-access pass to mastering Premiere Pro. We’ll walk you through everything from setting up your workspace to creating smooth transitions, adding effects, and even mastering your audio. Whether you’re a newbie or a seasoned editor looking to level up, we’ve got the knowledge to fuel your creative fire.
Getting Started with Adobe Premiere Pro 2023
Premiere Pro is a powerful video editing software used by professionals and enthusiasts alike. This guide will walk you through the basics of using Premiere Pro, helping you create stunning videos with ease.
The Premiere Pro Interface
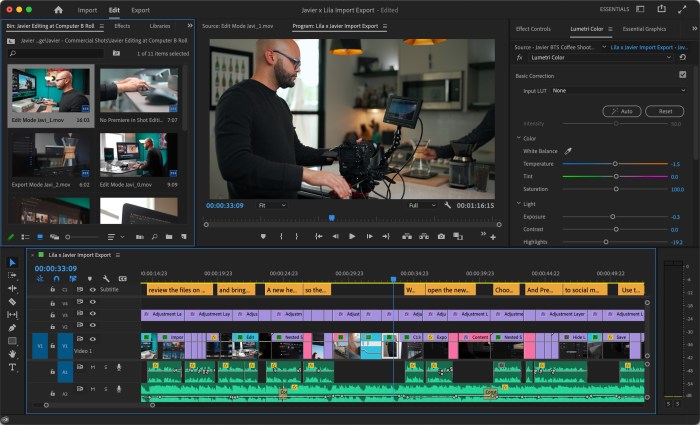
The Premiere Pro interface is designed to be intuitive and efficient. The main components of the interface are:
- Media Browser:This panel is where you’ll import and organize your media files. You can browse through folders, drag and drop files, and even preview clips before you add them to your project.
- Project Panel:This panel is where you’ll see all the assets of your project, including your media files, sequences, and effects. You can easily navigate and manage your project assets in this panel.
- Timeline:This is the heart of Premiere Pro. It’s where you’ll assemble your video clips, add transitions, and apply effects. The timeline is divided into tracks, each representing a different layer of your video.
- Source Monitor:This panel displays the current clip you have selected in the project panel. You can use this to preview your clips, trim them, and make other edits.
- Program Monitor:This panel shows the output of your timeline. You can use this to preview your video as you’re editing, and to make sure everything is looking the way you want it to.
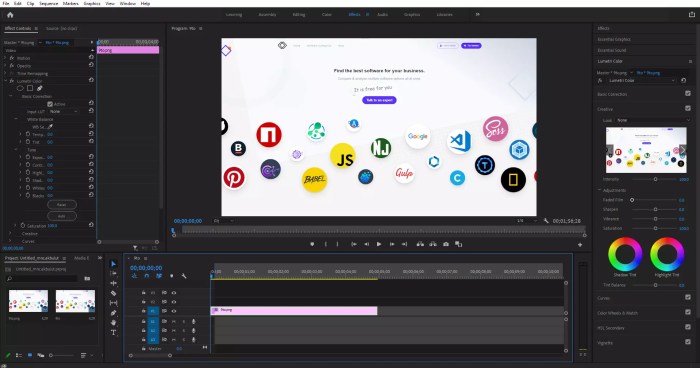
- Effects Panel:This panel is where you’ll find all the effects that Premiere Pro has to offer. You can use these effects to add visual flair to your videos, or to correct problems with your footage.
Importing Media Files
Before you can start editing your video, you need to import your media files into Premiere Pro. Here’s how:
- Open Premiere Pro: Launch the Premiere Pro application.
- Create a New Project:You’ll be greeted with a welcome screen. Click “New Project” to start a new project. You can choose a template or create a custom project by selecting “Create New Project.”
- Navigate to the Media Browser:Look for the “Media Browser” panel in the left sidebar. You can use the “Media Browser” to locate and import your media files.
- Import Files:Locate your media files (videos, images, audio files) and drag and drop them into the “Media Browser.” Alternatively, you can click the “Import” button and select the files from your computer.
Creating a New Project
Creating a new project in Premiere Pro sets up the foundation for your video editing process. Here’s a breakdown:
- Project Settings:When you create a new project, you’ll be prompted to set up the project’s settings. These settings define the video’s resolution, frame rate, and audio format. Choose the appropriate settings for your project based on your video’s requirements. For example, if you’re editing a YouTube video, you’ll likely choose a 1080p resolution with a 29.97 fps frame rate.
- Scratch Disk:Premiere Pro uses temporary files to store project data during editing. Choose the appropriate location for your “Scratch Disk” to ensure smooth performance and avoid storage issues.
- Project Name and Location:Give your project a descriptive name and choose a location to save it on your computer.
Setting Up the Timeline
The timeline is where you’ll arrange your video clips, add transitions, and apply effects. Here’s how to set up your timeline:
- Create a New Sequence:From the “Project Panel,” select the media files you want to use in your video and drag them to the “Timeline” panel. Premiere Pro will automatically create a new sequence based on the selected media files.
- Add More Tracks:If you need to add more layers to your video, you can add additional tracks to the timeline. To do this, right-click on an existing track and select “Add Track” or “Add Video Track.”
- Arrange Clips:Drag and drop your video clips onto the different tracks in the timeline. You can arrange them in any order you want.
Navigating the Workspace Efficiently
Here are some tips to navigate the Premiere Pro workspace more efficiently:
- Keyboard Shortcuts:Utilize keyboard shortcuts to speed up your workflow. Premiere Pro offers a wide range of shortcuts for common tasks, such as playback controls, editing tools, and effects.
- Use the “Shift” Key:Hold down the “Shift” key while selecting multiple clips to move them together. This is useful for rearranging multiple clips at once.
- Zoom In and Out:Use the scroll wheel on your mouse or the “+” and “-” keys to zoom in and out on the timeline. This helps you focus on specific areas of your video.
- Customize Workspaces:Premiere Pro allows you to customize your workspace by rearranging panels and creating custom workspaces for different types of projects. This can help you optimize your workflow and improve efficiency.
Essential Editing Techniques

Alright, so you’ve got your footage in Premiere Pro, but now what? Time to get your hands dirty with the essential editing techniques that’ll turn your raw clips into a polished masterpiece. We’re talking about the building blocks of video editing, like trimming, cutting, and pasting clips, as well as adding transitions, effects, and audio mixing.
Get ready to unleash your inner editor!
Trimming, Cutting, and Pasting Clips
Trimming, cutting, and pasting are the fundamental skills you’ll use to shape your video. It’s like editing a movie, but instead of using a film reel, you’re working with digital clips.* Trimming:This is the process of shortening a clip. It’s like getting rid of the boring parts, like that awkward silence in your interview or the outtakes where you messed up your lines.
You can trim clips by dragging the edges of the clip in the timeline or by using the razor tool.
Cutting
Cutting is like taking a pair of scissors to your video. You’re removing a portion of the clip, like that part where your friend’s cat jumps on the table and steals your sandwich. To cut a clip, use the razor tool and click on the point in the clip where you want to make the cut.
Pasting
Pasting is the opposite of cutting. It’s like taking a piece of video and adding it back into your timeline. Imagine you’ve cut out a funny scene from your video, but you want to use it later. You can paste it back in at a different spot.
To paste a clip, simply drag the cut clip from the project panel to the timeline.
Transitions
Transitions are like the smooth connections between your video clips, making your video flow seamlessly. Imagine them as the bridges between different scenes, keeping the viewer engaged. Premiere Pro offers a variety of transitions, from basic fades to more complex effects.* Fade In/Out:These are the most basic transitions.
A fade in gradually brings a clip into view, while a fade out slowly fades it out. They’re like the opening and closing credits of a movie.
Cross Dissolve
This transition blends two clips together, creating a smooth transition. Imagine it like a slow, blurry shift from one scene to the next.
Wipe
This transition is like a curtain being drawn across the screen, revealing the next clip. Think of it like a quick, sharp transition.
Effects
Effects are like adding spices to your video, enhancing the visual appeal and adding creative flair. Premiere Pro offers a wide range of effects, from simple color adjustments to more advanced special effects.* Color Correction:Adjusting the color of your video can make it look more vibrant and appealing.
Imagine fixing the lighting in your video so that everything looks just right.
Sharpen
Sharpening your video can make it look more crisp and detailed. Think of it like giving your video a good dose of caffeine.
Motion Blur
Want to edit like a pro? “Adobe Premiere Pro 2023 An Illustrated Step-By-Step Guide for Beginners” is your go-to for mastering the basics. Need some inspiration? Check out the dialogue in “Succession Season One The Complete Scripts” Succession Season One The Complete Scripts and see how the writers craft those epic power plays.
You’ll be editing your own “Royco” worthy scenes in no time!
Adding motion blur can make your video look more realistic, especially when you have fast-moving objects. It’s like a blur effect that makes it look like things are moving quickly.
Audio Mixing
Audio mixing is like creating the soundtrack for your video. You can adjust the volume of your audio clips, add music, and even use sound effects to enhance your video.* Volume Adjustment:Adjusting the volume of your audio clips can make them sound clearer or more powerful.
Yo, wanna level up your video editing game? “Adobe Premiere Pro 2023 An Illustrated Step-By-Step Guide for Beginners” is your ultimate cheat sheet. It’s like having a pro editor whisper in your ear, showing you the ropes. Want a sneak peek at the secrets?
Download And Listen Here and get ready to make your videos pop like a TikTok trend! This guide’s got you covered, from basic cuts to crazy effects, so you can turn your raw footage into a masterpiece.
It’s like turning up the volume on your favorite song.
Adding Music
Music can set the mood for your video, making it more engaging and emotional. Imagine adding a catchy tune to your travel vlog or a dramatic score to your action video.
Sound Effects
Sound effects can add realism to your video or create a sense of humor. Imagine adding the sound of a car horn to a scene where someone is honking their car.
Sample Project: A Day in the Life
Let’s create a simple project to showcase these techniques. Imagine you’re creating a short video about your day.* Footage:Start with clips of different parts of your day, like waking up, having breakfast, going to work, and spending time with friends.
Trimming
Trim each clip to remove any unnecessary parts.
Cutting and Pasting
Cut out the boring parts and paste in the most interesting moments.
Transitions
Add fade-in and fade-out transitions to create a smooth flow between clips.
Effects
Use color correction to enhance the colors in your video and add motion blur to clips of fast-moving objects.
Audio Mixing
Add a background music track to set the mood, and adjust the volume of your audio clips to ensure everything is balanced.
Advanced Features and Workflow

Now that you’ve got the basics down, it’s time to level up your Premiere Pro game! Let’s dive into some of the more advanced features that will take your video editing skills to the next level.
Color Grading
Color grading is the art of adjusting the colors in your video to create a specific mood or look. It’s a powerful tool that can transform your footage from bland to breathtaking.
- Premiere Pro offers a wide range of color grading tools, including curves, color wheels, and Lumetri Color panels.
- Start by adjusting the overall brightness and contrast of your footage.
- Then, fine-tune the individual color channels (red, green, blue) to achieve the desired look.
- Experiment with different color grading presets to see what works best for your project.
Motion Graphics
Motion graphics are animated elements that can add visual interest and dynamism to your videos. Premiere Pro has a built-in motion graphics engine that lets you create everything from simple text animations to complex 3D effects.
- The Essential Graphics panel provides a user-friendly interface for creating and editing motion graphics.
- Use the built-in templates or create your own from scratch.
- Experiment with different animation styles, such as keyframing, easing, and transitions.
- You can also import motion graphics from other applications, such as After Effects.
Audio Mastering
Audio mastering is the final stage of audio production, where you optimize the overall sound quality of your video. This involves adjusting the volume, equalization, and dynamics to create a professional-sounding audio track.
- Premiere Pro includes a powerful audio mixer that lets you control the volume and effects of each audio track.
- Use the built-in EQ and dynamics processors to enhance the clarity and impact of your audio.
- Consider using external audio mastering software for more advanced audio editing tasks.
Keyboard Shortcuts
Keyboard shortcuts are your secret weapon for speeding up your workflow in Premiere Pro. They allow you to perform common editing tasks quickly and efficiently, without having to reach for the mouse.
- Learn the most important keyboard shortcuts for your editing tasks.
- Create custom keyboard shortcuts to suit your workflow.
- Use the keyboard shortcuts reference guide for a comprehensive list of shortcuts.
Project Organization and File Management
A well-organized project is a happy project! Keeping your files organized will make it easier to find what you need, avoid errors, and ensure that your project runs smoothly.
- Create a clear folder structure for your project files.
- Use descriptive file names to make it easy to identify different files.
- Back up your project files regularly to avoid losing your work.
Book Review
Premiere Pro is a powerful video editing software, and there are plenty of resources available to help you learn how to use it. But which one is right for you? One popular choice is “Adobe Premiere Pro 2023: The Complete Guide” by [Author Name], a comprehensive guide that covers everything from the basics to advanced techniques.This book is a great resource for beginners who are looking for a step-by-step guide to learning Premiere Pro.
It’s also a good choice for more experienced editors who want to learn about the latest features in Premiere Pro 2023.
Strengths
The book’s strengths lie in its detailed explanations, clear visuals, and practical exercises. The author takes a step-by-step approach, making it easy to follow along and learn new concepts. The book is also packed with helpful tips and tricks that can save you time and improve your workflow.
Weaknesses
The book can be overwhelming for some beginners, as it covers a wide range of topics. It also relies heavily on screenshots, which can make it difficult to follow along if you’re not familiar with the Premiere Pro interface.
Comparison with Other Resources
Compared to other resources, “Adobe Premiere Pro 2023: The Complete Guide” offers a more comprehensive approach to learning Premiere Pro. Online tutorials and courses often focus on specific techniques or workflows, while this book provides a more complete overview of the software.
Yo, so you wanna learn how to edit videos like a pro? “Adobe Premiere Pro 2023 An Illustrated Step-By-Step Guide for Beginners” is your jam, dude. It’s like the “The Teachings of Don Juan A Yaqui Way of Knowledge” for video editing – The Teachings of Don Juan A Yaqui Way of Knowledge – but with way less peyote and more transitions.
You’ll be cutting and pasting like a boss in no time.
However, online resources often provide more up-to-date information, as the software is constantly evolving.
Target Audience
This book is best suited for beginners and intermediate users who want a comprehensive guide to Premiere Pro. If you’re an experienced editor who is already familiar with the software, you may find this book to be too basic.
So you wanna level up your video editing game with Adobe Premiere Pro 2023? It’s like the ultimate cheat code for creating epic content, but if you’re a newbie, it can feel like you’re trying to decipher ancient hieroglyphics.
Don’t sweat it! Think of it like learning to draw, but instead of characters, you’re working with video clips and sound effects. If you’re looking to master the art of drawing, check out How to Draw Manga and Anime Including Unique Characters Basic Drawing Guide For Kids Teens and Adults To Becoming a Pro at all Things Anime , and you’ll be on your way to creating some seriously awesome visuals.
Once you’ve got the drawing skills down, you can take your video editing to the next level with Premiere Pro. It’s all about mastering the tools and techniques, and before you know it, you’ll be making videos that are so good, people will be saying, “OMG, that’s FIRE!”
Practical Applications
The book’s practical exercises are a great way to reinforce what you’ve learned. They’re also a good way to get familiar with the Premiere Pro interface and learn how to apply different techniques in a real-world setting.
Concluding Remarks

So, you’ve got the tools, the know-how, and the passion – now it’s time to let your creativity shine! Premiere Pro is your playground, so get out there and experiment. Create, edit, and share your vision with the world.
And remember, if you ever get stuck, this guide is your trusty sidekick, ready to help you conquer any editing challenge. Happy editing!
Answers to Common Questions
Is Premiere Pro difficult to learn?
Not at all! Premiere Pro is designed to be user-friendly, with a clear interface and tons of helpful tutorials. You’ll pick up the basics quickly, and with practice, you’ll become a pro in no time.
Do I need a powerful computer to use Premiere Pro?
Premiere Pro runs smoothly on a decent computer, but for more complex projects, you’ll definitely want a machine with a powerful processor, plenty of RAM, and a good graphics card.
What are some good resources for learning Premiere Pro beyond this guide?
Adobe offers a wealth of resources on their website, including tutorials, online courses, and a helpful community forum. You can also find tons of great content on YouTube and other online learning platforms.

