Build your own furniture plans offer a rewarding way to transform your home and create unique pieces that reflect your personal style. From simple shelves to intricate tables, the possibilities are endless when you embrace the DIY spirit. The satisfaction of crafting something with your own hands is unmatched, and the process itself can be both enjoyable and empowering.
Whether you’re a seasoned woodworker or a curious beginner, this guide will equip you with the knowledge and resources to embark on your own furniture-building journey. We’ll explore everything from choosing the right plans to selecting materials, mastering essential tools, and achieving professional-looking finishes. Get ready to unleash your creativity and turn your furniture dreams into reality.
Introduction to DIY Furniture
Building your own furniture has become increasingly popular in recent years, with many people opting for the satisfaction and cost-effectiveness of crafting their own pieces. There are many reasons why individuals choose to embark on DIY furniture projects, ranging from a desire for unique and personalized pieces to a passion for woodworking and a drive to save money.
Benefits of Building Your Own Furniture
Building your own furniture offers numerous benefits, including:
- Customization: You have complete control over the design, size, materials, and finishes, allowing you to create pieces that perfectly suit your needs and style.
- Cost Savings: Building your own furniture can be significantly cheaper than purchasing ready-made pieces, especially if you utilize reclaimed or salvaged materials.
- Personal Satisfaction: There’s a sense of accomplishment and pride in creating something with your own hands, and the process itself can be a rewarding and enjoyable experience.
- Skill Development: Building furniture requires various skills, such as woodworking, measuring, and using tools, which can be learned and honed over time.
- Unique Pieces: You can create one-of-a-kind pieces that reflect your personality and style, making your home truly unique.
Finding the Right Plans
You’ve decided to take the plunge into DIY furniture, and you’re ready to build something amazing! But before you start sawing and hammering, you need to find the perfect furniture plans. Choosing the right plans can make all the difference in your success and enjoyment of the project.
Choosing Plans Based on Your Skill Level
The first step is to honestly assess your skill level. Are you a seasoned woodworker or a complete beginner? Choosing plans that match your abilities will ensure a positive experience.
- Beginner: Start with simple projects like a small shelf or a stool. These plans typically involve basic cuts, straightforward assembly, and minimal tools.
- Intermediate: Once you’ve gained some experience, you can tackle more complex projects like a coffee table or a simple chair. These plans may involve more intricate cuts, joinery techniques, and potentially some power tools.
- Advanced: If you’re a seasoned woodworker, you can explore challenging projects like a dining table or a custom-built bookcase. These plans often require advanced joinery, specialized tools, and a deep understanding of woodworking techniques.
Types of Furniture Plans
There are various types of furniture plans available, each with its own advantages and disadvantages.
- Free Plans: Many websites and blogs offer free furniture plans. These plans can be a great starting point, but they may lack detailed instructions or professional-level quality.
- Paid Plans: Paid plans are typically more comprehensive and detailed, offering professional-quality instructions and often include detailed cut lists and material lists. These plans can be a worthwhile investment if you want to ensure success and avoid costly mistakes.
- Plan Books: Furniture plan books offer a curated collection of plans on a specific theme or skill level. They provide a tangible resource and can be a valuable addition to your woodworking library.
- Online Subscription Services: Some websites offer subscription services that provide access to a vast library of furniture plans. These services can be cost-effective if you plan to build multiple projects.
Considering Material Requirements and Tools
Once you’ve found a plan that interests you, carefully review the material requirements and tool list.
- Materials: Ensure you have access to the required materials, such as wood, hardware, and finishes. Consider the cost of materials and whether you can source them locally or need to order them online.
- Tools: Make sure you have the necessary tools for the project. If you don’t have a particular tool, consider whether it’s worth investing in or if you can rent it for the project.
Choosing Materials
Choosing the right materials is crucial for a successful furniture building project. The quality of your materials will directly impact the durability, aesthetics, and overall success of your project. This section will guide you through selecting the best wood types, hardware, and finishes for your furniture project.
Wood Types
Wood is the heart of most furniture projects. Different wood types have unique characteristics that make them suitable for specific furniture styles and uses.
- Hardwoods: Hardwoods are known for their strength, durability, and beautiful grain patterns. They are ideal for furniture that will receive heavy use, such as tables, chairs, and cabinets. Popular hardwood choices include oak, maple, cherry, walnut, and mahogany.
- Softwoods: Softwoods are generally less expensive and easier to work with than hardwoods. They are often used for furniture that requires lighter construction, such as shelves, bookcases, and smaller pieces. Common softwood choices include pine, cedar, fir, and spruce.
When choosing a wood type, consider the following factors:
- Durability: Hardwoods are more resistant to scratches, dents, and wear and tear. Softwoods are more susceptible to damage.
- Aesthetics: Each wood type has a unique grain pattern and color. Choose a wood that complements the style of your furniture.
- Cost: Hardwoods are generally more expensive than softwoods. Consider your budget and the type of furniture you are building.
- Availability: Certain wood types may be more readily available in your area than others. Check with local lumberyards or online retailers.
Hardware and Finishes
Hardware and finishes add the finishing touches to your furniture project.
- Hardware: This includes hinges, drawer slides, knobs, pulls, and other functional components. Choose hardware that is durable, aesthetically pleasing, and appropriate for the style of your furniture.
- Finishes: Finishes protect the wood from damage and enhance its natural beauty. Popular finish options include paint, stain, varnish, and oil.
When selecting hardware and finishes, consider:
- Style: Choose hardware and finishes that complement the style of your furniture.
- Durability: Select hardware and finishes that will withstand wear and tear.
- Ease of Application: Some finishes are easier to apply than others. Choose a finish that you are comfortable working with.
Sourcing Materials
You can source materials from local stores or online retailers.
- Local Stores: Lumberyards, hardware stores, and home improvement centers offer a wide variety of wood types, hardware, and finishes. Visiting these stores allows you to see and feel the materials before purchasing them.
- Online Retailers: Online retailers offer a vast selection of materials, often at competitive prices. However, you cannot physically inspect the materials before purchasing them.
When sourcing materials, consider the following:
- Quality: Ensure that the materials you choose are of high quality and meet your project’s requirements.
- Price: Compare prices from different retailers to find the best deals. Consider shipping costs if ordering online.
- Availability: Check the availability of the materials you need before purchasing them.
- Customer Service: Choose retailers with a reputation for excellent customer service.
Essential Tools and Equipment

Building furniture requires a set of essential tools and equipment. These tools are vital for accurate measurements, precise cuts, and safe assembly. Knowing which tools are necessary and how to use them safely is crucial for a successful project.
Measuring Tools
Accurate measurements are the foundation of any woodworking project. The following tools help ensure precise measurements for cutting and assembling furniture pieces.
- Measuring Tape: A measuring tape is essential for taking accurate measurements of materials and furniture components. It features a retractable metal blade with markings in inches or centimeters, making it easy to measure lengths and distances.
- Ruler: A ruler is a straight, flat tool with markings along its edge. It’s ideal for measuring shorter lengths and checking the accuracy of cuts.
- Combination Square: This tool combines a ruler with a protractor and a miter head. It helps measure lengths, angles, and check for squareness.
- T-Bevel: A T-bevel is used to transfer angles from one piece of wood to another. It has a blade that can be adjusted to match any angle.
Cutting Tools
Cutting tools are essential for shaping and sizing wood for furniture construction.
- Hand Saw: A hand saw is a basic tool for cutting wood. It features a blade with teeth that cut through the wood as you push and pull.
- Circular Saw: A circular saw is a power tool with a rotating blade that cuts through wood. It’s ideal for making straight cuts and can be used for ripping and crosscutting.
- Jigsaw: A jigsaw is a power tool with a reciprocating blade that cuts curved and intricate shapes in wood.
- Table Saw: A table saw is a stationary power tool with a rotating blade that cuts wood precisely. It’s used for ripping and crosscutting, and can be used to make accurate cuts for joints and other features.
Drilling Tools
Drilling tools are used to create holes in wood for assembling furniture, attaching hardware, and other purposes.
- Drill Press: A drill press is a stationary power tool with a rotating drill bit that creates precise holes in wood. It’s ideal for creating consistent holes at specific depths.
- Cordless Drill: A cordless drill is a portable power tool that offers versatility for drilling and driving screws. It’s ideal for drilling holes in wood, metal, and plastic.
Joining and Fastening Tools
Joining and fastening tools are used to secure furniture pieces together.
- Clamps: Clamps are used to hold wood pieces together while glue dries or during assembly. They come in various sizes and types, including bar clamps, C-clamps, and spring clamps.
- Screwdriver: A screwdriver is used to drive screws into wood. They come in various sizes and types, including Phillips, flathead, and Torx.
- Hammer: A hammer is used to drive nails into wood. It has a head with a striking face and a handle for grip.
- Nail Gun: A nail gun is a power tool that drives nails into wood quickly and efficiently. It uses compressed air or a battery to drive nails.
Finishing Tools
Finishing tools are used to prepare and apply finishes to furniture.
- Sandpaper: Sandpaper is used to smooth and even out wood surfaces. It comes in various grits, with finer grits for smoother finishes.
- Sander: A sander is a power tool that uses sandpaper to smooth wood surfaces quickly. It comes in various types, including belt sanders, random orbit sanders, and palm sanders.
- Paintbrush: A paintbrush is used to apply paint, stain, or varnish to wood surfaces. They come in various sizes and shapes, depending on the application.
- Roller: A roller is used to apply paint or stain to large surfaces. It has a roller head with a cover that’s dipped in paint or stain.
Safety Precautions
Using woodworking tools requires caution to prevent injuries.
- Wear Safety Glasses: Always wear safety glasses when using woodworking tools to protect your eyes from flying debris.
- Use Hearing Protection: Power tools can generate loud noises, so wear earplugs or earmuffs to protect your hearing.
- Keep Tools Sharp: Sharp tools are safer than dull tools because they require less force to use. Keep your tools sharp and in good working condition.
- Use a Dust Mask: Woodworking can generate dust, so wear a dust mask to protect your lungs.
- Keep Work Area Clean: A clean and organized work area reduces the risk of tripping or falling.
- Be Aware of Your Surroundings: Always be aware of your surroundings and the people around you when using woodworking tools.
Building Techniques
Building furniture is a rewarding experience, but it requires understanding and mastering various woodworking techniques. These techniques ensure the furniture is strong, durable, and aesthetically pleasing.
Common Woodworking Techniques
Woodworking techniques are the foundation of furniture construction. They determine the strength, stability, and appearance of the finished product. Here are some common techniques:
- Cutting: Cutting wood to precise dimensions is essential. Common cutting tools include saws (hand saws, circular saws, miter saws), chisels, and planers.
- Joining: Joining wood pieces together is crucial for creating furniture. Common joining methods include:
- Butt Joint: This simple joint joins two pieces of wood end-to-end, often reinforced with glue and screws or nails.
- Dado Joint: This joint creates a groove in one piece of wood to accommodate the edge of another piece, providing a strong and flush connection.
- Mortise and Tenon Joint: This traditional joint creates a strong, interlocking connection. A tenon is a projection on one piece of wood that fits into a mortise, a hole in the other piece.
- Dovetail Joint: This intricate joint is known for its strength and decorative appeal. It features interlocking, tapered pins and slots that create a secure and visually pleasing connection.
- Finishing: Finishing wood protects it from damage and enhances its appearance. Common finishing techniques include:
- Sanding: Sanding smooths out the wood surface and prepares it for finishing.
- Staining: Staining adds color and highlights the wood’s grain.
- Painting: Painting provides a durable and decorative finish.
- Varnishing: Varnishing creates a protective and glossy finish.
Basic Woodworking Joints
Understanding and mastering basic woodworking joints is essential for building furniture. Here are some step-by-step instructions for common joints:
Butt Joint
- Step 1: Cut the two pieces of wood to the desired length and width. Ensure the ends are square and flush.
- Step 2: Apply wood glue to the end of one piece of wood.
- Step 3: Align the two pieces of wood and clamp them together. Apply pressure evenly to ensure a tight bond.
- Step 4: Allow the glue to dry completely before removing the clamps.
- Step 5: Optional: Reinforce the joint with screws or nails.
Dado Joint, Build your own furniture plans
- Step 1: Cut a groove, or dado, in one piece of wood using a dado blade or a router.
- Step 2: Ensure the dado is the same width and depth as the thickness of the other piece of wood.
- Step 3: Apply wood glue to the dado and the edge of the other piece of wood.
- Step 4: Fit the two pieces of wood together and clamp them securely.
- Step 5: Allow the glue to dry completely before removing the clamps.
Mortise and Tenon Joint
- Step 1: Cut a mortise, a rectangular hole, in one piece of wood using a chisel or a mortising machine.
- Step 2: Cut a tenon, a projection, on the end of the other piece of wood using a saw or a tenoning jig.
- Step 3: Ensure the tenon is the same size as the mortise.
- Step 4: Apply wood glue to the tenon and the inside of the mortise.
- Step 5: Fit the tenon into the mortise and clamp the pieces of wood together.
- Step 6: Allow the glue to dry completely before removing the clamps.
Dovetail Joint
- Step 1: Mark the layout for the dovetail joint on both pieces of wood.
- Step 2: Cut the dovetails on one piece of wood using a dovetail saw or a dovetail jig.
- Step 3: Cut the corresponding pins on the other piece of wood.
- Step 4: Apply wood glue to the dovetails and pins.
- Step 5: Fit the two pieces of wood together and clamp them securely.
- Step 6: Allow the glue to dry completely before removing the clamps.
Importance of Accurate Measurements and Cutting
Accurate measurements and cutting are critical for successful furniture construction.
Precise measurements and cuts ensure that the furniture pieces fit together correctly and that the finished product is level and square.
Inaccurate measurements or cuts can lead to gaps, misalignments, and structural problems.
Finishing Touches

The final step in your DIY furniture project is applying a finish. This protects the wood and enhances its natural beauty. Choosing the right finish depends on the type of wood, desired look, and intended use of the furniture.
Types of Wood Finishes
There are many different types of wood finishes available, each with its own unique characteristics.
- Oil-based finishes, such as tung oil, linseed oil, and Danish oil, penetrate the wood and create a durable, water-resistant finish. They are often used for furniture that will be exposed to the elements, such as outdoor furniture.
- Varnish is a resin-based finish that creates a hard, protective layer on the wood. It comes in a variety of finishes, including gloss, semi-gloss, satin, and matte. Varnish is a good choice for furniture that will be handled frequently, such as tables and chairs.
- Polyurethane is a durable, water-resistant finish that is often used for floors and furniture. It comes in a variety of finishes, including gloss, semi-gloss, satin, and matte.
- Lacquer is a fast-drying, durable finish that is often used for furniture and musical instruments. It comes in a variety of finishes, including gloss, semi-gloss, satin, and matte.
- Shellac is a natural finish made from the secretions of the lac bug. It is a good choice for furniture that needs a natural finish, such as antiques.
- Wax is a soft, protective finish that is often used for furniture and floors. It is easy to apply and maintain, but it is not as durable as other finishes.
Achieving a Professional-Looking Finish
To achieve a professional-looking finish, it’s important to follow these tips:
- Prepare the surface. Before applying any finish, it’s important to prepare the surface of the wood. This includes sanding the wood smooth, filling any holes or cracks, and cleaning the surface of dust and debris.
- Apply the finish in thin coats. Applying too much finish at once can lead to drips and runs. It’s best to apply several thin coats, allowing each coat to dry completely before applying the next.
- Sand between coats. Sanding between coats helps to smooth out any imperfections and create a more even finish.
- Use a good quality brush or applicator. A good quality brush or applicator will help you apply the finish evenly and prevent streaks or bubbles.
- Let the finish cure completely. Most finishes need several days to cure completely. During this time, it’s important to avoid touching or moving the furniture.
Caring for and Maintaining Your Finished Furniture
Once your furniture is finished, it’s important to care for it properly to maintain its beauty and longevity.
- Dust regularly. Dusting your furniture regularly will help to prevent dirt and grime from building up and damaging the finish.
- Avoid using harsh cleaners. Harsh cleaners can damage the finish of your furniture. Use a mild soap and water solution to clean your furniture.
- Protect from heat and sunlight. Heat and sunlight can cause the finish of your furniture to fade or crack. Place your furniture out of direct sunlight and away from heat sources.
- Use coasters and placemats. Coasters and placemats will help to protect your furniture from spills and scratches.
Inspiring Projects

Ready to bring your DIY furniture dreams to life? We’ve got you covered with some exciting projects that are perfect for beginners and seasoned builders alike. These projects showcase the versatility of DIY furniture and provide a platform to explore different styles and techniques.
Designing a Table
A table is a fundamental piece of furniture, offering a versatile platform for dining, working, or simply displaying your favorite items. Let’s design a table that combines functionality and aesthetics.
For this project, we’ll create a simple rectangular table with a solid wood top and sturdy metal legs. The table will measure 60 inches in length, 30 inches in width, and 30 inches in height.
Construction Process:
1. Materials: You’ll need a 1.5-inch thick piece of hardwood for the tabletop, four metal legs with a square base, wood screws, wood glue, and a stain or paint of your choice.
2. Cutting the Tabletop: Cut the hardwood to the desired dimensions (60 inches x 30 inches). Sand the edges and surfaces for a smooth finish.
3. Attaching the Legs: Drill pilot holes in the underside of the tabletop at the four corners. Apply wood glue to the base of each leg and secure them to the tabletop using screws. Ensure the legs are evenly spaced and aligned.
4. Finishing Touches: Sand the entire table again to remove any imperfections and achieve a smooth surface. Apply your chosen stain or paint, allowing it to dry completely before using the table.
This simple table design can be customized with different wood types, finishes, and leg styles to suit your personal taste.
Building a Simple Bookshelf
Bookshelves are a practical and decorative addition to any room. Let’s build a simple bookshelf that’s perfect for showcasing your favorite books and adding storage space.
Step-by-Step Guide:
1. Materials: Gather the necessary materials, including plywood or MDF boards, wood screws, wood glue, and a drill.
2. Cutting the Shelves: Cut the plywood or MDF boards to the desired dimensions for the shelves. For a standard bookshelf, you’ll likely need three shelves, each measuring 30 inches in length and 12 inches in width.
3. Constructing the Sides: Cut two pieces of plywood or MDF to form the sides of the bookshelf. These pieces should be 30 inches in height and 12 inches in width.
4. Assembling the Structure: Attach the shelves to the sides using wood screws and wood glue. Ensure the shelves are evenly spaced and securely attached.
5. Adding a Back Panel (Optional): Cut a piece of plywood or MDF to fit the back of the bookshelf and attach it using screws. This will provide added stability and a finished look.
6. Finishing Touches: Sand the entire bookshelf to remove any rough edges and apply a stain or paint of your choice.
Popular DIY Furniture Projects
Here’s a list of popular DIY furniture projects that you can explore:
- Coffee Table: A classic piece of furniture that can be customized with different materials, shapes, and finishes. [Link to detailed plans]
- Nightstand: A practical and stylish addition to your bedroom. [Link to detailed plans]
- Desk: Create a functional and personalized workspace for your home office. [Link to detailed plans]
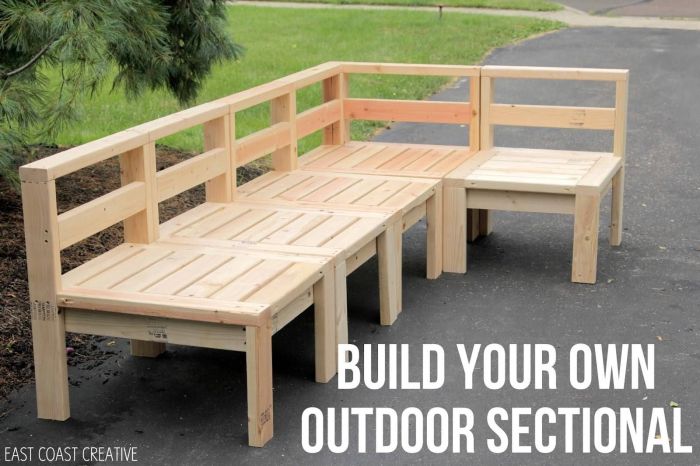
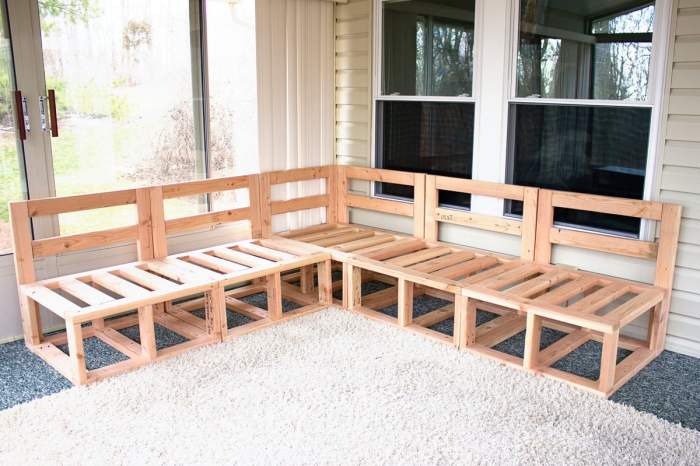
- Bench: Add seating to your entryway, living room, or garden. [Link to detailed plans]
- Headboard: Upgrade your bedroom with a unique and personalized headboard. [Link to detailed plans]
These projects offer a great starting point for your DIY furniture journey. Remember to always prioritize safety and follow the instructions carefully.
Resources and Inspiration
The journey of building your own furniture is an exciting one, filled with creative possibilities and a sense of accomplishment. But it’s also important to have the right resources and inspiration to guide you along the way. This section explores valuable resources to fuel your DIY furniture journey.
Online Communities and Websites
Online communities and websites are treasure troves of information, inspiration, and support for DIY furniture enthusiasts. These platforms connect you with like-minded individuals, offering a space to share your projects, seek advice, and learn from others’ experiences.
- Reddit: Subreddits like r/DIY, r/woodworking, and r/furniture are vibrant online communities where you can find discussions, tutorials, and project ideas. You can ask questions, share your progress, and connect with fellow DIYers.
- Forums: Forums like Lumberjocks and WoodworkingTalk provide dedicated spaces for woodworking enthusiasts to discuss techniques, share projects, and seek advice. You can find detailed discussions on specific tools, materials, and techniques, along with inspiring project galleries.
- Blogs and Websites: Numerous blogs and websites dedicated to DIY furniture offer a wealth of resources, including tutorials, plans, and inspirational projects. Websites like Ana White, Shanty2Chic, and The DIY Playbook provide step-by-step instructions, project plans, and creative ideas.
Books and Magazines
Books and magazines are excellent sources of inspiration and detailed woodworking plans. They offer a more structured approach to learning woodworking techniques and provide valuable insights into different styles and designs.
- Books: Books like “The Complete Illustrated Guide to Woodworking” by David Thiel and “The Woodworker’s Bible” by John C. Campbell offer comprehensive guides to woodworking techniques, covering everything from basic skills to advanced projects.
- Magazines: Magazines like “Fine Woodworking,” “Woodworking Illustrated,” and “Popular Woodworking” feature articles on woodworking techniques, project plans, and inspiring projects. They provide a visual and informative experience, showcasing the creativity and craftsmanship of skilled woodworkers.
Local Woodworking Clubs and Workshops
Joining a local woodworking club or workshop offers a unique opportunity to learn from experienced woodworkers, network with other enthusiasts, and access specialized tools and equipment.
- Learning and Networking: Woodworking clubs often host workshops, demonstrations, and social gatherings, providing a platform to learn new techniques, share your knowledge, and connect with other woodworkers.
- Access to Resources: Many clubs have access to specialized tools and equipment that might be expensive or impractical to purchase individually. This allows you to experiment with different techniques and tools without a significant investment.
- Community Support: Woodworking clubs provide a supportive community where you can seek advice, share your projects, and receive constructive feedback from experienced woodworkers.
Conclusive Thoughts: Build Your Own Furniture Plans

Building your own furniture is a journey of creativity, skill, and satisfaction. It’s a chance to express your individuality, personalize your space, and create lasting pieces that you’ll cherish for years to come. So, gather your tools, choose your plans, and embark on this rewarding adventure. With a little patience, dedication, and the right guidance, you’ll be amazed at what you can achieve.
Answers to Common Questions
What kind of tools do I need to get started?
The essential tools for furniture building include a saw, drill, sander, measuring tape, and clamps. The specific tools you’ll need will depend on the project, so consult your plans for a detailed list.
Where can I find free furniture plans?
Many websites offer free furniture plans, including Ana White, Instructables, and Pinterest. You can also find free plans in woodworking magazines and books.
How do I choose the right wood for my project?
Consider the type of furniture, its intended use, and your budget when selecting wood. Hardwoods like oak and maple are durable and beautiful, while softwoods like pine and cedar are more affordable. Consult with a lumber specialist for personalized advice.
What are some tips for achieving a professional-looking finish?
Sanding is crucial for a smooth finish. Use progressively finer grit sandpaper to remove imperfections. Apply a clear sealant to protect the wood and enhance its natural beauty. Consider using a stain or paint to achieve your desired color and style.
Building your own furniture is a rewarding experience, and there are tons of plans out there to help you get started. If you’re looking for something a little more unique, check out these valet woodworking plans. They’re perfect for adding a touch of luxury and functionality to your home.
Whether you’re a seasoned woodworker or just starting out, there’s a plan for you to build your own custom furniture.
