DIY outdoor furniture plans offer a fantastic way to create custom, stylish pieces for your backyard without breaking the bank. Building your own furniture allows you to personalize designs, choose materials that suit your style, and experience the satisfaction of crafting something unique. From cozy benches to inviting tables, the possibilities are endless!
This guide will walk you through the entire process, from choosing the right plans to assembling your masterpiece. We’ll cover essential techniques, provide tips for working with wood, and offer solutions for common challenges. By the end, you’ll be ready to transform your outdoor space into a haven of comfort and style.
Planning Your DIY Project

Now that you’ve got the DIY bug, it’s time to get your project rolling! This section will guide you through the planning phase, ensuring you have everything you need for a successful build.
Identifying Your Furniture Type
The first step is to decide what kind of outdoor furniture you want to build. Consider your needs, the size of your space, and the style you’re going for. Think about the function of the furniture: Do you want a comfortable seating area, a dining table, a storage bench, or something else entirely?
Materials and Tools
Once you’ve chosen your furniture type, you’ll need to gather the necessary materials and tools. The materials you’ll need will depend on the type of furniture you’re building, but some common materials include:
- Wood: This is a popular choice for outdoor furniture, as it’s durable and relatively easy to work with. Common wood types include cedar, redwood, and teak, known for their resistance to rot and insects.
- Metal: Metal furniture can be very sturdy and stylish, but it can be more challenging to work with. Steel and aluminum are popular choices for outdoor furniture due to their durability and resistance to rust.
- Plastic: Plastic is a lightweight and affordable option for outdoor furniture. It’s easy to clean and maintain, but it may not be as durable as wood or metal.
- Fabric: If you’re building upholstered furniture, you’ll need to choose a fabric that’s suitable for outdoor use. Look for fabrics that are water-resistant, fade-resistant, and mildew-resistant.
In addition to materials, you’ll also need the right tools. Here’s a list of basic tools that you’ll likely need:
- Saw: You’ll need a saw to cut your materials to size. A circular saw is a good choice for cutting large pieces of wood, while a jigsaw is useful for cutting curves and intricate shapes.
- Drill: A drill is essential for drilling holes for fasteners and assembling your furniture. A cordless drill is a good choice for portability.
- Screwdriver: You’ll need a screwdriver to drive screws into your furniture. A cordless screwdriver is convenient for working on larger projects.
- Measuring tape: You’ll need a measuring tape to accurately measure your materials and ensure that your furniture is built to the correct dimensions.
- Level: A level is essential for ensuring that your furniture is built straight and level.
- Safety glasses: Always wear safety glasses when working with power tools.
Planning Your Project
Once you have your materials and tools, it’s time to start planning your project. Here’s a step-by-step guide:
- Design: Start by sketching out your furniture design. Consider the dimensions, style, and functionality. You can find inspiration online or in magazines. For complex designs, consider using a CAD (Computer-Aided Design) program.
- Measurements: Once you have a design, you’ll need to take accurate measurements. This will help you determine the amount of materials you’ll need and ensure that your furniture fits properly in your space.
- Materials List: Create a detailed materials list. Include the type, quantity, and size of each material you’ll need. This will help you avoid last-minute trips to the hardware store.
- Cutting List: Create a cutting list that specifies the dimensions of each piece of material you’ll need to cut. This will help you cut your materials efficiently and accurately.
- Assembly Instructions: Write down detailed assembly instructions. This will help you assemble your furniture correctly and avoid any mistakes.
Finding DIY Outdoor Furniture Plans

Now that you’ve planned your project, it’s time to find the perfect DIY outdoor furniture plans. The internet is a treasure trove of resources, offering a wide range of plans to suit different skill levels and styles.
Popular Online Resources
You can find a wealth of free and paid DIY plans for outdoor furniture online. Some popular resources include:
- Ana White: Ana White is a well-known DIY blogger with a vast library of free woodworking plans, including several for outdoor furniture. Her plans are detailed and easy to follow, making them a great choice for beginners.
- Pinterest: Pinterest is a visual search engine that’s perfect for finding inspiration and DIY ideas. Search for “DIY outdoor furniture plans” to find a wide variety of options, including free and paid plans.
- Etsy: Etsy is a marketplace for handmade goods, including digital downloads like DIY plans. You can find a wide range of unique and creative plans on Etsy, from modern to rustic styles.
- Instructables: Instructables is a community-driven website where users share their DIY projects and tutorials. You can find a variety of outdoor furniture plans on Instructables, many of which are free.
- YouTube: YouTube is a great resource for finding step-by-step tutorials for DIY projects. Search for “DIY outdoor furniture” to find a wide range of videos, including those that feature free plans.
Choosing the Right Plans
When choosing DIY plans, it’s important to consider your skill level and the complexity of the project. Here are some tips:
- Start with Simple Projects: If you’re new to woodworking, start with simple projects like a bench or a small table. These projects will help you build your skills and confidence before tackling more complex projects.
- Read Reviews: Before purchasing plans, read reviews from other DIYers. This will give you an idea of the plan’s quality, clarity, and difficulty level.
- Consider the Materials: Some plans specify the materials needed, while others leave it up to you. If you’re new to woodworking, choose plans that provide a complete materials list.
- Check the Measurements: Double-check the measurements in the plans to ensure they’re accurate and suitable for your needs.
- Look for Detailed Instructions: The best plans include detailed instructions, diagrams, and step-by-step photos. These elements make it easier to understand the process and avoid mistakes.
Comparing Plan Sources, Diy outdoor furniture plans
Here’s a table comparing different plan sources based on their features, pros, and cons:
| Plan Source | Features | Pros | Cons |
|---|---|---|---|
| Ana White | Free plans, detailed instructions, wide range of projects | Easy to follow, beginner-friendly, comprehensive | Limited customization options, some plans may be outdated |
| Wide variety of plans, visual inspiration | Easy to find ideas, visually appealing | Plan quality can vary, may not be as detailed | |
| Etsy | Unique and creative plans, digital downloads | Wide range of styles, support independent creators | Can be expensive, may not be as detailed |
| Instructables | Community-driven, user-generated plans | Free plans, wide range of projects, helpful community | Plan quality can vary, may not be as detailed |
| YouTube | Step-by-step tutorials, visual instructions | Easy to learn, helpful for beginners | Plan quality can vary, may not be as detailed |
Essential Techniques and Skills

Building outdoor furniture requires some basic woodworking skills and techniques. While you don’t need to be a professional carpenter, understanding these fundamentals will help you create sturdy and beautiful pieces.
Cutting
Cutting wood accurately is essential for creating well-fitting pieces. Here are some common cutting techniques and tools:
* Measuring and Marking: Before making any cuts, accurately measure and mark the wood using a tape measure, pencil, and a ruler.
* Hand Saw: A hand saw is a versatile tool for making straight cuts in wood.
* Circular Saw: A circular saw is a power tool that provides faster and more precise cuts, particularly for straight lines and ripping wood.
* Jigsaw: A jigsaw is used for cutting curves and intricate shapes in wood.
* Table Saw: A table saw is a powerful tool for making accurate and precise cuts, particularly for crosscutting and ripping.
* Miter Saw: A miter saw is used for making angled cuts, which are essential for creating frames and joining pieces at specific angles.
Sanding
Sanding smooths out rough surfaces and prepares the wood for finishing. Different types of sandpaper are used for various stages of sanding:
* Coarse Sandpaper: Use coarse sandpaper (grit 40-80) to remove rough edges and imperfections.
* Medium Sandpaper: Use medium sandpaper (grit 100-150) to smooth out the surface and remove scratches.
* Fine Sandpaper: Use fine sandpaper (grit 180-220) for a smooth, polished finish.
Assembling
Assembling the pieces of your outdoor furniture requires various techniques and tools:
* Joinery: Different types of joinery, like mortise and tenon, dovetail, or biscuit joints, are used to create strong and durable connections between pieces.
* Screws and Nails: Screws and nails are commonly used to secure pieces together.
* Clamps: Clamps are essential for holding pieces together while glue dries or screws are driven.
* Drilling: Drilling pilot holes before driving screws prevents wood from splitting.
Working with Different Types of Wood
Different types of wood have varying characteristics, including hardness, durability, and grain patterns:
* Hardwoods: Hardwoods, like oak, maple, and walnut, are strong and durable, making them ideal for outdoor furniture.
* Softwoods: Softwoods, like pine and cedar, are lighter and easier to work with but may be less durable.
* Wood Finishes: Applying a finish to your outdoor furniture protects it from the elements and enhances its appearance.
* Paint: Paint provides a durable and weather-resistant finish.
* Stain: Stain penetrates the wood and enhances its natural grain pattern.
* Oil: Oil finishes, like teak oil, provide a protective barrier and enhance the wood’s natural beauty.
Building Your DIY Outdoor Furniture
You’ve gathered your plans, materials, and tools, and you’re ready to start building your outdoor furniture. This is the exciting part where your vision takes shape. Take your time, follow the instructions carefully, and don’t be afraid to ask for help if needed.
Building a Simple Outdoor Bench
This step-by-step guide will help you build a basic outdoor bench using readily available materials.
Cutting and Assembling the Frame
- Start by cutting the lumber for the frame according to your plans. You’ll need two long pieces for the sides, two shorter pieces for the legs, and two more for the seat supports.
- Use a miter saw or circular saw to make precise cuts, ensuring that all pieces are square and at the right length.
- Assemble the frame by joining the pieces together with wood glue and screws. Use a drill and countersinking bits to create pilot holes before driving in screws to prevent wood splitting.
- Check that all corners are square and that the frame is level and stable before proceeding.
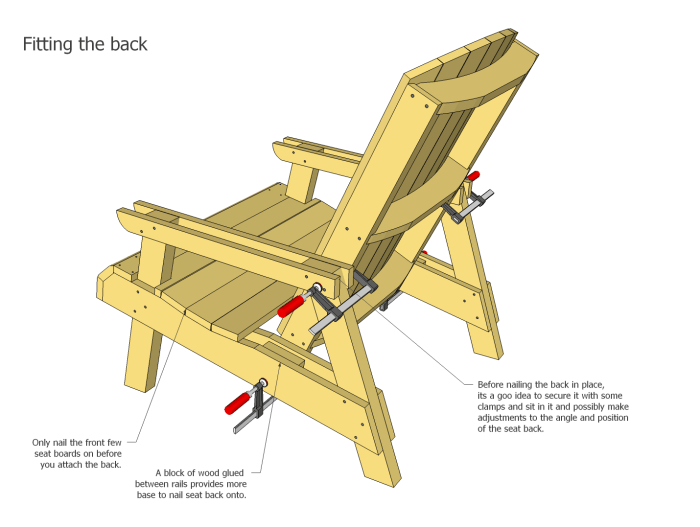
Adding the Seat and Backrest
- Cut the lumber for the seat and backrest to the desired dimensions. Ensure that the seat boards are wide enough to provide comfortable seating.
- Attach the seat boards to the frame using wood glue and screws. Make sure the boards are flush with the frame and that the screws are countersunk.
- For the backrest, you can use individual boards or a single piece of plywood. Attach the backrest to the frame using wood glue and screws, ensuring that it’s angled for comfortable leaning.
Finishing Touches
- Sand the entire bench to smooth out any rough edges and create a consistent surface.
- Apply a wood stain or paint to protect the bench from the elements. Choose a weather-resistant finish that complements your outdoor space.
- Once the finish is dry, you can add additional features like armrests or decorative details.
Troubleshooting
- If the frame is not level or stable, check that all corners are square and that the screws are secure.
- If the seat boards are not flush with the frame, adjust their position before attaching them with screws.
- If the backrest is not angled correctly, loosen the screws and adjust its position before tightening them again.
Finishing Touches and Maintenance

You’ve built your outdoor furniture, and now it’s time to give it that final touch and ensure its longevity. Choosing the right finish can enhance its look and protect it from the elements. This section will discuss various finishing options, application techniques, and maintenance tips for keeping your furniture looking its best for years to come.
Choosing the Right Finish
The type of finish you choose depends on the material of your furniture and your desired aesthetic. Here are some common finishing options:
- Paint: Paint provides a durable, colorful, and customizable finish. It’s suitable for various materials like wood, metal, and even plastic. Choose outdoor-grade paints formulated to withstand UV rays, moisture, and temperature fluctuations.
- Stains: Stains penetrate the wood’s surface, enhancing its natural grain and color. They offer a more natural look than paint while still protecting the wood. Stains come in various finishes, from transparent to semi-transparent to opaque.
- Sealants: Sealants create a protective barrier over the wood, preventing moisture, UV damage, and other elements from penetrating. They can be applied over paint or stain to enhance their durability.
Applying Finishes
Proper application is crucial for achieving a durable and attractive finish.
- Preparation: Before applying any finish, thoroughly clean and sand your furniture. This ensures a smooth surface for even application and better adhesion.
- Application Techniques: Use brushes, rollers, or sprayers depending on the finish and your preference. Follow the manufacturer’s instructions for application, drying time, and recoating.
- Safety Precautions: Work in a well-ventilated area and wear appropriate protective gear like gloves and masks when applying finishes.
Maintaining Your Furniture
Regular maintenance will extend the lifespan of your outdoor furniture.
- Cleaning: Regularly clean your furniture with mild soap and water. Avoid harsh chemicals that can damage the finish.
- Refinishing: Depending on the type of finish and exposure to the elements, you may need to refinish your furniture every few years.
- Protection: Cover your furniture during harsh weather conditions or when not in use to prevent damage and premature wear.
Final Thoughts

Creating your own outdoor furniture is a rewarding journey that combines creativity, practicality, and a touch of DIY magic. With the right plans and a bit of effort, you can craft pieces that reflect your personal style and enhance your outdoor living experience. So, grab your tools, gather your materials, and embark on a project that will leave you with a sense of accomplishment and a beautiful, custom-made outdoor space to enjoy.
Common Queries: Diy Outdoor Furniture Plans
What are the best materials for DIY outdoor furniture?
Durable and weather-resistant materials like cedar, teak, or pressure-treated pine are excellent choices for outdoor furniture. You can also use composite materials like recycled plastic lumber for low-maintenance options.
What tools do I need for DIY outdoor furniture projects?
Basic woodworking tools like a saw, drill, sander, and measuring tape are essential. You might also need specialized tools depending on the project, such as a router or a table saw.
How do I protect my DIY furniture from the elements?
Apply a sealant or finish specifically designed for outdoor use to protect your furniture from rain, sun, and moisture. Regularly clean and maintain your furniture to extend its lifespan.
DIY outdoor furniture plans are a great way to personalize your outdoor space and save money. You can find plans for everything from simple benches to elaborate dining sets. If you’re looking for inspiration for smaller projects, check out crib furniture plans which can be adapted for outdoor use, like building a small side table or a planter box.
No matter what your skill level, there’s a DIY outdoor furniture project out there for you.
