Dollhouse woodworking plans offer a captivating way to create miniature masterpieces, bringing childhood dreams and architectural aspirations to life. Whether you’re a seasoned woodworker or a curious beginner, these plans provide detailed blueprints and instructions to guide you through every step of the building process.
From selecting the right plans based on your skill level and desired style to understanding the importance of scale and measurements, this comprehensive guide will equip you with the knowledge and tools to embark on your own dollhouse building adventure.
Introduction to Dollhouse Woodworking Plans

Dollhouses have captivated children and adults alike for centuries, offering a miniature world of imagination and creativity. From simple cardboard models to intricate, handcrafted masterpieces, dollhouses provide a unique opportunity to explore architectural styles, interior design, and even historical periods.
The appeal of dollhouses lies in their ability to spark the imagination and provide a tangible platform for creative expression. Whether it’s designing furniture, arranging miniature rooms, or simply enjoying the intricate details of a meticulously crafted structure, dollhouses offer a delightful escape from the everyday.
Types of Dollhouse Plans
Dollhouse plans cater to a wide range of skill levels and interests. Here are some common types of plans:
- Beginner Plans: These plans are ideal for those new to woodworking or dollhouse construction. They typically feature simple designs, straightforward instructions, and readily available materials. Examples include basic cottage-style dollhouses with minimal details and straightforward construction techniques.
- Advanced Plans: Advanced plans are designed for experienced woodworkers and hobbyists who seek more complex designs and challenging construction techniques. These plans may feature intricate details, custom-made components, and advanced joinery techniques. An example of an advanced plan could be a Victorian mansion with multiple levels, elaborate rooflines, and detailed interior features.
- Themed Plans: These plans are based on specific themes or historical periods. For example, you might find plans for a Victorian dollhouse, a medieval castle, or a modern skyscraper. Themed plans often include specific architectural details, furniture styles, and accessories that reflect the chosen theme. A popular example is a Victorian dollhouse plan that includes detailed gingerbread trim, ornate windows, and furniture inspired by the Victorian era.
Benefits of Building a Dollhouse from Plans
Building a dollhouse from plans offers numerous benefits:
- Structured Guidance: Plans provide a clear roadmap for the construction process, ensuring that each step is well-defined and easy to follow. This eliminates guesswork and helps avoid common mistakes.
- Detailed Instructions: Plans typically include detailed instructions, diagrams, and cutting lists, providing a comprehensive guide for each stage of construction. This level of detail ensures accuracy and helps to prevent errors.
- Material Specifications: Plans often specify the materials required for the project, including wood types, dimensions, and hardware. This eliminates the need to guess or research materials, saving time and effort.
- Scale Accuracy: Plans are designed to ensure that the finished dollhouse is built to a specific scale, guaranteeing that all components are proportionate and aesthetically pleasing.
- Personalized Design: While plans provide a framework, they also allow for creative customization. You can adapt the design, add personal touches, and incorporate your own unique style.
Choosing the Right Dollhouse Plans
Choosing the right dollhouse plans is crucial for a successful project. You need to consider your skill level, the time you are willing to invest, and the style of dollhouse you want to build. The right plans will make the process enjoyable and rewarding.
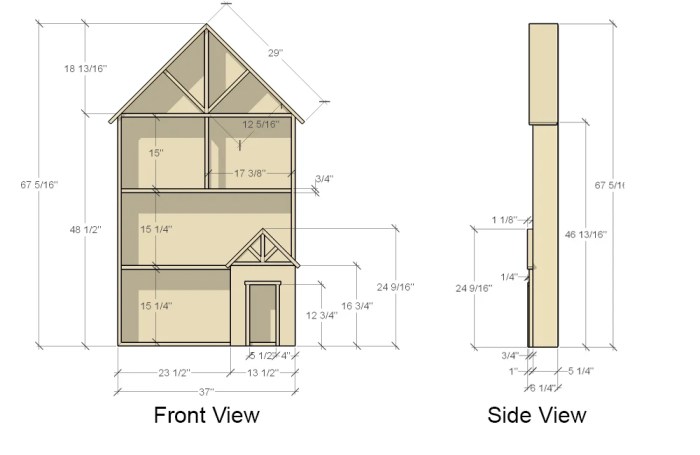
Understanding Scale and Measurements
Dollhouse plans are designed to a specific scale, which represents the ratio between the dollhouse and a real-life structure. Understanding scale is essential for accurate construction. For example, a 1:12 scale means that every inch in the dollhouse represents one foot in real life.
Scale: The ratio between the dollhouse and a real-life structure. For example, a 1:12 scale means that every inch in the dollhouse represents one foot in real life.
Most dollhouse plans will clearly state the scale. However, if it is not explicitly mentioned, you can usually determine it by examining the measurements provided. For instance, if a plan states that a wall is 12 inches long, and you know that a typical wall in a real house is 12 feet long, then the scale is 1:12.
Selecting Plans Based on Skill Level
The complexity of dollhouse plans varies widely, ranging from simple beginner projects to intricate designs that require advanced woodworking skills.
- Beginner: Choose plans with simple designs and straightforward instructions. Look for projects that use basic woodworking techniques and require minimal cutting or joinery.
- Intermediate: As you gain experience, you can tackle more complex designs that involve more intricate details and advanced woodworking techniques.
- Advanced: For experienced woodworkers, there are plans for elaborate dollhouses with intricate details, custom-made furniture, and advanced construction techniques.
Considering Time Commitment
The time required to build a dollhouse can vary greatly depending on the complexity of the design, the number of pieces, and your woodworking experience.
- Simple Designs: A simple dollhouse can be completed in a few days or weeks, especially if you are familiar with basic woodworking techniques.
- Complex Designs: Elaborate dollhouses with intricate details and custom-made furniture can take months or even years to complete.
Choosing the Right Style
Dollhouse plans come in a wide variety of styles, from traditional Victorian homes to modern contemporary designs.
- Traditional: Traditional dollhouse plans often feature intricate details, such as gingerbread trim, bay windows, and decorative rooflines.
- Modern: Modern dollhouse plans are typically characterized by clean lines, simple shapes, and minimalist designs.
- Other Styles: You can also find plans for dollhouses inspired by different historical periods, architectural styles, or specific locations.
Finding Reputable Sources for Dollhouse Plans
There are many sources for dollhouse woodworking plans, but it is important to choose reputable sources that offer high-quality plans and accurate instructions.
- Online Retailers: Websites like Etsy, Amazon, and eBay offer a wide variety of dollhouse plans from independent designers and established companies.
- Specialty Dollhouse Stores: Brick-and-mortar dollhouse stores often carry a selection of plans, kits, and supplies.
- Dollhouse Clubs and Associations: Many dollhouse clubs and associations offer plans and resources for their members.
- Online Forums and Communities: Online forums and communities dedicated to dollhouse building can be a great source of information and inspiration.
Materials and Tools for Dollhouse Construction
Building a dollhouse is a rewarding project that involves selecting the right materials and tools. This section will guide you through the essential materials and tools needed for a successful dollhouse construction journey.
Materials for Dollhouse Construction
The materials you choose will affect the durability, aesthetics, and overall look of your dollhouse.
- Wood: The most common material for dollhouse construction is wood. Various types of wood are suitable, each offering unique characteristics.
- Balsa Wood: Lightweight and easy to work with, balsa wood is ideal for intricate details and delicate structures. It is often used for roofs, walls, and smaller components.
- Basswood: A harder wood with a fine grain, basswood is suitable for larger dollhouse structures and can be carved or sculpted.
- Pine: A readily available and affordable wood, pine is often used for dollhouse construction. It is known for its strength and durability.
- Plywood: A versatile material, plywood is commonly used for floors, roofs, and the base of the dollhouse. It provides stability and strength.
- Adhesives: Strong and reliable adhesives are crucial for assembling dollhouse components.
- Wood Glue: A popular choice for dollhouse construction, wood glue provides a strong bond that dries clear.
- Epoxy Resin: A two-part adhesive that offers exceptional strength and water resistance, epoxy resin is ideal for joining delicate or intricate components.
- Hot Glue: A fast-setting adhesive, hot glue is suitable for quick repairs or attaching small decorations.
- Paint: Adding color and detail to your dollhouse is essential.
- Acrylic Paint: A versatile and water-based paint, acrylic paint is easy to use and dries quickly. It comes in a wide range of colors and finishes.
- Oil-Based Paint: Offers a durable and long-lasting finish, oil-based paint is suitable for exterior applications and can create a more traditional look.
- Spray Paint: A convenient option for quickly covering large areas, spray paint provides a smooth and even finish.
- Finishing Supplies: Finishing touches add realism and enhance the overall look of your dollhouse.
- Varnish: A protective coating that seals and enhances the wood’s natural beauty, varnish comes in gloss, satin, and matte finishes.
- Polyurethane: A durable and water-resistant finish, polyurethane is suitable for both interior and exterior applications.
- Stain: Adds color and depth to the wood without hiding its grain, stain comes in various shades and finishes.
Tools for Dollhouse Construction
The right tools make dollhouse construction easier and more enjoyable.
- Saws: Used for cutting wood to size.
- Hand Saw: A basic saw for making straight cuts.
- Coping Saw: A small saw with a narrow blade, ideal for intricate cuts and curves.
- Jigsaw: An electric saw that can make intricate cuts and curves.
- Drills: Used for drilling holes for screws or dowels.
- Cordless Drill: A versatile tool for drilling and driving screws.
- Drill Press: A stationary tool that provides more accuracy and control for drilling holes.
- Sanders: Used for smoothing and finishing wood surfaces.
- Sandpaper: Available in various grits, sandpaper is used for smoothing and sanding wood surfaces.
- Orbital Sander: An electric sander that provides a smooth and even finish.
- Belt Sander: A powerful sander that can remove large amounts of material quickly.
- Measuring Tools: Essential for accurate measurements.
- Measuring Tape: A flexible tape measure used for measuring length and width.
- Ruler: A straight edge used for measuring shorter distances.
- T-Square: A tool used for drawing and measuring right angles.
- Level: Used to ensure surfaces are level and plumb.
Safety Precautions
Safety is paramount when working with woodworking tools.
- Always wear safety glasses: Protect your eyes from flying debris.
- Use hearing protection: Woodworking tools can be noisy, so protect your hearing.
- Keep your work area clean and organized: Avoid tripping hazards and clutter.
- Use the right tools for the job: Using the wrong tool can be dangerous.
- Always unplug tools when not in use: This prevents accidental starts.
- Be aware of your surroundings: Keep your hands and fingers away from moving parts.
Building the Dollhouse Structure
Now that you have your plans and materials, it’s time to start building! This is where the fun truly begins. You’ll be transforming your carefully chosen plans into a tangible dollhouse. This section will guide you through the process of constructing the basic structure, including the walls, roof, and floor.
Cutting and Joining Wood Pieces
The first step is to cut the wood pieces according to your plans. This is where accuracy is crucial, as any errors in cutting will be amplified in the final structure. You’ll need to use a saw that is suitable for the type of wood you are using. For most dollhouse projects, a fine-tooth saw like a coping saw or a jigsaw is ideal.
Here are some tips for accurate cutting:
- Mark your cuts precisely: Use a pencil and ruler to mark your cuts clearly on the wood. Be sure to account for the thickness of the saw blade when making your marks.
- Use a cutting guide: A cutting guide, such as a miter box or a track saw, can help you make precise cuts at specific angles. This is especially helpful for cutting the roof pieces.
- Cut slowly and steadily: Avoid rushing the cutting process, as this can lead to inaccurate cuts and splintering. A slow and steady pace will ensure cleaner cuts.
Once you have cut your wood pieces, you’ll need to join them together to form the walls, roof, and floor. There are several techniques for joining wood, but the most common for dollhouses are:
- Gluing: Wood glue is a simple and effective way to join wood pieces. Be sure to use a high-quality wood glue that is specifically designed for woodworking. Apply the glue evenly to the surfaces you are joining, and clamp the pieces together until the glue dries.
- Nails and screws: For added strength, you can use nails or screws to secure the wood pieces together. Choose nails or screws that are the appropriate size for your wood thickness. Pre-drill holes for screws to prevent splitting the wood.
- Dowels: Dowels are small wooden rods that can be used to join pieces of wood together. They provide a strong and secure joint, especially for corner pieces. Drill holes in the pieces you are joining, and insert the dowels into the holes. Secure the dowels with glue.
Constructing the Walls
The walls of your dollhouse will form the basic structure of the building. You’ll need to cut the wall pieces to the correct size and then join them together at the corners.
Here are some steps for constructing the walls:
- Cut the wall pieces: Refer to your plans for the exact dimensions of each wall piece. Cut the pieces using your saw and ensure the cuts are precise.
- Join the corners: Use glue and nails or screws to join the wall pieces at the corners. Make sure the corners are square and that the walls are all the same height. For added strength, you can use dowels to reinforce the corners.
- Add bracing: To strengthen the walls, you can add bracing to the inside. This can be done with thin strips of wood or cardboard.
Constructing the Roof
The roof of your dollhouse will add a finishing touch to the structure. There are many different styles of dollhouse roofs, from simple gable roofs to more elaborate mansard roofs.
Here are some steps for constructing a basic gable roof:
- Cut the roof pieces: Refer to your plans for the dimensions of the roof pieces. You’ll need two pieces of wood for the roof slopes, and a piece for the ridge board that runs down the center of the roof.
- Cut the roof slopes: The roof slopes will need to be cut at an angle to create the desired pitch. Use a miter saw or a cutting guide to ensure the angles are accurate.
- Join the roof slopes: Use glue and nails or screws to join the roof slopes to the ridge board. Make sure the slopes are symmetrical and that the ridge board is centered.
- Attach the roof to the walls: Use glue and nails or screws to attach the roof to the walls. Make sure the roof is securely attached and that it sits flush with the walls.
Constructing the Floor
The floor of your dollhouse will provide a base for the interior furnishings. You’ll need to cut the floor pieces to the correct size and then join them together to form a single floor.
Here are some steps for constructing the floor:
- Cut the floor pieces: Refer to your plans for the dimensions of the floor pieces. Cut the pieces using your saw and ensure the cuts are precise.
- Join the floor pieces: Use glue and nails or screws to join the floor pieces together. Make sure the joints are tight and that the floor is level. You can use a piece of plywood or cardboard as a base to ensure the floor is flat.
- Attach the floor to the walls: Use glue and nails or screws to attach the floor to the walls. Make sure the floor is securely attached and that it is level with the walls.
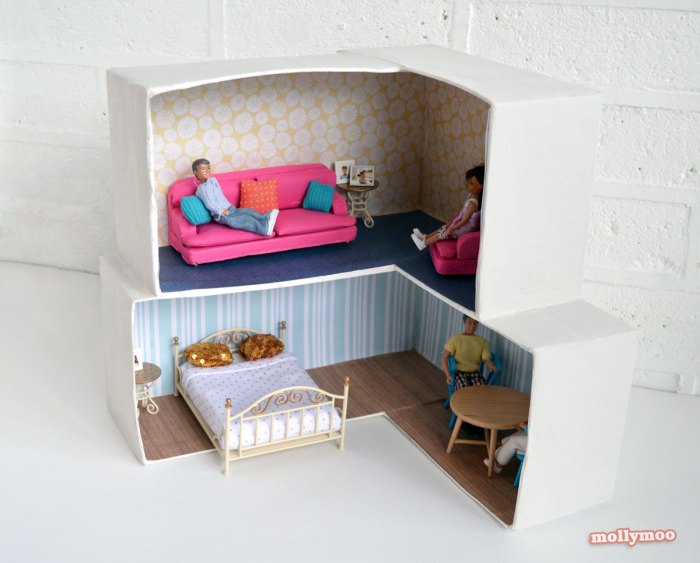
Adding Interior Details
Bringing your dollhouse to life involves adding realistic interior details. This can be as simple as painting walls or as intricate as building custom furniture. The key is to use your imagination and have fun with the process!
Creating Realistic Interior Details
Adding details like fireplaces, stairs, and furniture can elevate your dollhouse from a simple structure to a miniature world.
- Fireplaces: You can create a convincing fireplace using a variety of materials. A simple cardboard box can be cut and shaped, then painted to resemble brick or stone. For a more elaborate fireplace, you can use wood or even a small piece of metal. Don’t forget to add a mantelpiece and a fire screen.
- Stairs: Stairs can be made from wood, cardboard, or even plastic. For a more realistic look, you can use a small piece of wood for each step and then glue them together. You can also add a railing using thin strips of wood or wire.
- Furniture: Furniture can be made from a variety of materials, including wood, cardboard, and even plastic. For simple pieces like chairs and tables, you can use cardboard cutouts and then decorate them with paint or fabric. More elaborate pieces, like beds and couches, can be made from wood.
Using Different Materials for Interior Details
Here are some ideas for using different materials to create furniture and accessories for your dollhouse.
- Wood: Wood is a versatile material that can be used to create a variety of furniture pieces. You can use scraps of wood from other projects or purchase pre-cut pieces from a craft store. Use wood glue and small nails or screws to assemble your furniture.
- Fabric: Fabric can be used to create curtains, upholstery, and even rugs. You can use scraps of fabric from old clothes or purchase fabric specifically for dollhouse projects. Use fabric glue or a sewing machine to attach the fabric to your furniture.
- Paper: Paper can be used to create wallpaper, books, and even miniature artwork. You can use patterned paper, wrapping paper, or even construction paper. Use glue or tape to attach the paper to your dollhouse walls or furniture.
Creative Interior Design Ideas
Think outside the box when it comes to decorating your dollhouse. Here are some unique and creative interior design ideas.
- Theme: Choose a theme for your dollhouse, such as a Victorian era home, a modern loft, or a whimsical fairytale cottage. This will help you choose the right furniture and accessories.
- Color Scheme: Use a color scheme to create a cohesive look. For example, you could use a palette of pastel colors for a Victorian-style dollhouse or bold colors for a modern loft.
- Personal Touches: Add personal touches to your dollhouse, such as family photos, books, and other items that reflect the personalities of your dollhouse inhabitants.
Finishing Touches and Decoration: Dollhouse Woodworking Plans
After building your dollhouse, it’s time to give it that final touch of magic. This stage is all about making your dollhouse look polished and ready for its inhabitants. Think of it as adding the finishing touches to a painting or a sculpture. This step involves sanding, painting, and adding decorative elements to create a truly unique and beautiful dollhouse.
Sanding and Painting
Sanding and painting are crucial steps in finishing your dollhouse. Sanding smooths out any imperfections and creates a uniform surface for painting. Painting adds color and protects the wood from wear and tear.
- Sanding: Use fine-grit sandpaper to smooth out any rough edges or imperfections. Start with a coarser grit and gradually move to a finer grit for a smoother finish.
- Priming: Before painting, apply a primer to create a smooth, even surface for the paint to adhere to. This helps prevent the wood from absorbing the paint unevenly.
- Painting: Choose paints specifically designed for wood. Acrylic paints are a popular choice because they dry quickly and are easy to clean up. Use multiple thin coats instead of one thick coat for a smoother, more even finish.
Applying Wallpaper and Other Decorative Elements
Adding wallpaper, fabric, and other decorative elements can bring your dollhouse to life.
- Wallpaper: Use self-adhesive wallpaper for easy application. Measure and cut the wallpaper to fit the walls of your dollhouse.
- Fabric: Use fabric for curtains, upholstery, and other decorative elements. You can use glue or fabric adhesive to attach the fabric to the dollhouse.
- Other Decorative Elements: You can add other decorative elements like moldings, trim, and stencils to give your dollhouse a unique look.
Adding Finishing Touches
There are many ways to add finishing touches to your dollhouse. Here are a few ideas:
- Lighting: Add miniature light fixtures to illuminate your dollhouse. You can use battery-powered lights or wire them to a power source.
- Landscaping: Create a miniature garden around your dollhouse using artificial plants, rocks, and other landscaping materials.
- Miniature Accessories: Add miniature furniture, appliances, and other accessories to furnish your dollhouse. You can find these at craft stores, online retailers, or even make them yourself.
Inspiration and Resources
The world of dollhouses is brimming with creative possibilities. Whether you prefer a traditional Victorian mansion or a whimsical fairy house, there’s a dollhouse project out there waiting to be built. To help you get started, we’ll explore some inspiring projects and resources that will ignite your imagination and guide you on your dollhouse journey.
Inspiring Dollhouse Projects, Dollhouse woodworking plans
To spark your creativity, let’s explore a few captivating dollhouse projects that showcase unique designs and themes:
- Modern Minimalist Dollhouse: This dollhouse embodies simplicity and elegance with clean lines, open spaces, and a neutral color palette. The minimalist design allows you to showcase modern furniture and accessories, creating a contemporary feel.
- Victorian Dollhouse with Intricate Details: This dollhouse pays homage to the grandeur of Victorian architecture. It features elaborate trim, gingerbread detailing, and multiple levels, providing ample space for creating a rich and detailed interior.
- Fairy Tale Cottage Dollhouse: This enchanting dollhouse is perfect for bringing your favorite fairy tales to life. It features whimsical elements like a thatched roof, ivy-covered walls, and a charming garden, creating a magical atmosphere.
- Medieval Castle Dollhouse: This imposing dollhouse transports you to a bygone era. It features a stone facade, towering turrets, and a drawbridge, offering a glimpse into the world of medieval knights and princesses.
Finding Dollhouse Woodworking Plans and Tutorials
The internet is a treasure trove of dollhouse resources. Here are a few websites and platforms where you can find woodworking plans, tutorials, and inspiration:
- Pinterest: Pinterest is a visual search engine where you can find countless dollhouse ideas, plans, and tutorials. Simply search for “dollhouse plans” or “dollhouse building” to discover a wide range of options.
- Etsy: Etsy is an online marketplace where you can find handcrafted dollhouses, plans, and kits. Many sellers offer custom designs and unique materials, allowing you to personalize your project.
- YouTube: YouTube is a great resource for finding step-by-step tutorials on dollhouse construction. Search for “dollhouse building tutorial” or “dollhouse woodworking” to discover a wealth of videos.
- Dollhouse Forums and Communities: Online forums and communities dedicated to dollhouse enthusiasts are excellent places to connect with other builders, share your projects, and get advice.
The Importance of Community
Connecting with other dollhouse enthusiasts can be incredibly rewarding. Sharing your projects, seeking advice, and learning from others’ experiences can enhance your dollhouse journey. Here’s how community can benefit you:
- Inspiration: Seeing the creations of other dollhouse builders can spark new ideas and inspire you to try different techniques and designs.
- Support: Joining a dollhouse community provides a supportive network where you can ask questions, share challenges, and celebrate successes.
- Learning: By interacting with experienced dollhouse builders, you can learn valuable tips, tricks, and techniques that can elevate your skills.
Final Wrap-Up
Building a dollhouse from plans is a rewarding journey that combines creativity, precision, and a touch of nostalgia. As you bring your miniature world to life, you’ll experience the satisfaction of crafting something unique and enduring. So, gather your tools, choose your plans, and let your imagination take flight as you embark on this exciting woodworking adventure.
FAQ Explained
What kind of wood is best for dollhouse construction?
Balsa wood, basswood, and pine are popular choices for dollhouse building due to their lightweight, easy-to-work properties.
How do I choose the right scale for my dollhouse?
Dollhouses are typically built to different scales, with 1:12 being the most common. This means that every inch in the dollhouse represents one foot in real life.
Where can I find inspiration for dollhouse design ideas?
Browse online galleries, visit miniature shows, and explore books and magazines dedicated to dollhouse building for a wealth of creative inspiration.
Dollhouse woodworking plans are a great way to get started with woodworking, and they’re a fun project for all skill levels. You can learn the basics of cutting, sanding, and assembling wood while creating something truly unique. Once you’ve mastered the basics, you can move on to more complex projects, like woodworking furniture.
But don’t forget about those dollhouse plans! They’re a great way to hone your skills and create something special for yourself or a loved one.
