Ever dreamed of drawing a majestic lion, a playful dolphin, or a cuddly cat? This drawing book is your ticket to bringing those animal dreams to life! It’s all about making art easy and fun for kids of all ages, with simple step-by-step instructions that turn anyone into a budding animal artist.
Get ready to ditch the complicated instructions and dive into a world of creative exploration. This book breaks down complex animal shapes into simple lines and forms, making it a breeze to learn. From basic shapes to adding cool details like fur and scales, you’ll be amazed at how quickly your skills will grow.
Drawing Animals Step-by-Step
Drawing animals can be a fun and rewarding experience, especially for kids! By breaking down complex animal features into simpler shapes and lines, anyone can learn to draw amazing creatures. This section will guide you through drawing various animals step-by-step, making it easy and enjoyable.
Drawing a Dog
To draw a dog, start by sketching a simple oval for the head and a rectangle for the body. Then, add two smaller circles for the ears and a triangle for the nose. You can use curved lines to create the dog’s legs and tail.
- Step 1:Begin with an oval for the head and a rectangle for the body. Make sure the body is slightly wider than the head.
- Step 2:Add two small circles for the ears on top of the head. Draw a triangle for the nose in the middle of the head.
- Step 3:Connect the head and body with a smooth line. Draw four short, curved lines for the legs, with the front legs slightly shorter than the back legs.
- Step 4:Add a curved line for the tail, extending from the back of the body. The tail can be wagging or curled.
- Step 5:Use curved lines to create the dog’s eyes, mouth, and eyebrows. Add details like a tongue sticking out or a playful expression.
- Step 6:You can add fur to the dog by drawing short, wavy lines all over the body. Use darker lines for shadows and lighter lines for highlights.
Drawing a Cat
Cats are known for their sleek and graceful features. To draw a cat, start with a circle for the head and a long oval for the body. Add two triangles for the ears and a small oval for the nose.
Use curved lines for the legs and tail.
- Step 1:Draw a circle for the head and a long oval for the body, making the body slightly longer than the head.
- Step 2:Add two triangles for the ears on top of the head, with the base of the triangles facing inwards.
- Step 3:Draw a small oval for the nose in the middle of the head, and two small circles for the eyes above the nose.
- Step 4:Connect the head and body with a smooth line. Draw four short, curved lines for the legs, with the front legs slightly shorter than the back legs.
- Step 5:Add a long, curved line for the tail, extending from the back of the body. The tail can be curled or straight.
- Step 6:Use curved lines to create the cat’s whiskers and add details like a playful expression or a mischievous grin.
- Step 7:You can add fur to the cat by drawing short, wavy lines all over the body. Use darker lines for shadows and lighter lines for highlights.
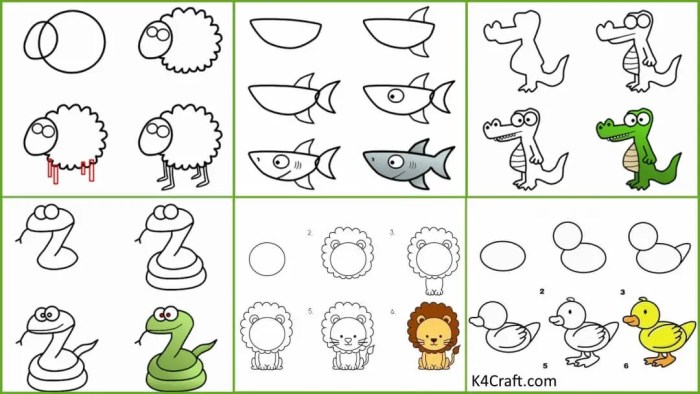
Drawing a Lion
Lions are majestic creatures with powerful features. To draw a lion, start with a circle for the head and a long rectangle for the body. Add two triangles for the ears and a large, curved line for the mane.
- Step 1:Draw a circle for the head and a long rectangle for the body, making the body longer than the head.
- Step 2:Add two triangles for the ears on top of the head, with the base of the triangles facing inwards.
- Step 3:Draw a large, curved line for the mane around the head and neck. The mane can be long and flowing or short and bushy.
- Step 4:Draw a small oval for the nose in the middle of the head, and two small circles for the eyes above the nose.
- Step 5:Connect the head and body with a smooth line. Draw four short, curved lines for the legs, with the front legs slightly shorter than the back legs.
- Step 6:Add a long, curved line for the tail, extending from the back of the body. The tail can be curled or straight, and it often has a tuft of hair at the end.
- Step 7:Use curved lines to create the lion’s whiskers and add details like a fierce expression or a roaring mouth.
- Step 8:You can add fur to the lion by drawing short, wavy lines all over the body. Use darker lines for shadows and lighter lines for highlights.
Drawing an Elephant
Elephants are massive animals with distinctive features. To draw an elephant, start with a large oval for the body and a smaller circle for the head. Add two large ears, a trunk, and four thick legs.
- Step 1:Draw a large oval for the body and a smaller circle for the head, making the body much larger than the head.
- Step 2:Add two large, floppy ears on top of the head. The ears should be wider than the head.
- Step 3:Draw a long, curved line for the trunk, extending from the bottom of the head. The trunk should be thick and have a small, rounded tip.
- Step 4:Draw four thick, sturdy legs below the body. The legs should be wide and strong, with rounded feet.
- Step 5:Draw two small circles for the eyes on the head, and a small oval for the nose at the tip of the trunk.
- Step 6:You can add wrinkles and texture to the elephant’s skin by drawing small, curved lines all over the body. Use darker lines for shadows and lighter lines for highlights.
Drawing a Dolphin
Dolphins are sleek and playful creatures that live in the ocean. To draw a dolphin, start with a curved shape for the body and a pointed head. Add a dorsal fin on the back and a tail fin at the end of the body.
- Step 1:Draw a curved shape for the body, making it slightly thicker in the middle and tapering towards the tail.
- Step 2:Add a pointed head at the front of the body, with a small, curved line for the mouth.
- Step 3:Draw a dorsal fin on the back of the body, with a pointed tip. The fin should be curved and slightly angled.
- Step 4:Add a tail fin at the end of the body, with two curved lobes. The tail fin should be wide and powerful.
- Step 5:Draw two small circles for the eyes on the head, and a small oval for the blowhole on top of the head.
- Step 6:You can add details like ripples in the water around the dolphin and bubbles coming out of the blowhole.
Creative Drawing Techniques
Drawing techniques help you create realistic and expressive animal drawings. They are like special tools that let you add depth, texture, and personality to your artwork.
Hatching and Cross-Hatching
Hatching and cross-hatching are shading techniques that use lines to create different values, from light to dark. Hatching uses parallel lines to create a sense of depth and form. Cross-hatching adds another layer of lines, crossing over the hatching lines to create a more complex and darker shade.
To create hatching, draw a series of parallel lines in one direction. To create cross-hatching, draw another set of parallel lines perpendicular to the first set.
Blending
Blending is a technique that uses tools like your fingers, a blending stump, or a cotton swab to smooth out lines and create smooth transitions between colors. Blending helps create a more realistic look, especially when drawing fur, feathers, or scales.
You can use a blending stump to gently rub the lines of a drawing, creating a soft and blended effect.
Using Color Pencils, Crayons, and Markers
Color pencils, crayons, and markers are versatile tools for adding color and vibrancy to your animal drawings. Each tool has its own unique qualities:
- Color pencils offer a wide range of colors and allow for precise control, making them ideal for detailed drawings.
- Crayons are great for bold, vibrant colors and adding texture to drawings.
- Markers provide a smooth, even application of color, making them great for quick and easy drawings.
Adding Backgrounds, Textures, and Unique Elements
Backgrounds, textures, and unique elements can bring your animal drawings to life.
Yo, wanna unleash your inner artist and draw some super cool animals? This book’s got you covered, from fluffy pups to majestic lions, it’s like a step-by-step guide to becoming a total animal drawing pro. And hey, if you’re feeling extra creative, check out this awesome article on Color Archetypes – Healing Processes in the Visual Journal to add some serious depth to your drawings.
Who knows, maybe you’ll discover a whole new side of yourself through your art!
- Backgrounds: Create a setting for your animal, like a jungle, a forest, or a desert. You can use different colors, textures, and patterns to create a sense of depth and atmosphere.
- Textures: Add texture to your drawings by using different techniques like hatching, cross-hatching, or stippling. You can also use different colored pencils, crayons, or markers to create different textures.
- Unique Elements: Add unique elements to your drawings, such as flowers, butterflies, or other animals. This can help create a more interesting and engaging composition.
Book Review
This book takes a fun and approachable approach to teaching kids how to draw animals. It uses simple step-by-step instructions and clear illustrations to guide young artists through the process. The book’s strength lies in its simplicity and clarity. The instructions are easy to follow, even for beginners, and the illustrations are engaging and helpful.
The book covers a wide range of animals, from common pets like dogs and cats to more exotic creatures like lions and elephants.
Strengths and Weaknesses
The book’s biggest strength is its ability to make drawing accessible to kids of all ages and skill levels. The simple instructions and clear illustrations make it easy for even young children to follow along and create their own drawings.
The book also covers a wide variety of animals, providing kids with plenty of options to choose from.One potential weakness is that the book may not be challenging enough for older or more experienced artists. The instructions are very basic, and some kids might find them repetitive or too simple.
Suitability for Different Age Groups and Skill Levels
This book is perfect for young children who are just starting to learn how to draw. The simple instructions and clear illustrations make it easy for them to follow along and create their own drawings. It’s also a great resource for parents and teachers who are looking for fun and engaging activities to do with kids.While the book is suitable for young children, it may not be challenging enough for older or more experienced artists.
They may find the instructions too basic and the content too repetitive.
Concluding Remarks

So grab your pencils, crayons, or markers, and get ready to unleash your inner artist! This book is your ultimate guide to drawing the coolest animals, from fluffy pets to wild creatures roaming the savanna. With a little practice and a whole lot of fun, you’ll be creating amazing animal masterpieces in no time.
Essential Questionnaire
What kind of animals can I draw in this book?
This book features a wide variety of animals, including dogs, cats, lions, elephants, dolphins, and more!
Do I need any special drawing skills to use this book?
Absolutely not! This book is perfect for beginners, and the step-by-step instructions make it easy for anyone to learn.
What supplies do I need to get started?
You’ll just need some basic drawing supplies, like pencils, crayons, or markers. A piece of paper is all you need to unleash your creativity!
