
Ever dreamed of crafting your own musical masterpieces without leaving the comfort of your couch? You’re not alone! Home studio recording is booming, and with the right tools and knowledge, you can turn your living room into a professional-sounding recording studio.
This comprehensive guide will take you on a journey from setting up your studio to mastering your tracks, covering everything from choosing the right equipment to mastering the art of mixing and mastering. Whether you’re a seasoned musician or just starting out, this guide will equip you with the knowledge and confidence to produce high-quality music from your home studio.
Setting Up Your Home Studio
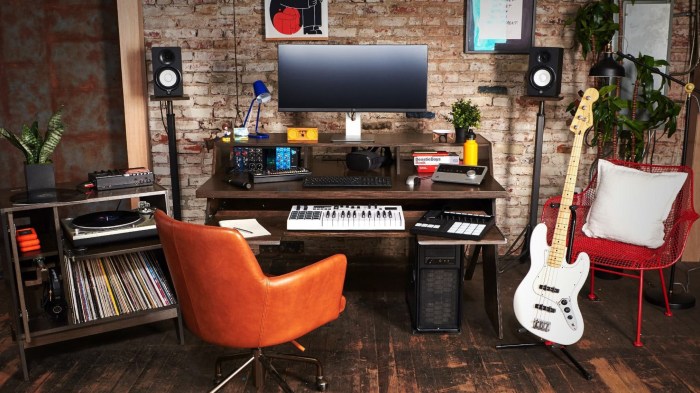
Setting up a home studio can be a thrilling and rewarding experience. You can create your own musical masterpieces in the comfort of your own home, but it’s important to start with the right tools and techniques. This section will guide you through the essential equipment, setup process, and acoustic considerations for a successful home studio.
Essential Equipment
To begin your recording journey, you’ll need a few key pieces of equipment. These form the foundation of your home studio, allowing you to capture, manipulate, and enjoy your music.
- Microphones:These are the ears of your studio, converting sound waves into electrical signals. There are many types of microphones, each with its own characteristics.
- Condenser Microphones:These are known for their sensitivity and detailed sound reproduction, often used for vocals, acoustic instruments, and overhead drum recording.
- Dynamic Microphones:These are more robust and handle high sound pressure levels, making them ideal for loud instruments like guitar amps, drums, and vocals in live settings.
- Ribbon Microphones:These offer a warm and smooth sound, often used for vocals, instruments, and capturing ambient sounds.
- Audio Interface:This acts as the bridge between your microphones, instruments, and your computer. It converts analog audio signals to digital data that your computer can understand. Audio interfaces typically come with preamps, which boost the signal from your microphones.
- Headphones:These are crucial for monitoring your recordings, allowing you to hear what you’re capturing without feedback. Headphones should be comfortable, have good sound quality, and isolate external noise.
- Speakers:These are used for listening back to your recordings and mixing your music. Choose speakers with a flat frequency response, meaning they accurately reproduce the full range of sound frequencies.
- DAW Software:Digital Audio Workstation (DAW) software is the heart of your home studio. It provides the tools to record, edit, mix, and master your music. Popular DAWs include Logic Pro X, Ableton Live, Pro Tools, and Studio One.
Setting Up Your Equipment
Once you have your equipment, you need to connect and configure it properly. This process involves physically connecting the devices and setting up the software to work together.
So, you wanna make beats like your favorite artists, right? “Home Studio Recording The Complete Guide” will hook you up with the knowledge you need to rock your own world. But hey, you gotta be able to write down those killer ideas, too! Check out Learn To Write Like An Architect A HANDWRITING PRACTICE GUIDE FOR ADULTS to level up your penmanship and keep your musical vision organized.
Once you’ve got your ideas flowing and your writing game on point, it’s time to get back to the studio and unleash your inner musical genius!
- Connect Your Microphones:Plug your microphones into the appropriate inputs on your audio interface. You may need to use XLR cables for condenser microphones and 1/4″ cables for dynamic microphones.
- Connect Your Audio Interface:Connect your audio interface to your computer using a USB or Thunderbolt cable.
- Connect Your Headphones and Speakers:Plug your headphones into the headphone jack on your audio interface and your speakers into the main outputs.
- Install and Configure Your DAW:Download and install your chosen DAW software on your computer. Follow the setup instructions to configure the software to work with your audio interface and other devices.
- Set Up Your Input and Output Channels:In your DAW, create audio tracks for each microphone and instrument you want to record. Ensure the correct input and output channels are selected for each track to match your audio interface’s configuration.
- Calibrate Your Monitoring System:Use a calibration tool or your DAW’s built-in features to ensure your speakers and headphones are accurately reproducing sound.
Acoustics and Sound Treatment
The sound of your recordings can be significantly impacted by the acoustics of your studio space. To achieve the best possible sound quality, you need to address reflections and unwanted noise.
- Reflection Control:Reflections occur when sound waves bounce off hard surfaces, causing coloration and distortion. You can control reflections by using sound-absorbing materials like acoustic panels, foam, or carpets.
- Noise Reduction:Unwanted noise can come from outside your studio or from within your home. To minimize noise, you can use soundproofing materials, such as thick curtains or acoustic panels, to isolate your studio.
- Room Treatment:Acoustic treatment involves strategically placing sound-absorbing and sound-diffusing materials throughout your studio. This helps to create a balanced and controlled acoustic environment, reducing unwanted reflections and improving the overall sound quality.
Choosing a Quiet Location
Choosing a quiet location within your home is crucial for minimizing noise interference.
Setting up a home studio can be a real blast, but it can also be a little stressful trying to figure out all the gear and software. Sometimes, you just need a break to chill out, and that’s where the Cute Fairies Coloring Book For Adults And Teens 50 Beautiful Flower Fairies Illustrations for Relaxation and Stress Relief…Gift For Adults Teens Girls.Paperback – February 16 2023 comes in handy.
After a few hours of coloring those adorable fairies, you’ll be back in the studio with a fresh perspective, ready to rock those tracks!
- Minimize External Noise:Avoid rooms with windows facing busy streets or noisy neighbors.
- Consider Internal Noise Sources:Be mindful of noise from appliances, HVAC systems, or other household activities.
- Isolate Your Studio:If possible, create a dedicated studio space that is separate from other rooms to minimize noise bleed.
Recording Techniques
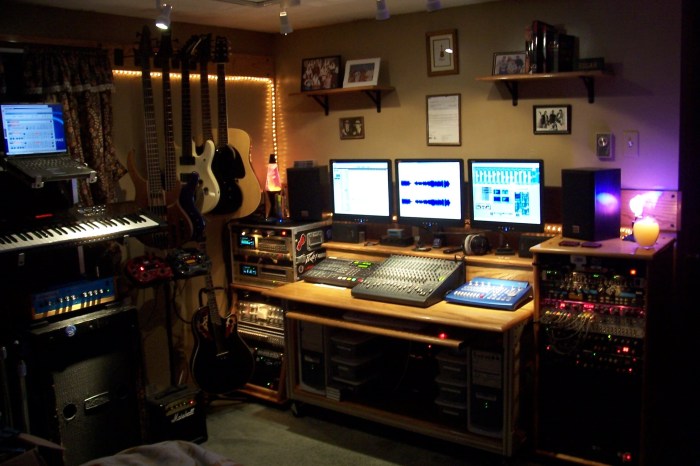
You’ve got your home studio set up, but now it’s time to capture that awesome sound. This is where recording techniques come into play. It’s like being a sound engineer, but in your own space! Let’s dive into the world of mics, placement, and getting the best sound out of your instruments and vocals.
Microphone Types
Microphones are the heart of recording, converting sound waves into electrical signals that your computer can understand. Think of them as the ears of your studio! There are different types of mics, each with their own strengths and weaknesses.
- Condenser Microphones:These mics are known for their sensitivity and detail. They pick up a wide range of frequencies, making them great for capturing delicate sounds like acoustic guitars, vocals, and even room ambience. They’re often used in studios for their pristine sound quality.
- Dynamic Microphones:These mics are built tough and can handle high sound pressure levels, making them perfect for loud instruments like drums, electric guitars, and even vocals. They’re less sensitive than condensers but offer a more “punchy” sound.
- Ribbon Microphones:These mics have a unique, vintage sound. They’re very sensitive to sound coming from the sides, which makes them great for capturing the nuances of instruments like horns and string sections. They’re known for their warmth and natural tone.
Microphone Techniques
Now that you know about different microphone types, let’s talk about how to use them.
- Close Miking:This technique involves placing the microphone very close to the sound source, often within inches. It captures a direct, focused sound, perfect for instruments like guitars, vocals, and drums. It’s like being right in the face of the action!
- Room Miking:This technique involves placing the microphone further away from the sound source, capturing the natural ambience of the room. It’s great for adding depth and space to recordings, especially for instruments like acoustic guitars and vocals. Think of it like capturing the whole atmosphere of your studio.
- Stereo Recording:This technique uses two microphones to capture a wider soundstage, creating a more immersive listening experience. It’s like having two ears listening to the music! There are different stereo techniques, like X-Y, AB, and MS, each offering a unique perspective on the sound.
Microphone Placement
Mic placement is key to getting the best sound out of your instruments and vocals. It’s like finding the sweet spot for each sound!
Yo, wanna level up your music game? “Home Studio Recording The Complete Guide” is your ultimate cheat sheet to making beats like a boss. It’s got all the tips and tricks, from setting up your space to mixing like a pro.
Download And Listen Here to get your creative juices flowing and start making tracks that’ll blow everyone’s minds. Trust me, this guide is your ticket to becoming a recording studio superstar!
- Vocals:For vocals, a condenser microphone placed about 6-12 inches from the singer’s mouth, angled slightly towards the center of the mouth, is a common starting point. Experiment with different distances and angles to find the best sound.
Setting up your own home studio can be a total blast! It’s like having your own personal music lab, but you gotta be organized. You need the right gear, the right software, and the right mindset. Think of it like coloring a picture, but instead of crayons, you’re using microphones and plugins.
And just like the COLOR BY NUMBERS BOOK FOR KIDS AGES 8-12 Over 45+ Large Print Birds Flowers Animals and Pretty Patterns Color by Number Activity Coloring Books (Black Background) , the possibilities are endless! Once you’ve got your studio set up, you can start making your own beats, recording your own vocals, and maybe even putting together your own album.
Who knows, maybe you’ll be the next big thing!
- Acoustic Guitar:For acoustic guitars, a condenser microphone placed about 6-12 inches from the soundhole, angled slightly towards the bridge, is a good starting point. You can also experiment with placing the microphone near the neck or body of the guitar for different tonal characteristics.
- Electric Guitar:For electric guitars, a dynamic microphone placed in front of the speaker cabinet is a common technique. Experiment with different distances and angles to find the best sound for your amp.
- Drums:For drums, a microphone setup usually includes a kick drum microphone, snare drum microphone, overhead microphones, and individual microphones for toms and cymbals. The placement of these microphones can vary depending on the size of the drum set and the desired sound.
Recording Techniques for Different Genres
The way you record music can vary depending on the genre. It’s like tailoring your sound to the style!
- Pop:Pop music often uses a combination of close miking, room miking, and stereo recording techniques. It’s all about capturing a clear, polished sound with a wide soundstage.
- Rock:Rock music often uses a combination of close miking and room miking techniques, with a focus on capturing the raw energy of the instruments.
- Jazz:Jazz music often uses a combination of close miking, room miking, and stereo recording techniques, with a focus on capturing the nuances of the instruments and the interplay between musicians.
- Classical:Classical music often uses a combination of close miking, room miking, and stereo recording techniques, with a focus on capturing the natural sound of the instruments and the acoustics of the performance space.
Mixing and Mastering
Mixing and mastering are the final steps in the audio production process, where you take your individual tracks and transform them into a cohesive and polished final product. Think of it like taking your raw ingredients and turning them into a delicious meal.
Mixing is like blending the flavors, while mastering is like adding the finishing touches to make it restaurant-worthy.
Balancing Levels
Balancing levels is crucial for achieving a clear and dynamic mix. It involves adjusting the volume of each track to ensure that no single instrument or vocal dominates the mix. A well-balanced mix allows each element to be heard clearly without any unwanted clipping or distortion.
Here are some tips for balancing levels:
- Use a meter to monitor the levels of each track, ensuring they are within a safe range.
- Start by setting the levels of the main instruments and vocals, then adjust the levels of the supporting instruments and effects accordingly.
- Use automation to adjust levels dynamically throughout the song, ensuring that each element is heard at the appropriate time.
Panning
Panning involves placing instruments and vocals in the stereo field. Think of it like arranging instruments on a stage. By panning instruments to the left and right speakers, you can create a sense of width and depth, giving your mix a more spacious and immersive feel.Here are some tips for panning:
- Use panning to create a sense of space and separation between instruments.
- Pan instruments that are meant to be heard together in the center, while panning instruments that should be heard separately to the left and right.
- Experiment with panning to find the best placement for each instrument.
EQ
EQ (Equalization) is used to shape the frequency response of each track. It allows you to boost or cut specific frequencies to enhance the clarity and presence of each instrument or vocal. Here are some tips for using EQ:
- Use EQ to remove unwanted frequencies that may be causing muddiness or harshness.
- Boost specific frequencies to enhance the presence of certain instruments or vocals.
- Use high-pass filters to remove low-frequency noise and rumble.
- Use low-pass filters to remove high-frequency noise and hiss.
Compression
Compression is used to control the dynamic range of a track. It reduces the difference between the loudest and quietest parts of a track, making it sound more consistent and powerful.Here are some tips for using compression:
- Use compression to even out the volume of a track, making it sound more consistent and powerful.
- Use compression to add punch and impact to drums and bass.
- Use compression to smooth out vocal tracks, making them sound more polished and professional.
Effects
Effects are used to add color and depth to your mix. They can be used to create a variety of sounds, from subtle reverb to dramatic delays. Here are some common effects used in mixing:
- Reverb: Adds a sense of space and depth to a track, making it sound like it was recorded in a larger room. It’s like creating an echo effect, giving your sound a sense of atmosphere.
- Delay: Creates a repeating echo effect, adding rhythmic interest and a sense of space to a track. Imagine that cool repeating echo effect in songs like “Echoes” by Pink Floyd.
- Chorus: Creates a thick and lush sound by doubling or tripling the signal, adding a sense of richness and fullness to your mix.
- Distortion: Adds a gritty and aggressive sound to a track, often used to enhance the punch of guitars or vocals.
Mastering
Mastering is the final stage of audio production, where you prepare your mix for distribution. It involves making subtle adjustments to the overall sound of your mix, ensuring that it is loud, clear, and balanced. Here are some key aspects of mastering:
- Loudness: Mastering engineers use limiters to increase the overall loudness of the mix without sacrificing clarity or introducing distortion.
- Clarity: Mastering engineers use EQ to fine-tune the frequency response of the mix, ensuring that all instruments and vocals are heard clearly.
- Balance: Mastering engineers ensure that the mix is balanced across the stereo field, creating a cohesive and enjoyable listening experience.
Plugins and Software
There are many different plugins and software available for mixing and mastering. Some popular choices include:
- EQs: FabFilter Pro-Q 3, Waves Q10, iZotope Ozone 9
- Compressors: FabFilter Pro-C 2, Waves CLA-76, iZotope Ozone 9
- Limiters: FabFilter Pro-L 2, Waves L3-LL, iZotope Ozone 9
- Reverbs: Valhalla Vintage Verb, Lexicon PCM Native, Eventide Space
Best Practices
Here are some best practices for achieving a balanced and dynamic mix:
- Use a reference track: Listen to professionally mastered songs in your genre to get an idea of what a good mix should sound like.
- Take breaks: It’s easy to get fatigued when mixing, so take breaks to avoid making mistakes. Fresh ears are always better.
- Work in a well-treated room: A good acoustic environment will make it easier to hear your mix accurately.
- Experiment: Don’t be afraid to experiment with different plugins and settings to find the best sound for your mix.
Book Review

Alright, so you’ve got your home studio set up, you’re recording like a boss, and you’re mixing tracks that sound pretty darn good. But what about taking those tracks to the next level? That’s where mastering comes in, and that’s where a book like “The Mastering Engineer’s Handbook” by Bob Katz comes in.This book is like the bible for mastering engineers, and it’s packed with info that can help you get your tracks sounding their absolute best.
Key Takeaways from the Book
Katz dives deep into the science and art of mastering, covering everything from the basics of equalization and dynamics to the more advanced concepts of psychoacoustics and loudness wars. Here are some of the key takeaways that can help aspiring producers and musicians:
- Understanding the role of mastering in the music production process: Mastering is the final stage of audio production, and it’s where you polish your tracks to make them sound their best for distribution.
- The importance of mastering for professional-sounding tracks: Mastering can help to improve the overall sound quality of your tracks, making them more competitive in the marketplace.
- How to use mastering techniques to achieve a desired sound: The book covers various techniques, such as equalization, compression, and limiting, that you can use to achieve a desired sound.
- The importance of psychoacoustics in mastering: Psychoacoustics is the study of how humans perceive sound, and understanding it can help you make more effective mastering decisions.
- How to avoid the loudness wars and create tracks that sound good at any volume: Katz emphasizes the importance of creating tracks that sound good at any volume, rather than simply trying to make them as loud as possible.
Comparison with Other Resources
“The Mastering Engineer’s Handbook” is a comprehensive resource that goes beyond what you might find in other books or online tutorials. It delves into the technical aspects of mastering in a way that’s both informative and accessible. Compared to online tutorials, the book offers a more structured and in-depth approach, providing a solid foundation in the theory and practice of mastering.
It also includes real-world examples and case studies that illustrate the concepts discussed.
Strengths and Weaknesses
The book’s strengths lie in its thoroughness, clarity, and practical advice. Katz’s writing style is clear and engaging, and he does a great job of breaking down complex concepts into easily understandable terms. However, the book can be quite dense at times, and it may not be suitable for beginners who are just starting out with mastering.
Some readers may find the technical details overwhelming, especially if they don’t have a strong background in audio engineering. Overall, “The Mastering Engineer’s Handbook” is a valuable resource for anyone who wants to learn more about mastering, whether you’re a seasoned producer or just starting out.
It’s a book that you can refer to again and again as you continue to develop your mastering skills.
Closing Summary
So, ditch the daydreams and dive into the world of home studio recording. With the right equipment, techniques, and a sprinkle of passion, you can create music that will blow your mind and leave your audience wanting more. Remember, the journey is just as important as the destination, so embrace the learning process and enjoy the creative freedom that comes with recording your own music.
Now, go forth and make some noise!
Query Resolution
What kind of microphone is best for beginners?
A condenser microphone is a great choice for beginners as they are versatile and can handle a wide range of instruments and vocals. Look for one with a cardioid pickup pattern to minimize unwanted noise.
How can I improve the acoustics of my home studio?
You can improve the acoustics of your home studio by using sound-absorbing materials like acoustic panels or foam to reduce reflections and echoes. You can also use diffusers to scatter sound waves and create a more balanced sound.
What is the best DAW for beginners?
There are many great DAWs available, but some popular options for beginners include GarageBand (Mac), Audacity (free), and Logic Pro X (Mac). These DAWs are user-friendly and offer a range of features for recording, editing, and mixing music.
What are some essential plugins for mixing and mastering?
Essential plugins for mixing and mastering include EQs, compressors, limiters, reverbs, and delays. These plugins allow you to shape the sound of your tracks, add depth and dimension, and achieve a polished professional sound.
