Ever wanted to bring your awesome ideas to life on paper? Drawing people can be a blast, and this guide is your secret weapon for creating characters that are totally cool and unique. We’re gonna break down the basics, show you how to draw girls and boys doing all sorts of things, and even give you some tips for adding personality to your art.
So, grab your pencils and get ready to unleash your inner artist!
This guide is all about having fun and learning new skills. We’ll start with the basics, like drawing simple shapes and understanding proportions. Then, we’ll dive into facial features, clothing, and accessories, and even explore different poses. By the end, you’ll be able to draw characters that are as awesome as you are!
Basic Shapes and Proportions

Drawing people can seem tricky, but it’s actually a lot of fun! Just like building a house with blocks, we can use basic shapes to build our drawings.
Drawing Basic Shapes
These simple shapes are the building blocks for our drawings. We’ll use them to create the head, body, and limbs of our characters.
Wanna unleash your inner artist and draw some super cool characters? “How to Draw People for Kids: A Step-by-Step Guide to Drawing Girls and Boys doing Things” will show you how to make awesome drawings of people doing all kinds of things.
You can even listen to the whole book Download And Listen Here while you’re drawing. So grab your pencils and get ready to make some masterpieces!
- Circles and Ovals:These are perfect for drawing heads, especially for children. A circle is a good starting point for a head, and you can make it slightly oval-shaped for a more realistic look.
- Rectangles:These are great for the body and limbs.
You can make them longer or shorter depending on the body part you’re drawing.
Drawing a Simple Stick Figure
Stick figures are a great way to practice proportions and get the basic shape of a person down.
- Start with a Circle for the Head:Draw a circle at the top of your paper. This will be the head of your stick figure.
- Add a Rectangle for the Body:Draw a rectangle below the circle. The rectangle should be about twice as long as the circle.
- Draw Limbs:Use straight lines to draw the arms and legs.
The arms should reach about halfway down the body, and the legs should be a little longer.
- Add Details:Draw small circles for hands and feet. You can also add a line for a neck and a smile for a face.
So you wanna draw some cool characters, huh? Maybe a tough cowboy, a sassy Native American girl, or even a mischievous little dude with a slingshot? Well, “How to Draw People for Kids” will give you all the tips you need to make those characters come to life.
But if you’re really looking to get into the spirit of the Wild West, check out “Nine Years Among the Indians 1870-1879 The Story of the Captivity and Life of a Texan Among the Indians (1927)” here. It’s a wild ride that’ll give you some real-life inspiration for your drawings.
You’ll be sketching like a pro in no time!
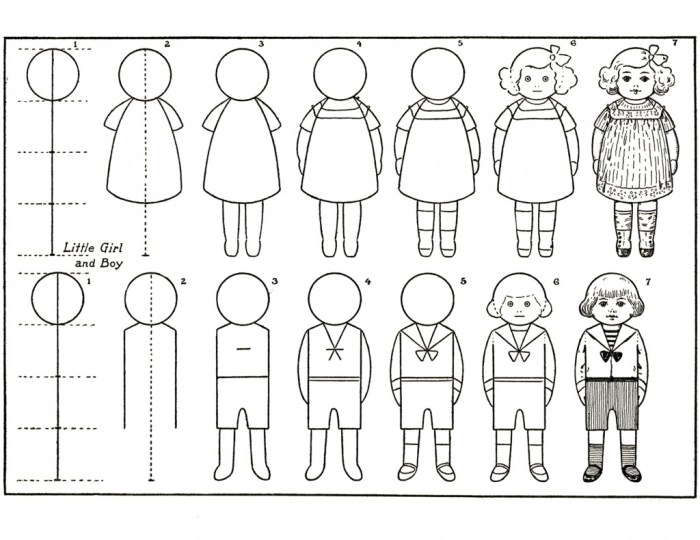
Drawing a Girl and a Boy
Now, let’s use these basic shapes to draw a girl and a boy!
- The Girl:
- Start with the Head:Draw a circle for the head.
- Add the Body:Draw a rectangle for the body. Make it a bit wider at the shoulders than the hips.
- Draw the Limbs:Draw the arms and legs using curved lines, giving them a more feminine look.
- Add Details:Draw a long, flowing skirt and add a bow or other girly details.
Drawing people can be a fun way to express your creativity, especially if you’re learning to draw. You can capture all sorts of actions and emotions, like a kid playing with a dog or a girl riding a bike. But sometimes, you want to draw something more serious and meaningful, like the struggles of a Holocaust survivor.
If you’re interested in learning about history and want to see how art can be used to tell a story, you might check out The Photographer’s Son A WW2 Historical Novel Based on a True Story of a Jewish Holocaust Survivor.
It’s a powerful book that shows how art can help us understand the past and learn from it. And hey, maybe after reading it, you’ll want to draw a character from the book, like a young boy hiding from the Nazis.
You never know what inspiration you might find!
- The Boy:
- Start with the Head:Draw a circle for the head.
- Add the Body:Draw a rectangle for the body. Make it slightly wider at the shoulders than the hips.
- Draw the Limbs:Draw the arms and legs using straight lines, giving them a more masculine look.
- Add Details:Draw pants or shorts and add a shirt.
You can also add a hat or other boyish details.
Facial Features
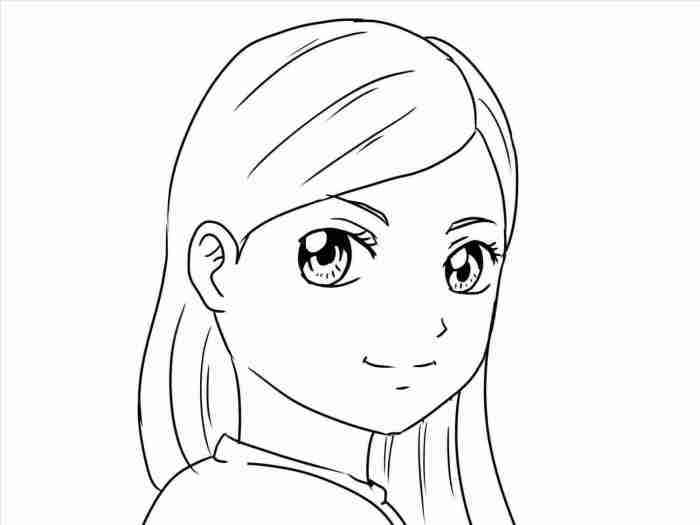
Now that you know how to draw the basic shapes of a body, let’s dive into the fun partdrawing faces! Faces are what give your characters personality and life.Drawing faces for kids is all about capturing their youthful charm. You don’t need to be a master artist to create adorable and expressive faces.
We’ll break down the steps for drawing eyes, nose, mouth, and ears in a way that’s easy for you to follow. We’ll also explore different hairstyles for both girls and boys.
Eyes
Eyes are the windows to the soul, and they’re super important in drawing people. For kids, you can make their eyes big and expressive.Here’s how to draw eyes:
- Start with a circle.This will be the base of the eye.
- Draw a smaller circle inside the bigger circle.This will be the iris, the colored part of the eye.
- Add a smaller circle in the middle of the iris.This will be the pupil, the black part of the eye.
- Draw a curved line at the top of the eye.This will be the eyelid.
- Add eyelashes.For girls, you can draw longer eyelashes. For boys, you can make them shorter or just add a few.
- Draw a small line under the eye.This will be the lower eyelid.
- Add some highlights to the eye.This will make the eye look more realistic.
Here are some tips for drawing eyes:* Spacing:Make sure there’s enough space between the eyes. They shouldn’t be too close together.
Shape
You can make the eyes round, almond-shaped, or even slightly squinted. Experiment to see what you like best!
Color
You can use different colors for the iris, such as blue, green, brown, or hazel.
Nose
Noses can be simple or detailed. Here’s a way to draw a cute nose:
- Draw a small triangle.This will be the bridge of the nose.
- Draw a small circle at the bottom of the triangle.This will be the tip of the nose.
- Draw two small lines coming out from the sides of the circle.These will be the nostrils.
Here are some tips for drawing noses:* Angle:You can change the angle of the nose to create different expressions. A nose pointing slightly upwards can make a character look happy, while a nose pointing downwards can make them look sad.
Size
For kids, you can keep the nose small and cute.
Mouth
Mouths are another important part of a face. Here’s how to draw a mouth:
- Draw a curved line.This will be the base of the mouth.
- Add a small line at the top of the curved line.This will be the upper lip.
- Add a small line at the bottom of the curved line.This will be the lower lip.
- Draw a small line in the middle of the curved line.This will be the tongue.
Here are some tips for drawing mouths:* Shape:You can make the mouth a simple curve, or you can add details like lips and teeth.
Expression
The shape of the mouth can convey different emotions. A wide smile indicates happiness, while a frown suggests sadness.
Ears
Ears are usually drawn on the sides of the head. Here’s how to draw ears:
- Draw a curved line.This will be the outer edge of the ear.
- Draw a smaller curved line inside the bigger curved line.This will be the inner edge of the ear.
- Draw a small circle at the bottom of the ear.This will be the earlobe.
Here are some tips for drawing ears:* Placement:Make sure the ears are placed at the correct height on the head.
Shape
You can make the ears round, pointy, or even folded over.
Expressions
Expressions are what make your characters come alive. Here are some tips for drawing different expressions:* Happy:Draw a big smile with a wide mouth and upturned eyes.
Sad
Draw a frown with a downturned mouth and droopy eyes.
Surprised
Draw wide eyes with a raised eyebrow.
Angry
Draw a furrowed brow and a clenched jaw.
Hairstyles
Hairstyles are a fun way to add personality to your characters. Here’s a table showing some different hairstyles for girls and boys:| Hairstyle | Girls | Boys ||—|—|—|| Ponytail | A high ponytail is a classic look for girls.
| A ponytail is a practical and easy hairstyle for boys. || Braids | Braids can be simple or elaborate. | Boys can wear braids too, especially in sports. || Short Cuts | Short cuts can be chic and stylish.
| Short cuts are a popular choice for boys. |Remember, these are just a few ideas to get you started. You can use your imagination to create all sorts of different hairstyles for your characters!
Clothing and Accessories
Now that you’ve mastered drawing the basic shapes of people, let’s add some personality and style with clothing and accessories! Clothing is a fun way to show what your characters are doing and what they’re like. Let’s dive into some basic techniques for drawing different types of clothes and accessories.
Drawing Different Types of Clothing
Clothing can be simple or detailed, depending on the look you’re going for. Let’s start with some basic shapes for common clothing items.
- T-shirts:Start with a rectangle for the body of the shirt. Add a curve at the bottom for the hemline. For short-sleeved shirts, draw two slightly curved rectangles for the sleeves. Long-sleeved shirts are just longer rectangles.
Drawing people doing things is totally rad, and it’s super easy with a step-by-step guide. Think of it like a cheat sheet for your artistic skills, showing you how to draw girls and boys doing all sorts of awesome stuff.
If you’re looking to plan out your art projects, grab a calendar like the Pooch Calendar 2022 Monthly Planner , so you can stay organized and make sure you’ve got time to practice your drawing skills. Then, you’ll be drawing like a pro in no time!
- Pants:Draw two long, slightly curved rectangles for the legs. Connect them at the top with a rectangle for the waistband. For shorts, simply shorten the legs.
- Dresses:Start with a long rectangle for the body of the dress. Add a curve at the bottom for the hemline. You can add sleeves, straps, or a belt to make the dress more interesting.
- Skirts:Draw a circle or a semi-circle for the skirt. You can make it short, long, or flowy. Add a waistband to the top.
- Formal Wear:Formal outfits can be more complex, but the basic shapes are still the same. For example, a suit jacket is like a large rectangle with a curved hemline. A tie is a long, narrow rectangle. A dress shirt is like a T-shirt, but with a collar.
Adding Accessories
Accessories can really make your drawings pop. Here are some common accessories you can add:
- Hats:Hats can be simple or elaborate. Start with a basic shape like a circle for a beanie or a rectangle for a baseball cap. Add details like a brim or a logo.
- Shoes:Shoes come in all shapes and sizes. Start with a basic rectangle for the sole and then add the upper part of the shoe. You can make it a sneaker, a boot, a sandal, or anything else you can imagine.
- Bags:Bags can be backpacks, purses, or totes. Start with a basic rectangle or square and then add details like straps, zippers, and pockets.
- Jewelry:Jewelry can be simple or elaborate. You can draw necklaces, bracelets, earrings, and rings. Use basic shapes like circles, squares, and triangles.
Poses for Girls and Boys
Here’s a table showing some basic poses for girls and boys engaged in different activities:
| Activity | Girls | Boys |
|---|---|---|
| Playing | Sitting on the floor, playing with a doll, jumping rope | Kicking a ball, playing with a toy car, running |
| Running | Arms swinging, legs moving in a fast pace | Arms swinging, legs moving in a fast pace |
| Dancing | Twirling, leaping, spinning | Dancing with a partner, breakdancing, performing a dance routine |
Book Review
This review will examine a popular children’s drawing book, “Drawing People for Kids: A Step-by-Step Guide to Creating Amazing Characters.” We’ll compare its approach to drawing people with the techniques presented in this guide and discuss its suitability for different age groups and skill levels.
Book’s Approach to Drawing People
This book uses a simplified approach to drawing people, focusing on basic shapes and step-by-step instructions. It breaks down the human figure into simple geometric shapes, such as circles, ovals, and rectangles, which are then gradually refined into more detailed features.
The book uses a combination of line drawings and colored illustrations to guide young artists through the process.
Comparison with This Guide
This guide and the book share a similar foundation, emphasizing basic shapes and proportions. However, this guide provides a more comprehensive approach, covering a wider range of topics, including facial features, clothing, and accessories. The book focuses primarily on the human figure, while this guide explores different poses and actions.
Suitability for Different Age Groups and Skill Levels
“Drawing People for Kids” is suitable for children aged 6 and up, with varying levels of drawing experience. The book’s simple instructions and clear illustrations make it accessible to beginners, while more experienced artists can use it to refine their skills.
Strengths of the Book
- Simple and Easy to Follow:The book’s step-by-step instructions and clear illustrations make it easy for young artists to understand and follow along.
- Encourages Creativity:The book provides a solid foundation for drawing people, but also encourages creativity by offering tips on adding personality and details to characters.
- Engaging and Fun:The book’s bright colors and engaging illustrations make drawing people an enjoyable experience for children.
Weaknesses of the Book
- Limited Scope:The book primarily focuses on drawing the human figure, with limited coverage of other aspects of drawing, such as perspective and composition.
- Repetitive Techniques:The book relies heavily on a limited number of drawing techniques, which can become repetitive for more experienced artists.
- Lack of Depth:The book provides a basic introduction to drawing people, but lacks the depth and detail found in more advanced drawing books.
Closure

Drawing people is like telling stories with your art. With practice, you can create characters that express emotions, show off their personalities, and even tell a whole story just by the way they stand or what they’re doing. So, keep practicing, have fun, and remember, the coolest thing about drawing is that there are no limits! Go out there and draw something amazing!
FAQ Compilation
What kind of drawing tools should I use?
You can use whatever you like! Pencils, crayons, markers, colored pencils, even digital art tools. It’s all about finding what you enjoy and what works best for you.
Is it okay if my drawings aren’t perfect?
Absolutely! Drawing is all about practice and having fun. Don’t worry about making mistakes, just keep trying and you’ll see how much you improve.
What are some good resources for learning more about drawing?
There are tons of great resources online, like YouTube tutorials and websites dedicated to art. You can also check out books from your local library.
