Picnic table woodworking plans set the stage for building your own sturdy and stylish outdoor gathering space. Whether you’re a seasoned woodworker or just starting out, crafting a picnic table from scratch offers a rewarding experience and a chance to create a unique piece for your backyard or patio. This guide will walk you through the process, from selecting materials to finishing touches, ensuring you have everything you need to create a beautiful and functional table.
Building a picnic table allows you to customize the design to your liking, choosing the perfect size, shape, and features to suit your needs. You can select from various wood types, finishes, and even add personalized touches like built-in coolers or umbrella holders. The satisfaction of creating something from scratch, a piece that will be enjoyed by family and friends for years to come, is truly unparalleled.
Introduction to Picnic Table Woodworking

Building a picnic table is a rewarding project that allows you to create a durable and stylish outdoor dining space for your family and friends. It’s a great way to personalize your backyard and add a touch of rustic charm to your outdoor area.
The appeal of building a picnic table lies in the satisfaction of creating something functional and beautiful with your own hands. You have complete control over the design, materials, and finishing touches, making it a truly unique piece of furniture.
Benefits of DIY Picnic Table Projects
Building your own picnic table offers several advantages over purchasing a pre-made one.
- Cost-Effectiveness: DIY projects can save you a significant amount of money compared to buying a similar table from a store. You can choose more affordable materials and avoid the markup associated with retail products.
- Customization: You have the freedom to design the table to your exact specifications, including the size, shape, and style. This allows you to create a piece that perfectly complements your outdoor space and personal preferences.
- Sense of Accomplishment: The process of building a picnic table is a satisfying and rewarding experience. You’ll gain valuable woodworking skills and have a tangible reminder of your hard work.
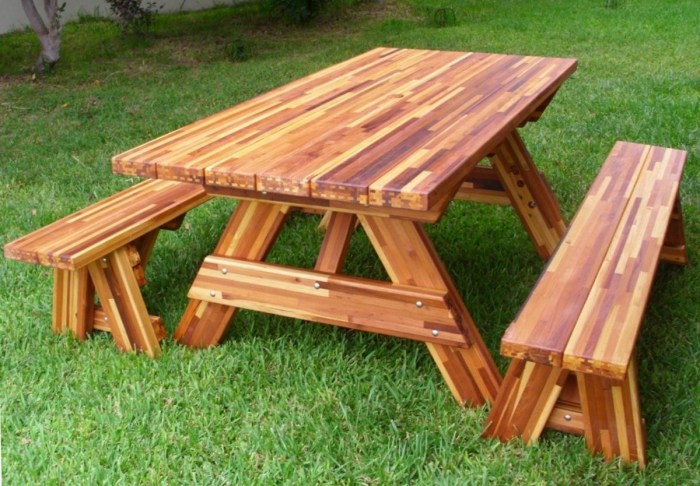
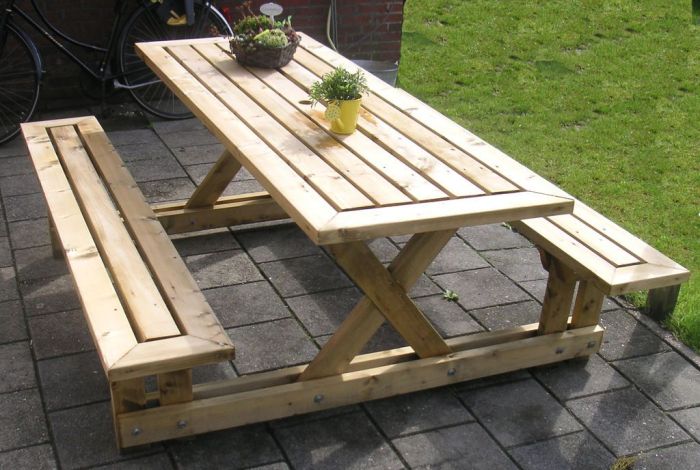
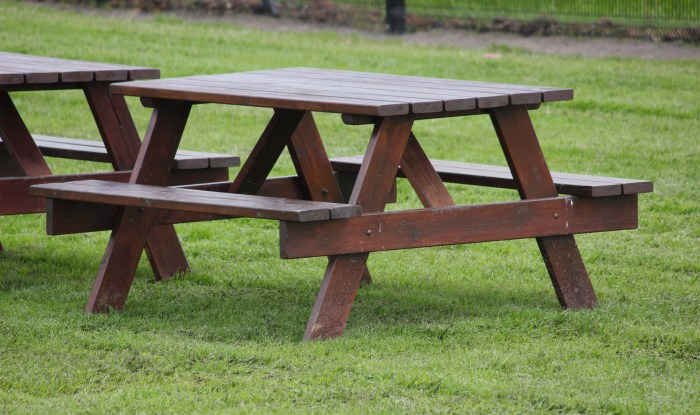
Picnic Table Styles
Picnic tables come in various styles, each offering unique features and aesthetic appeal.
- Traditional Picnic Table: This classic style features a rectangular tabletop with two long benches attached on either side. It’s a simple and functional design that’s perfect for casual gatherings.
- A-Frame Picnic Table: This style incorporates a distinctive A-frame design for the legs, providing extra stability and a more contemporary look. It’s often used for larger tables to accommodate more guests.
- Folding Picnic Table: This portable design features a tabletop that folds down for easy storage and transport. It’s ideal for small patios or for taking to the park.
- Rustic Picnic Table: This style emphasizes natural wood finishes and rough-hewn elements, creating a charming and cozy atmosphere. It’s often made from reclaimed wood or rough-cut lumber.
- Modern Picnic Table: This style incorporates sleek lines, minimalist designs, and contemporary materials like metal or composite wood. It’s a great option for adding a modern touch to your outdoor space.
Essential Materials and Tools
Constructing a picnic table requires a careful selection of materials and tools. This section will guide you through the essential elements needed for a successful build, from choosing the right wood to gathering the necessary tools.
Wood Selection
The choice of wood is crucial for a durable and aesthetically pleasing picnic table. Here are some suitable options:
- Redwood: Known for its natural resistance to decay and insects, redwood is a popular choice for outdoor furniture. It ages beautifully with a warm, reddish hue.
- Cedar: Similar to redwood, cedar offers natural insect and decay resistance. It has a distinctive aroma and a beautiful grain pattern.
- Pressure-Treated Pine: This affordable option is treated with chemicals to resist rot and insects, making it ideal for outdoor projects.
- Hardwoods: Oak, maple, and cherry are durable hardwoods that can withstand heavy use. They are more expensive but offer a classic look and exceptional longevity.
Essential Woodworking Tools
Having the right tools is essential for a smooth and successful picnic table construction process. Here’s a list of essential tools:
- Saw: A circular saw or a table saw is essential for cutting lumber to size. A handsaw can be used for smaller cuts and trimming.
- Drill: A cordless drill with various drill bits is necessary for creating pilot holes and fastening screws.
- Screwdriver: A variety of screwdrivers are needed for attaching different types of screws.
- Measuring Tape: Accuracy is crucial, so a measuring tape is indispensable for precise measurements.
- Clamps: Clamps are essential for holding wood pieces securely during assembly.
- Level: A level ensures that the table is built with a straight and stable surface.
- Safety Glasses: Always wear safety glasses to protect your eyes from flying debris.
- Work Gloves: Gloves provide protection for your hands while handling tools and lumber.
Additional Materials
Besides wood, you’ll need a few other materials for your picnic table:
- Screws: Choose screws specifically designed for outdoor use, such as stainless steel or galvanized screws.
- Wood Glue: Wood glue provides extra strength and durability to joints.
- Wood Finish: A wood finish, such as stain or sealant, helps protect the wood from the elements and enhances its appearance.
Planning and Design: Picnic Table Woodworking Plans
Before you start building, it’s crucial to plan and design your picnic table. This step ensures your table is the right size, shape, and style for your needs and space.
Designing a Picnic Table Plan
The first step is to create a plan that Artikels the dimensions and specifications of your picnic table. This plan will guide you during the construction process and help you determine the amount of materials you need.
Here’s a basic picnic table design with dimensions and specifications:
Tabletop
* Length: 6 feet (72 inches)
* Width: 3 feet (36 inches)
* Thickness: 1.5 inches
* Material: 2×12 lumber (or similar)
Legs
* Length: 28 inches
* Width: 4 inches
* Thickness: 2 inches
* Material: 2×4 lumber (or similar)
Supports
* Length: 30 inches
* Width: 4 inches
* Thickness: 2 inches
* Material: 2×4 lumber (or similar)
Bench Seats
* Length: 5 feet (60 inches)
* Width: 12 inches
* Thickness: 1.5 inches
* Material: 2×12 lumber (or similar)
Benches Legs
* Length: 16 inches
* Width: 4 inches
* Thickness: 2 inches
* Material: 2×4 lumber (or similar)
Bench Supports
* Length: 18 inches
* Width: 4 inches
* Thickness: 2 inches
* Material: 2×4 lumber (or similar)
These are just basic dimensions. You can adjust them to fit your needs and preferences. For example, if you want a longer table, you can increase the length of the tabletop and bench seats.
Creating a Picnic Table Design
Once you have your basic plan, you can start creating a more detailed design. This involves:
* Choosing a style: Consider the overall look you want for your picnic table. Do you want a rustic, modern, or traditional design?
* Determining the seating capacity: How many people do you want to seat at your table? This will help you determine the length of the tabletop and benches.
* Adding details: Think about adding features like a built-in cooler, a storage shelf, or a back support for the benches.
* Creating a sketch: Draw a rough sketch of your design to visualize how it will look.
Choosing the Right Size and Shape
The size and shape of your picnic table will depend on your needs and the space where you plan to place it.
Size
* Small: A small picnic table is perfect for a couple or a small family. It typically measures around 4 feet in length and 2 feet in width.
* Medium: A medium picnic table is ideal for a family or a small group of friends. It typically measures around 6 feet in length and 3 feet in width.
* Large: A large picnic table is perfect for large gatherings. It typically measures around 8 feet in length and 4 feet in width.
Shape
* Rectangular: Rectangular picnic tables are the most common shape. They are easy to build and offer plenty of seating space.
* Round: Round picnic tables are great for creating a sense of community and conversation. They are also good for small spaces as they can fit more people in a smaller area.
* Square: Square picnic tables are a good option for smaller groups. They are also easy to build and can fit into a variety of spaces.
Tips for Choosing the Right Size and Shape
* Consider the space: Measure the area where you plan to place your picnic table to ensure it will fit comfortably.
* Think about the seating capacity: How many people do you want to seat at your table?
* Choose a shape that complements your style: Do you want a traditional rectangular table or a more modern round table?
* Consider the functionality: Do you need a table with a built-in cooler or storage space?
Construction Process
This section details the step-by-step process of building your picnic table, from constructing the frame to assembling the top and legs.
Building the Table Frame
The table frame is the foundation of your picnic table. It provides stability and support for the table top and legs.
- Cut the frame pieces to size. Using your pre-cut measurements, carefully cut the lumber for the table frame using a saw. Ensure you make clean cuts for a sturdy and even frame.
- Assemble the frame. Join the frame pieces using wood glue and screws. Start by assembling the two long sides of the frame, then attach the two shorter sides. Ensure that the corners are square and the frame is level before securing the joints.
- Reinforce the frame. For added strength, consider adding cross-braces or diagonal supports to the frame. This will help to prevent the frame from warping or sagging over time.
Assembling the Table Top
The table top is the surface where you’ll be enjoying your picnic.
- Join the table top boards. Lay the table top boards side by side, ensuring they are flush and aligned. Attach the boards together using wood glue and screws.
- Sand the table top. Once the boards are securely attached, sand the entire surface of the table top to smooth out any rough edges and create a uniform finish.
- Finish the table top. Apply a sealant or stain to protect the table top from the elements.
Assembling the Legs, Picnic table woodworking plans
The legs provide support for the table top.
- Cut the legs to size. Cut the legs to the desired height using a saw. Make sure all four legs are the same length.
- Attach the legs to the frame. Secure the legs to the table frame using screws. Make sure the legs are positioned evenly and that the table is level before securing the joints.
Attaching the Benches or Chairs
If you’re building a picnic table with benches, follow these steps:
- Build the benches. Construct the benches using the same methods you used to build the table frame. Make sure the benches are the same length as the table top and are the desired height.
- Attach the benches to the table. Use screws to attach the benches to the table frame. Ensure the benches are securely attached and are positioned evenly on either side of the table.
Variations and Customization
A picnic table is a versatile piece of furniture that can be adapted to suit your needs and preferences. Beyond the basic design, there are numerous ways to personalize your picnic table, adding functionality and style.
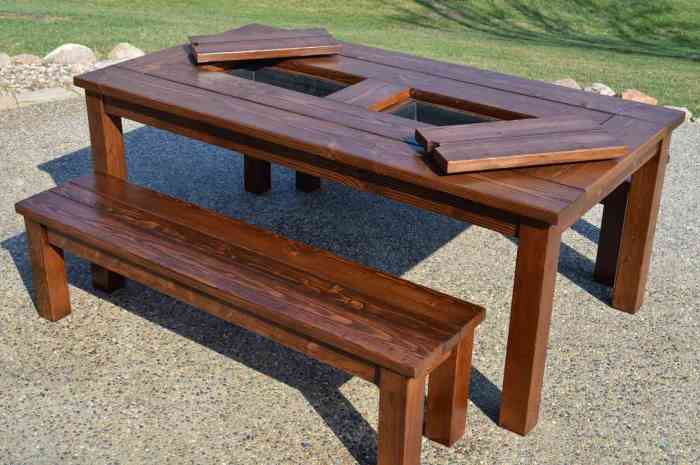
Adding Extra Features
Adding extra features to your picnic table can enhance its functionality and make it even more enjoyable. Here are a few ideas:
- Built-in Cooler: A built-in cooler can be incorporated into the table’s design, providing a convenient space to keep drinks and food cold. This can be achieved by creating a compartment within the table’s frame, lined with insulation and a drain for easy cleaning.
- Umbrella Holder: A built-in umbrella holder is a practical addition, providing shade and protection from the elements. This can be achieved by creating a hole in the center of the table, allowing the umbrella pole to pass through and be secured with a clamp or other mechanism.
- Storage Shelves: Adding shelves to the underside of the table can provide additional storage for plates, cups, and other picnic essentials. This can be achieved by attaching shelves to the table’s legs or frame.
Creating a Unique and Personalized Picnic Table
There are numerous ways to create a unique and personalized picnic table. This can involve choosing different wood types, applying custom finishes, and incorporating decorative elements.
- Wood Types: Different wood types offer distinct aesthetics and durability. Hardwoods like oak and maple are durable and resistant to scratches and dents, while softwoods like pine and cedar are more affordable and can be easily worked with. The choice of wood will influence the table’s appearance and longevity.
- Finishes: A wide range of finishes can be applied to the table, enhancing its appearance and protecting it from the elements. Staining can add color and depth, while varnishing or painting can provide a protective layer. Consider the desired look and the table’s intended use when selecting a finish.
- Decorative Elements: Incorporating decorative elements can personalize the table and add a touch of style. This could include carvings, inlays, or painted designs. Consider the table’s overall design and the desired aesthetic when choosing decorative elements.
Using Different Wood Types and Finishes for a Custom Look
The choice of wood and finish can significantly impact the appearance and longevity of your picnic table.
- Hardwoods: Hardwoods like oak, maple, and cherry offer durability, strength, and a rich natural grain pattern. They are suitable for high-traffic areas and will last for many years. Oak is known for its durability and distinctive grain pattern, while maple is known for its hardness and light color. Cherry is a beautiful wood with a reddish-brown hue that darkens with age.
- Softwoods: Softwoods like pine, cedar, and fir are more affordable and easier to work with. They are suitable for less demanding applications and can be treated with preservatives to increase their durability. Pine is a common choice for outdoor furniture due to its affordability and availability. Cedar is known for its natural insect-repelling properties and its distinctive aroma. Fir is a strong and lightweight wood that is often used for outdoor structures.
- Finishes: Finishes can enhance the appearance of the wood and protect it from the elements. Stains can add color and depth to the wood, while varnishes and paints provide a protective layer. Oil-based finishes offer excellent durability and water resistance, while water-based finishes are more environmentally friendly and dry faster. Consider the desired look and the table’s intended use when selecting a finish.
Safety Considerations

Building a picnic table is a fun and rewarding project, but it’s crucial to prioritize safety throughout the process. By following proper safety practices, you can ensure a safe and enjoyable experience while creating a sturdy and lasting piece of furniture.
Safe Tool Usage
Using the right tools and techniques is fundamental for safe woodworking.
- Always wear safety glasses to protect your eyes from flying debris.
- Use a dust mask or respirator when working with wood, especially when sanding or cutting, to prevent inhaling harmful particles.
- Ensure that all tools are sharp and in good working order. Dull tools require more force, increasing the risk of accidents.
- Keep your work area clean and organized to prevent tripping hazards.
- Always unplug power tools when not in use and before making adjustments.
- Use clamps to secure your workpieces, reducing the risk of kickback or movement during cutting.
Safe Handling of Materials
Woodworking involves handling heavy materials, which requires careful consideration.
- Lift heavy pieces of wood with your legs, not your back, to avoid strains and injuries.
- Use a sawhorse or workbench to support large pieces of wood, preventing them from falling and causing injuries.
- Store lumber properly to avoid warping or damage, ensuring safe handling during the construction process.
Preventing Injuries
- Always wear appropriate footwear, such as closed-toe shoes, to protect your feet from falling objects or sharp tools.
- Use a push stick when working with power tools to keep your hands away from the cutting blade.
- Be mindful of your surroundings and ensure that no one is in the path of your tools or workpieces.
- If you are using a circular saw, always make sure the blade is properly guarded and that you are using the correct blade for the material you are cutting.
Tips for Successful Picnic Table Building

Building a picnic table can be a rewarding project, but it’s important to approach it with careful planning and execution to ensure a sturdy and enjoyable end product. These tips will help you navigate the process smoothly and achieve a satisfying result.
Gathering Materials and Tools
Before you begin, it’s crucial to gather all the necessary materials and tools. This will save you time and prevent frustration later on.
- Wood: Choose high-quality, pressure-treated lumber for durability and resistance to weather elements. Consider the type of wood based on your desired aesthetic and budget.
- Fasteners: Select appropriate screws or bolts for joining the table components. Ensure they are long enough to securely fasten the wood.
- Wood glue: Use a high-quality wood glue to strengthen the joints.
- Clamps: Clamps are essential for holding the wood pieces together while the glue dries.
- Measuring tape: Accuracy is key. A measuring tape is crucial for precise measurements and cuts.
- Circular saw: A circular saw is ideal for cutting lumber to size.
- Drill: A drill with appropriate drill bits is needed for pre-drilling holes before inserting screws or bolts.
- Level: A level ensures that the table top is even and stable.
- Safety gear: Wear safety glasses, gloves, and ear protection to protect yourself during the building process.
Troubleshooting Common Issues
Even with careful planning, you might encounter some challenges during the construction process. Here’s how to address common issues:
- Uneven table top: If the table top isn’t level, use shims under the legs to adjust the height.
- Loose joints: Reinforce loose joints by adding additional screws or bolts, or by applying wood glue.
- Cracked wood: Replace cracked or damaged wood pieces to ensure the table’s stability.
Maximizing Efficiency and Minimizing Waste
By optimizing your approach, you can build your picnic table more efficiently and reduce material waste:
- Plan carefully: Carefully plan your cuts to minimize waste. Consider using a layout diagram to visualize the wood arrangement.
- Cut accurately: Precise cutting will reduce the need for adjustments and minimize wasted wood.
- Utilize scrap wood: Save scrap wood for smaller projects or use it for filling gaps or making shims.
Closing Notes
With careful planning, attention to detail, and a touch of creativity, building a picnic table from scratch can be a fulfilling and enjoyable project. The process allows you to create a custom piece that reflects your personal style and enhances your outdoor space. So gather your tools, select your materials, and embark on this rewarding journey of crafting a lasting piece that will be the centerpiece of many happy gatherings.
Helpful Answers
How long does it take to build a picnic table?
The time required to build a picnic table varies depending on your experience, the complexity of the design, and the availability of tools. A simple design can be completed in a weekend, while more intricate projects may take several days or weeks.
What are some common mistakes to avoid when building a picnic table?
Common mistakes include using improper materials, neglecting to check for squareness, and not pre-drilling holes for screws. It’s also important to use proper safety precautions and avoid rushing the process.
Where can I find free picnic table woodworking plans?
Many free plans are available online, including websites dedicated to woodworking, DIY projects, and home improvement. You can also find plans in woodworking magazines and books.
Building a picnic table is a great way to enjoy the outdoors, and there are tons of woodworking plans out there to help you get started. If you’re looking for even more woodworking project inspiration, check out furniture woodworking plans for a wider range of projects.
Whether you want to build a simple table or something more elaborate, there’s a plan out there for you. Once you’ve got your picnic table plans, you’re ready to gather your materials and get building!
