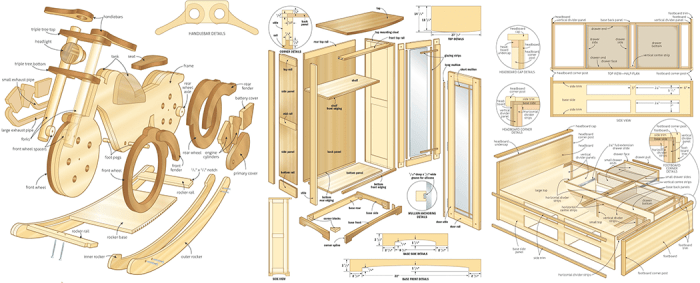
Plans for woodworking are your roadmap to crafting beautiful and functional pieces. Whether you’re a seasoned woodworker or just starting out, having a solid plan is essential for success. It guides you through every step, from choosing the right wood to finishing your project with pride. This guide delves into the world of woodworking plans, providing you with the knowledge and tools to turn your ideas into reality.
Imagine transforming a simple piece of wood into a stunning table, a cozy bookshelf, or a unique piece of furniture. Woodworking plans empower you to create these and so much more, allowing you to express your creativity and build something truly special. Let’s explore the world of woodworking plans together and discover the joy of creating with your hands.
Planning the Project
A well-structured woodworking plan is your roadmap to success, guiding you through every step and ensuring a satisfying outcome. Just like a blueprint for a house, a woodworking plan provides a clear vision of your project, preventing costly mistakes and ensuring efficiency.
Steps Involved in Planning a Woodworking Project
Planning a woodworking project involves several key steps that help you visualize the final product and execute the process smoothly.
- Define the Project Scope: Begin by clearly defining the project’s purpose, intended use, and desired aesthetic. What will your project be used for? What style and dimensions are you aiming for? Answering these questions will shape the project’s direction.
- Gather Inspiration and Research: Look at existing woodworking projects, explore online resources, and consult books for ideas and techniques. You can also draw inspiration from furniture styles, architectural elements, or even everyday objects.
- Create a Detailed Design: Once you have a clear idea, translate it into a detailed design. Sketch your project, create a 3D model, or use CAD software to visualize the final product. This step will help you identify potential challenges and refine the design.
- Choose Materials: Select the right wood species, considering factors like strength, grain pattern, and availability. Consider the project’s intended use and your budget when making this decision.
- Prepare a Bill of Materials: Create a comprehensive list of all the materials needed for your project, including wood, fasteners, glue, finishes, and any other supplies. This step ensures you have everything on hand before starting.
- Plan the Construction Process: Break down the project into manageable steps, outlining the order of operations and the specific tools required for each step. This will help you stay organized and avoid confusion.
- Consider Safety Precautions: Always prioritize safety by identifying potential hazards and planning how to mitigate them. Use appropriate safety gear, such as eye protection, gloves, and dust masks, and ensure your workspace is well-lit and organized.
Tips for Creating a Detailed Woodworking Project Plan
A comprehensive plan will ensure a smooth and successful woodworking project. Here are some tips for creating a detailed plan:
- Use Drawings and Diagrams: Create detailed drawings or diagrams to visualize the project’s dimensions, joinery techniques, and overall construction. This will help you avoid mistakes and ensure accuracy.
- List Tools and Equipment: Make a list of all the tools and equipment you will need, including their specific sizes and types. This will help you gather everything before starting and avoid interruptions.
- Specify Materials and Finishes: Detail the type, size, and quantity of wood, fasteners, glue, and finishes required for your project. Include the specific brand or manufacturer of each material if necessary.
- Artikel Construction Steps: Break down the project into individual steps, listing them in a logical order. This will help you stay organized and track your progress.
- Consider Potential Challenges: Anticipate potential problems or challenges that might arise during the construction process. Research solutions beforehand to ensure a smooth workflow.
Examples of Woodworking Project Plans
Here are a few examples of woodworking project plans that can inspire you:
- Simple Shelf: This project requires basic woodworking skills and involves cutting wood to size, drilling holes for shelves, and assembling the shelf unit.
- Wooden Toy Box: This project involves cutting, shaping, and assembling wood to create a sturdy toy box with a hinged lid. It requires basic woodworking skills and knowledge of joinery techniques.
- Small Table: This project involves building a table with legs, a tabletop, and possibly a drawer or shelf. It requires more advanced woodworking skills, including knowledge of joinery techniques and finishing techniques.
Choosing the Right Wood

Selecting the right wood is crucial for any woodworking project, as it significantly impacts the final outcome. Understanding the characteristics of different wood species is essential for making informed decisions.
Wood Types and Their Characteristics
Different wood species possess unique properties that make them suitable for specific applications. Some woods are known for their durability and strength, while others are prized for their beauty and workability.
- Hardwoods: Hardwoods generally come from deciduous trees, which lose their leaves seasonally. They are typically denser and more durable than softwoods, making them suitable for furniture, flooring, and other demanding applications. Examples of hardwoods include oak, maple, cherry, walnut, and mahogany.
- Softwoods: Softwoods come from coniferous trees, which bear cones and retain their needles year-round. They are generally lighter and less expensive than hardwoods, making them popular for construction, framing, and general woodworking projects. Examples of softwoods include pine, fir, spruce, cedar, and redwood.
Factors to Consider When Choosing Wood
Several factors influence the suitability of a particular wood species for a woodworking project.
- Grain Pattern: The grain pattern of wood refers to the arrangement of wood fibers, which creates unique visual characteristics. Some woods have straight grains, while others exhibit intricate patterns like swirls, knots, and figure. The grain pattern affects the appearance, strength, and workability of the wood.
- Hardness: Wood hardness is measured on the Janka scale, which indicates the force required to embed a steel ball into the wood. Harder woods are more resistant to dents and scratches, making them ideal for furniture and flooring.
- Workability: Workability refers to how easily a wood can be cut, shaped, and finished. Some woods are known for their ease of workability, while others are more challenging to work with due to their hardness or tendency to tear.
- Color and Appearance: Wood species vary in color and appearance, from light blonde to deep brown and even reddish hues. The color and appearance of wood can significantly impact the overall aesthetic of a woodworking project.
- Cost: The cost of wood varies greatly depending on the species, availability, and quality. It is essential to consider the budget when selecting a wood type.
Wood Type Comparison Table
The following table summarizes the pros and cons of various commonly used wood types:
| Wood Type | Pros | Cons |
|---|---|---|
| Oak | Durable, strong, beautiful grain pattern | Expensive, can be difficult to work with |
| Maple | Hard, strong, smooth finish | Can be brittle, susceptible to scratches |
| Cherry | Rich color, beautiful grain pattern, easy to work with | Soft, susceptible to dents |
| Walnut | Beautiful grain pattern, rich color, durable | Expensive, can be difficult to work with |
| Pine | Affordable, easy to work with, light weight | Soft, prone to dents and scratches |
| Cedar | Aromatic, naturally insect-resistant, durable | Can be brittle, expensive |
Essential Tools and Equipment
Woodworking requires a variety of tools and equipment to create projects from simple to complex. Having the right tools can make a significant difference in the quality and efficiency of your work.
Types of Woodworking Tools
Understanding the types of woodworking tools and their uses is crucial for selecting the appropriate tools for your project.
- Hand Tools: These tools are versatile and portable, making them suitable for various tasks. Common hand tools include:
- Saw: Used for cutting wood into different shapes and sizes. Different types of saws include hand saws, circular saws, jigsaw, and miter saws.
- Hammer: Used for driving nails, chisels, and other tools. Different types of hammers include claw hammers, ball-peen hammers, and rubber mallets.
- Screwdriver: Used for driving screws into wood. Different types of screwdrivers include Phillips head, flat head, and Torx screwdrivers.
- Chisel: Used for carving, shaping, and removing wood. Different types of chisels include bevel-edged chisels, mortise chisels, and gouges.
- Plane: Used for smoothing and shaping wood surfaces. Different types of planes include block planes, hand planes, and jointer planes.
- Measuring Tools: Essential for ensuring accuracy in woodworking projects. Common measuring tools include rulers, tape measures, calipers, and protractors.
- Clamps: Used for holding wood pieces together securely while gluing or joining them. Different types of clamps include bar clamps, spring clamps, and C-clamps.
- Power Tools: Power tools offer greater speed and efficiency for woodworking projects. Common power tools include:
- Power Drill: Used for drilling holes in wood. Different types of power drills include cordless drills, corded drills, and impact drivers.
- Router: Used for shaping, cutting, and trimming wood. Different types of routers include plunge routers, fixed-base routers, and trim routers.
- Sander: Used for smoothing and finishing wood surfaces. Different types of sanders include belt sanders, orbital sanders, and random orbit sanders.
- Table Saw: Used for cutting wood into precise shapes and sizes. Table saws are stationary tools that offer accuracy and safety features.
- Band Saw: Used for cutting intricate curves and shapes in wood. Band saws are stationary tools that utilize a continuous blade for smooth cuts.
- Jointer: Used for flattening and smoothing wood surfaces. Jointers are stationary tools that create perfectly straight and flat edges.
- Planer: Used for thicknessing wood boards to a consistent thickness. Planers are stationary tools that create a smooth and even surface.
Choosing the Right Tools
The choice of woodworking tools depends on the specific project and the skill level of the woodworker.
- Beginner Woodworkers: It is recommended to start with basic hand tools such as a saw, hammer, screwdriver, chisel, plane, and measuring tools. These tools are versatile and relatively inexpensive, providing a good foundation for learning woodworking skills.
- Intermediate Woodworkers: As you gain experience, you can gradually expand your tool collection to include power tools such as a power drill, sander, and router. These tools offer greater speed and efficiency, allowing you to tackle more complex projects.
- Advanced Woodworkers: For intricate and demanding projects, advanced woodworking tools such as a table saw, band saw, jointer, and planer may be necessary. These tools provide high levels of accuracy and precision, enabling you to create professional-quality work.
Safety Precautions
It is essential to use woodworking tools safely to prevent accidents and injuries.
- Always wear safety glasses to protect your eyes from flying debris.
- Use ear protection when operating loud power tools.
- Keep your work area clean and organized to prevent tripping hazards.
- Use the appropriate tools for the task and ensure they are in good working condition.
- Always follow the manufacturer’s instructions for each tool.
- Never operate tools when you are tired or under the influence of drugs or alcohol.
Woodworking Techniques

Woodworking techniques are the foundation of any successful woodworking project. Understanding these techniques will help you create beautiful and functional pieces.
Cutting, Plans for woodworking
Cutting is a fundamental woodworking technique that involves shaping wood using various tools. There are numerous cutting methods, each with its own advantages and applications.
- Hand Sawing: This method uses a hand saw to cut wood along a marked line. Hand saws are versatile and can be used for various cuts, including crosscuts, rips, and miters.
- Power Sawing: Power saws, such as circular saws, table saws, and miter saws, offer greater speed and precision compared to hand saws. These tools are essential for large-scale projects and intricate cuts.
- Chiseling: Chisels are hand tools used for shaping wood by removing material. They are particularly useful for intricate cuts, carving, and creating mortises and tenons.
Sanding
Sanding is the process of smoothing and refining the surface of wood using sandpaper. It removes imperfections, creates a smooth finish, and prepares the wood for finishing.
- Hand Sanding: This method involves using sandpaper by hand to smooth and refine the surface of wood. Hand sanding is effective for smaller areas and intricate details.
- Power Sanding: Power sanders, such as belt sanders, orbital sanders, and random orbit sanders, offer faster and more efficient sanding. They are ideal for larger surfaces and achieving a uniform finish.
Finishing
Finishing is the final step in woodworking, enhancing the appearance and protecting the wood. Various finishing techniques are available, each with its unique characteristics.
- Painting: Applying paint to wood provides a durable and colorful finish. Paints are available in various colors, finishes, and types, such as oil-based, latex, and acrylic.
- Staining: Staining is a technique that enhances the natural beauty of wood by adding color and depth. Stains penetrate the wood’s surface, creating a natural and rich finish.
- Varnishing: Varnishing is a protective coating that creates a durable and glossy finish on wood. Varnishes are available in various gloss levels, from matte to high-gloss.
- Waxing: Waxing is a traditional finishing method that adds a protective layer to wood. Wax provides a natural and subtle sheen, enhancing the wood’s beauty.
Joints
Joints are essential in woodworking, connecting pieces of wood to create a strong and stable structure.
- Butt Joint: This is the simplest joint, created by butting two pieces of wood together. It is relatively weak and requires reinforcement.
- Lap Joint: This joint overlaps two pieces of wood, creating a stronger connection than a butt joint.
- Miter Joint: This joint uses angled cuts to create a seamless corner. It is commonly used for picture frames and decorative elements.
- Dovetail Joint: This joint is known for its strength and interlocking design. It is commonly used for drawers and furniture construction.
- Mortise and Tenon Joint: This joint involves creating a mortise (a rectangular hole) in one piece of wood and a tenon (a projecting tongue) in another. It is a strong and durable joint suitable for furniture and structural elements.
Smooth and Accurate Cuts
Achieving smooth and accurate cuts is crucial for successful woodworking. Here are some tips:
- Sharp Tools: Ensure that your saws, chisels, and other cutting tools are sharp. Dull tools can cause uneven cuts and damage the wood.
- Proper Technique: Use the correct cutting technique for the tool and wood type. Practice and patience are key to achieving smooth cuts.
- Cutting Guides: Use cutting guides, such as rulers, squares, and jigs, to ensure accuracy and consistency in your cuts.
- Marking Lines: Mark your cutting lines clearly and accurately. Use a pencil or marking knife to create a visible guide.
- Support the Wood: Provide adequate support for the wood while cutting to prevent it from moving or warping.
Woodworking Safety
Woodworking is a rewarding hobby and profession, but it’s essential to prioritize safety to prevent injuries. Working with sharp tools and heavy machinery can be dangerous if proper precautions aren’t taken.
Potential Hazards
Woodworking involves various hazards, and it’s crucial to be aware of them to minimize risks.
- Sharp Tools: Saws, chisels, knives, and other sharp tools can cause cuts and lacerations if handled carelessly.
- Power Tools: Power saws, routers, sanders, and drills can cause severe injuries if not used correctly. These tools can kickback, throw debris, or trap fingers.
- Dust and Fumes: Wood dust can irritate the respiratory system, and some wood species contain harmful chemicals. Proper ventilation and dust collection are essential.
- Heavy Objects: Lifting heavy wood pieces can strain muscles and cause back injuries. Use proper lifting techniques and seek assistance when necessary.
- Fire Hazards: Woodworking involves working with flammable materials. Take precautions to prevent fires, including using fire extinguishers and keeping work areas clean.
Safety Measures
Following safety measures is crucial for woodworking.
- Wear Safety Glasses: Protect your eyes from flying debris by wearing safety glasses at all times.
- Use Hearing Protection: Power tools can generate loud noise, which can damage hearing. Use earplugs or earmuffs when operating machinery.
- Wear a Dust Mask: Protect your lungs from wood dust by wearing a dust mask. Choose a mask with the appropriate filtration level for the type of wood you’re working with.
- Use Gloves: Protect your hands from cuts and splinters by wearing gloves, especially when handling sharp tools.
- Secure Your Workpiece: Always secure your workpiece before cutting or shaping it. This prevents the wood from moving unexpectedly and causing injury.
- Keep Work Area Clean: A clean work area is a safe work area. Remove clutter and sawdust regularly to prevent tripping hazards and fires.
- Follow Tool Instructions: Read and understand the instructions for all tools before using them. Use the correct tools for the job and follow the manufacturer’s safety recommendations.
- Don’t Work When Tired: Fatigue can lead to mistakes and accidents. Take breaks when you feel tired or distracted.
- Keep a First Aid Kit Handy: Always have a first aid kit available in case of minor injuries. Know how to use the contents of the kit.
Preventing Injuries
Following these tips can help prevent injuries while woodworking:
- Stay Focused: Avoid distractions while working. Focus on the task at hand and be aware of your surroundings.
- Use the Right Tools: Choose the appropriate tools for the job and ensure they are in good working condition.
- Take Your Time: Rushing can lead to mistakes. Take your time and work carefully.
- Be Aware of Tool Kickback: Be aware of the potential for kickback when using power tools. Keep your fingers away from the blade or bit and use a push stick when necessary.
- Use a Push Stick: When cutting or shaping wood near the blade, use a push stick to keep your fingers away from the cutting edge.
- Maintain Tools: Keep your tools sharp and in good working order. Sharp tools are safer than dull tools.
- Learn Proper Techniques: Take the time to learn proper woodworking techniques. This will help you work safely and efficiently.
- Use a Safety Harness: When working on a ladder or scaffold, use a safety harness to prevent falls.
Inspiration and Ideas
Woodworking is a craft that offers endless possibilities for creativity and expression. Whether you’re a beginner or a seasoned woodworker, finding inspiration and ideas for your next project can be a rewarding and exciting experience.
The beauty of woodworking lies in its ability to transform simple materials into functional and beautiful objects. From simple projects like cutting boards and picture frames to intricate furniture pieces and unique home decor, the possibilities are truly limitless.
When you’re planning your next woodworking project, don’t forget to consider a dedicated woodworking rack to organize your tools and materials. A well-organized workspace can make a big difference in your efficiency and enjoyment of the craft. Having everything within easy reach can help you stay focused and avoid frustration, so make sure to include a woodworking rack in your plans.
Popular Woodworking Project Ideas
Here are some popular woodworking project ideas for beginners and experienced woodworkers, categorized by skill level and theme:
- Beginner-Friendly Projects:
- Cutting boards
- Picture frames
- Simple shelves
- Birdhouses
- Wooden toys
- Intermediate Projects:
- Coffee tables
- End tables
- Small benches
- Jewelry boxes
- Wooden signs
- Advanced Projects:
- Custom furniture
- Detailed woodworking projects
- Intricate carvings
- Wooden sculptures
- Restoring antique furniture
Finding Inspiration and Ideas
There are many resources available to help you find inspiration and ideas for your woodworking projects:
- Woodworking Books and Magazines: These publications offer a wealth of project plans, techniques, and tips from experienced woodworkers.
- Online Resources: Websites like Pinterest, Instructables, and Woodworking for Mere Mortals provide a vast collection of woodworking projects, tutorials, and inspiration.
- Woodworking Communities: Online forums and social media groups dedicated to woodworking offer a platform for sharing ideas, seeking advice, and connecting with other woodworkers.
- Local Woodworking Classes: Taking a woodworking class can provide hands-on experience, learn new techniques, and gain inspiration from instructors and fellow students.
Exploring Different Woodworking Styles and Themes
Woodworking offers a diverse range of styles and themes, allowing you to create projects that reflect your personal taste and interests.
| Style/Theme | Description | Examples |
|---|---|---|
| Rustic | Characterized by natural wood finishes, rough-hewn surfaces, and a focus on the beauty of the wood’s grain. | Rustic coffee tables, farmhouse-style benches, reclaimed wood shelves. |
| Modern | Emphasizes clean lines, geometric shapes, and minimalist designs. | Modern dining tables, contemporary bookcases, sleek side tables. |
| Traditional | Inspired by classic furniture designs, often featuring ornate carvings, detailed joinery, and rich wood finishes. | Antique-style chairs, traditional dressers, Victorian-era furniture. |
| Industrial | Combines raw materials like metal and wood, often featuring exposed hardware and a vintage aesthetic. | Industrial-style desks, metal-framed shelves, reclaimed wood tables. |
| Coastal | Inspired by beach life and nautical themes, often incorporating light wood tones, rope accents, and nautical elements. | Coastal-style coffee tables, beach-themed decor, nautical-inspired shelves. |
Final Thoughts: Plans For Woodworking

With a clear plan, the right tools, and a little bit of patience, woodworking can be an incredibly rewarding hobby or even a profession. Whether you’re building a simple birdhouse or an intricate piece of furniture, the satisfaction of creating something with your own hands is unmatched. Remember, the journey is just as important as the destination. So, embrace the process, enjoy the challenge, and let your woodworking plans guide you to amazing creations.
FAQ Summary
Where can I find free woodworking plans?
There are many websites and online communities dedicated to sharing free woodworking plans. Some popular options include Ana White, Woodworking for Mere Mortals, and Instructables. You can also find free plans in woodworking magazines and books.
What are the best wood types for beginners?
For beginners, softwoods like pine and cedar are great choices. They are relatively inexpensive, easy to work with, and forgiving of mistakes. Hardwoods like oak and maple are more durable but can be more challenging to work with.
What safety gear should I wear when woodworking?
Safety gear is essential when working with wood. At a minimum, you should wear safety glasses, ear protection, and a dust mask. You may also want to wear gloves and a respirator, depending on the project and the type of wood you are working with.
