Shaker furniture plans offer a gateway to crafting timeless, functional pieces that embody simplicity and elegance. The Shaker movement, known for its minimalist aesthetic and emphasis on craftsmanship, left a lasting legacy in the world of furniture design. With detailed plans as your guide, you can recreate the iconic Shaker style, from classic chairs and tables to charming storage solutions. Whether you’re a seasoned woodworker or a curious beginner, the world of Shaker furniture plans presents an inviting opportunity to create enduring pieces that will be cherished for generations to come.
The beauty of Shaker furniture lies in its understated elegance. Clean lines, simple forms, and a focus on functionality define the Shaker aesthetic. Their furniture was built to last, using high-quality materials and sturdy construction techniques. These timeless designs seamlessly blend with various interior styles, adding a touch of classic charm to any space.
Introduction to Shaker Furniture
Shaker furniture, known for its simple yet elegant design, has captivated design enthusiasts for centuries. Its enduring popularity stems from the unique blend of practicality and aesthetics that reflects the values of the Shaker community, a religious sect that originated in England in the 18th century.
Historical Context
The Shakers, known for their communal lifestyle and dedication to simplicity, believed in functionality and craftsmanship. They strived to create furniture that was both useful and beautiful, reflecting their belief in plain living and high thinking. Shaker communities thrived in the northeastern United States, where they developed their distinct style of furniture making. The furniture served a practical purpose in their communal living spaces, emphasizing functionality and durability.
Design Principles and Aesthetics
Shaker furniture embodies several key design principles that distinguish it from other styles:
- Simplicity: Shaker furniture is characterized by its clean lines, uncluttered forms, and absence of ornamentation. They prioritized functionality and believed that beauty could be found in simplicity.
- Functionality: Every piece of Shaker furniture was designed with a specific purpose in mind. They avoided unnecessary embellishments, focusing on creating pieces that were practical and efficient.
- Craftsmanship: Shakers were skilled craftspeople who took pride in their work. They used high-quality materials and meticulous techniques to create furniture that was both durable and aesthetically pleasing.
- Symmetry and Proportion: Shaker furniture often features balanced proportions and symmetrical designs. This creates a sense of harmony and order, reflecting the Shakers’ belief in balance and simplicity.
- Natural Materials: Shakers primarily used natural materials like wood, often in its natural state, to create their furniture. This reflected their appreciation for the beauty of nature and their commitment to sustainability.
Iconic Shaker Furniture Pieces
Several iconic pieces of Shaker furniture have become synonymous with the style, exemplifying its enduring appeal:
- The Shaker Rocking Chair: Known for its simple yet comfortable design, the Shaker rocking chair is a timeless classic. It features a gently curved seat and back, allowing for a smooth and relaxing rocking motion.
- The Shaker Ladder-Back Chair: This iconic chair features a simple ladder-back design, typically made from a single piece of wood. It is known for its durability and elegant simplicity.
- The Shaker Table: Shaker tables are known for their clean lines and sturdy construction. They often feature a simple rectangular top and tapered legs, with minimal ornamentation.
- The Shaker Dresser: Shaker dressers are characterized by their simple design and functionality. They often feature drawers with dovetail joints and simple, uncluttered hardware.
- The Shaker Box: Shaker boxes are known for their elegant simplicity and craftsmanship. They are often made from wood with dovetail joints and a simple, unadorned lid.
Benefits of Building Shaker Furniture from Plans
Building Shaker furniture from plans offers numerous advantages, making it a popular choice for both seasoned woodworkers and beginners. Using plans provides a structured and detailed guide, ensuring a successful outcome and enhancing the overall woodworking experience.
The Advantages of Using Plans
Plans offer a clear roadmap for building Shaker furniture, eliminating guesswork and potential errors. They provide precise measurements, detailed instructions, and illustrations, ensuring that every step is clearly understood. This clarity is especially beneficial for beginners, who can rely on the plans to guide them through the process.
- Accuracy and Precision: Plans provide accurate measurements and detailed specifications, ensuring that all components are cut and assembled correctly. This precision results in a well-proportioned and aesthetically pleasing piece of furniture.
- Consistency and Repeatability: Using plans allows you to replicate the same design multiple times, achieving consistency in your work. This is particularly useful if you plan to build a set of matching furniture pieces.
- Reduced Risk of Errors: Plans provide a step-by-step guide, reducing the risk of mistakes and ensuring that the project progresses smoothly. This is especially helpful for beginners who are still developing their woodworking skills.
- Confidence and Satisfaction: Completing a project successfully using plans boosts confidence and satisfaction. The sense of accomplishment from creating a beautiful and functional piece of furniture is highly rewarding.
Comparing Plans to Building Without Plans
Building Shaker furniture without plans can be challenging, especially for beginners. While it allows for creativity and improvisation, it also increases the risk of errors, wasted materials, and time delays. Plans provide a framework for success, ensuring that the project stays on track and meets the desired outcome.
- Structure and Organization: Plans provide a structured approach, organizing the steps involved in building the furniture. This ensures a logical progression and reduces the likelihood of overlooking important details.
- Detailed Instructions: Plans offer detailed instructions, covering every aspect of the building process, from cutting and shaping the wood to assembling the final piece. This comprehensive guidance minimizes the risk of misinterpretations and ensures a successful outcome.
- Visual References: Plans often include illustrations and diagrams, providing visual references to complement the written instructions. This visual aid enhances understanding and helps to visualize the final product.
- Time and Resource Efficiency: Plans help to optimize time and resources by providing a clear roadmap and minimizing the need for trial and error. This ensures a more efficient and productive woodworking experience.
Skills and Tools Needed for Building Shaker Furniture
Building Shaker furniture requires a combination of woodworking skills and tools. The specific skills and tools needed will vary depending on the complexity of the project, but generally include:
- Basic Woodworking Skills: Understanding how to use hand tools, power tools, and woodworking techniques is essential. This includes skills like measuring, cutting, sanding, and joining wood.
- Knowledge of Wood Types: Familiarity with different wood species and their properties is important for selecting the right wood for your project. Shaker furniture often features traditional wood types like maple, cherry, and pine.
- Toolset: A basic toolset for woodworking includes a saw, hammer, screwdriver, chisel, plane, sandpaper, and clamps. Depending on the project, you may also need specialized tools like a router, drill press, or table saw.
Finding and Selecting Shaker Furniture Plans
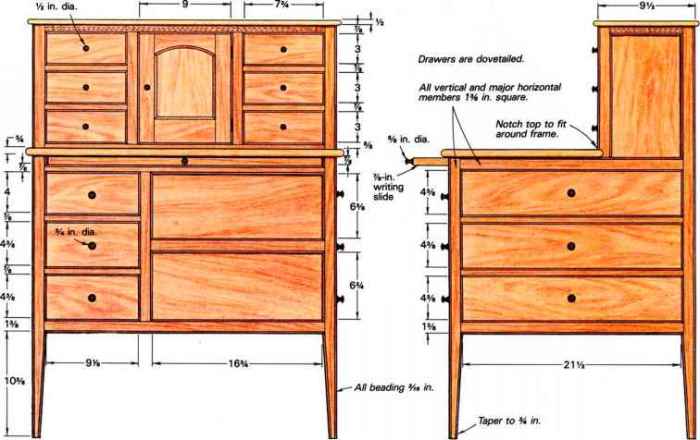
Finding the right Shaker furniture plans is crucial for a successful project. You’ll want to choose plans that are detailed, accurate, and match your skill level.
Reputable Sources for Shaker Furniture Plans
You can find Shaker furniture plans from various sources, both online and offline. Here are some reputable options:
- Shaker Village of Pleasant Hill: This historic site offers a wide selection of plans for authentic Shaker furniture, including chairs, tables, and chests. They also provide detailed instructions and historical information.
- The Shaker Museum & Library: This museum in New Hampshire houses a vast collection of Shaker artifacts, including furniture plans. They offer a selection of plans online and through their publications.
- Woodworking Magazines: Magazines like “Fine Woodworking” and “Popular Woodworking” often feature Shaker furniture plans, sometimes as part of their subscription services.
- Online Woodworking Forums: Online communities dedicated to woodworking often have members who share their Shaker furniture plans. These plans can be a great resource for finding unique designs and variations.
- Books on Shaker Furniture: Many books are dedicated to Shaker furniture design and construction. These books can provide valuable information on historical context, design principles, and detailed plans.
Factors to Consider When Choosing Shaker Furniture Plans
Once you’ve found a few potential plans, it’s important to consider these factors before making your final decision:
- Skill Level: Choose plans that match your woodworking experience. Beginner plans often offer simpler designs and detailed instructions, while advanced plans might require more specialized skills and knowledge.
- Complexity: Consider the complexity of the design. Some plans might involve intricate joinery or complex curves, while others are simpler and more straightforward.
- Materials: Make sure the plans specify the types of wood and other materials needed for the project. This will help you estimate costs and ensure you have the necessary supplies.
- Availability: Check if the plans are available in a format that you can easily access and use. Some plans might be downloadable, while others might require purchasing a physical copy.
- Cost: Consider the cost of the plans and the materials required for the project. You can compare prices from different sources and choose the most affordable option.
Types of Shaker Furniture Plans
Shaker furniture plans are available in various formats, each offering different advantages:
| Type of Plan | Description | Advantages | Disadvantages |
|---|---|---|---|
| Digital Plans | Plans available for download in digital formats like PDF or CAD files. | Easy to access and print, often cheaper than physical plans. | May require specific software to view or edit. |
| Printed Plans | Physical copies of plans printed on paper. | Easy to read and use, often include detailed instructions and diagrams. | Can be bulky and difficult to store, may be more expensive than digital plans. |
| Video Tutorials | Step-by-step video instructions for building specific Shaker furniture pieces. | Visual learning experience, can provide valuable insights into techniques and processes. | May require internet access and can be time-consuming. |
| Combination Plans | Plans that combine digital and printed formats, often including a downloadable PDF and a printed booklet with additional instructions. | Offers flexibility and convenience, combines the advantages of both digital and printed formats. | May be more expensive than single-format plans. |
Understanding Shaker Furniture Construction Techniques
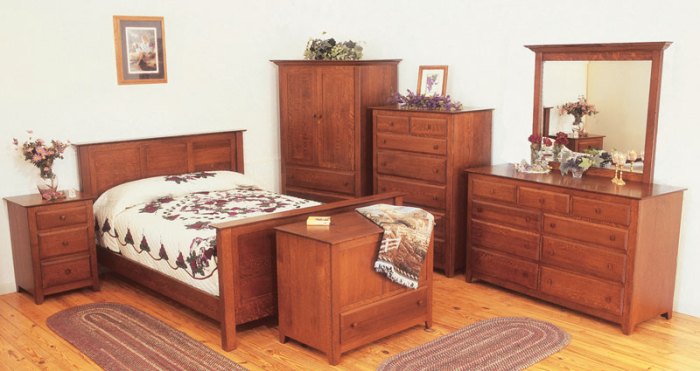
Shaker furniture is renowned for its simple, functional, and elegant designs. This style is characterized by clean lines, understated ornamentation, and meticulous craftsmanship. The construction techniques used by the Shakers were driven by practicality and a desire for efficiency.
Joinery
The use of joinery is a defining characteristic of Shaker furniture. Shaker joiners emphasized strong, durable, and visually appealing joints. They utilized a variety of joints, each chosen for its specific purpose and suitability to the piece being built.
- Mortise and Tenon: This joint is a cornerstone of Shaker furniture construction. It involves cutting a rectangular hole (mortise) in one piece of wood and a corresponding projection (tenon) on another. The tenon fits snugly into the mortise, creating a strong and stable connection.
- Dovetail: This joint is known for its strength and beauty. Dovetails are formed by interlocking tapered pins and slots. They are commonly used to join drawer sides to drawer fronts.
- Through Tenon: This joint is similar to the mortise and tenon joint, but the tenon extends through the mortise. The tenon is often secured with a wooden peg or a screw.
- Dado: This joint is created by cutting a groove (dado) into one piece of wood and fitting a matching projection (tenon) from another piece into the groove. It is commonly used for joining shelves to the sides of cabinets or for creating drawer runners.
Creating Your Own Shaker Furniture Plans
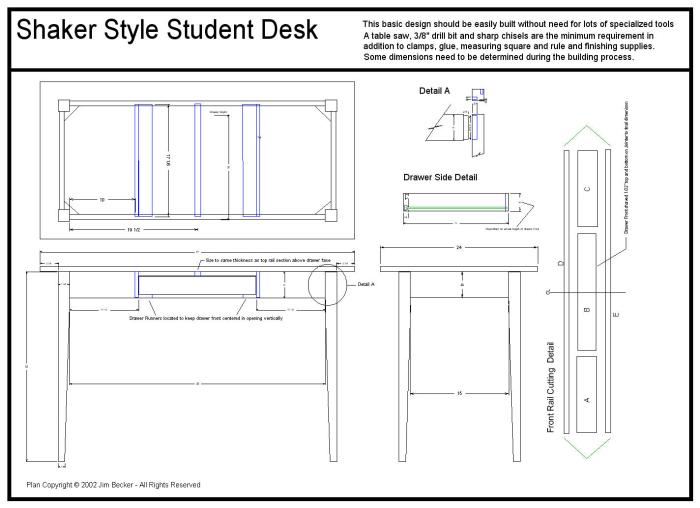
Designing your own Shaker furniture plans allows you to create pieces that perfectly suit your style and space. It’s a rewarding experience that lets you express your creativity and woodworking skills.
Designing a Simple Shaker Furniture Project
Start with a simple project that utilizes basic woodworking skills. Consider a small shelf, a simple stool, or a basic box. These projects provide a great foundation for understanding Shaker design principles and construction techniques.
Drafting a Shaker Furniture Plan
Once you’ve chosen your project, it’s time to draft a plan. This plan will serve as your guide throughout the building process. Here are the steps involved in drafting a Shaker furniture plan:
1. Sketching the Design
Begin by sketching your chosen design on paper. This initial sketch helps visualize the overall shape, proportions, and features of your furniture piece.
2. Creating a Detailed Drawing
Once you’re satisfied with the initial sketch, create a more detailed drawing. This drawing should include accurate measurements, dimensions, and joinery details. You can use graph paper or specialized software for this purpose.
3. Defining Material Requirements
Determine the type and amount of wood needed for your project. Consider the size, weight, and intended use of your furniture piece when selecting the appropriate wood species.
4. Creating a Cutting List
Create a cutting list that Artikels the specific dimensions and quantities of each wood piece required for your project. This list ensures you have all the necessary materials before you begin cutting.
5. Detailing the Assembly Process
Clearly define the assembly process in your plan. Include instructions on how to join the different wood pieces, attach hardware, and finish the furniture piece.
Adapting Existing Shaker Furniture Plans
You can adapt existing Shaker furniture plans to suit your specific needs and preferences. Here are some tips for adapting existing plans:
1. Modifying Dimensions
Adjust the dimensions of the plan to fit your space or desired size. Make sure to maintain the overall proportions of the original design to preserve its aesthetic appeal.
2. Changing Materials
Choose different wood species or finishes to reflect your personal style and preferences. Consider the properties of different wood types and their suitability for your project.
3. Adding Personal Touches
Incorporate unique details or features to personalize your Shaker furniture piece. This could include adding decorative elements, altering the joinery techniques, or experimenting with different finishes.
4. Combining Elements from Different Plans
You can combine elements from multiple Shaker furniture plans to create a unique and customized piece. For example, you might use the base of one plan and the top of another to create a unique table.
Resources and Tools for Shaker Furniture Building
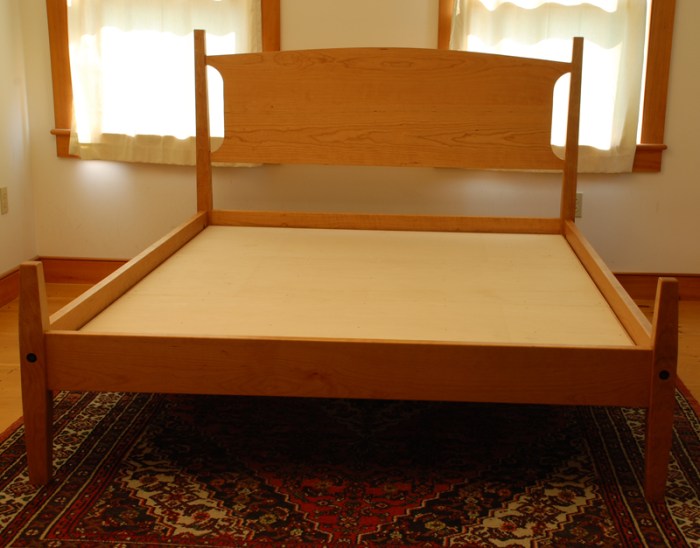
Building Shaker furniture requires a combination of tools, materials, and knowledge. Understanding these elements will allow you to create beautiful and functional pieces that embody the Shaker aesthetic. This section provides a comprehensive overview of the essential resources and tools needed for successful Shaker furniture building.
Essential Tools for Shaker Furniture Building
Having the right tools is crucial for accurate and efficient woodworking. Here’s a list of essential tools for building Shaker furniture:
- Hand Tools: Hand tools provide control and precision, especially for intricate details. Essential hand tools include:
- Hand Plane: A hand plane is used for smoothing and shaping wood surfaces.
- Chisels: Chisels are used for carving and shaping wood, particularly for joinery.
- Screwdrivers: Screwdrivers are essential for assembling furniture components.
- Clamps: Clamps are used to hold pieces of wood together while glue dries.
- Measuring Tape: A measuring tape is essential for accurate measurements and layout.
- Marking Gauge: A marking gauge helps transfer measurements to wood accurately.
- Combination Square: A combination square is used for checking angles and marking lines.
- Level: A level ensures that furniture is built with straight and even surfaces.
- Mallet: A mallet is used for striking chisels and other tools.
- Hammer: A hammer is used for driving nails and other tasks.
- Power Tools: Power tools can significantly speed up the building process. Here are some essential power tools:
- Circular Saw: A circular saw is used for cutting wood to size.
- Jig Saw: A jig saw is used for cutting curves and intricate shapes.
- Drill/Driver: A drill/driver is used for drilling holes and driving screws.
- Router: A router is used for shaping edges and creating decorative details.
- Belt Sander: A belt sander is used for smoothing and shaping large surfaces.
- Orbital Sander: An orbital sander is used for fine sanding and finishing.
- Safety Equipment: Safety should always be a priority when working with wood. Essential safety equipment includes:
- Safety Glasses: Safety glasses protect your eyes from flying debris.
- Hearing Protection: Hearing protection is essential when using power tools.
- Dust Mask: A dust mask protects you from inhaling wood dust.
- Gloves: Gloves protect your hands from splinters and other hazards.
Resources for Learning Shaker Furniture Building
Numerous resources are available to help you learn about Shaker furniture building. These resources provide valuable information, plans, and techniques:
- Websites: Several websites offer information, plans, and resources for Shaker furniture building. Some popular websites include:
- The Shaker Community: This website provides a wealth of information about Shaker history, furniture, and design principles.
- Shaker Workshops: This website offers plans, tutorials, and resources for building Shaker furniture.
- Shaker Village of Pleasant Hill: This website features information about the Shaker Village of Pleasant Hill, Kentucky, and its collection of Shaker furniture.
- Books: Books provide in-depth information and detailed instructions for building Shaker furniture. Some recommended books include:
- “The Shaker Style: Furniture and Design” by David R. Starbuck: This book provides a comprehensive overview of Shaker furniture and design.
- “Shaker Furniture: The Complete Guide to Making Authentic Reproductions” by John C. Stott: This book offers detailed instructions for building Shaker furniture.
- “Shaker: The Furniture” by John C. Stott: This book provides a detailed history of Shaker furniture and its design principles.
- Workshops and Classes: Hands-on workshops and classes offer an opportunity to learn from experienced woodworkers. These classes provide practical experience and guidance in building Shaker furniture.
Materials for Shaker Furniture Building, Shaker furniture plans
Shaker furniture is known for its simplicity and functionality. The materials used for building Shaker furniture are carefully selected for their durability and aesthetic qualities. Here are some common materials used:
- Wood: Wood is the primary material used for building Shaker furniture. The most common wood species used are:
- Cherry: Cherry wood is known for its rich reddish-brown color and beautiful grain pattern.
- Maple: Maple wood is known for its hardness, durability, and light color.
- Walnut: Walnut wood is known for its dark brown color and rich grain pattern.
- Pine: Pine wood is known for its affordability and soft texture.
- Hardware: Shaker furniture typically uses simple and functional hardware. Common hardware includes:
- Hinges: Hinges are used for doors and lids.
- Knobs: Knobs are used for drawers and doors.
- Screws: Screws are used for assembling furniture components.
- Nails: Nails are used for securing furniture components.
- Finishes: Shaker furniture is typically finished with simple and natural finishes. Common finishes include:
- Oil: Oil finishes provide a natural look and protect the wood.
- Wax: Wax finishes enhance the wood’s natural beauty and provide a protective layer.
- Shellac: Shellac finishes offer a durable and traditional look.
Inspirational Shaker Furniture Projects: Shaker Furniture Plans
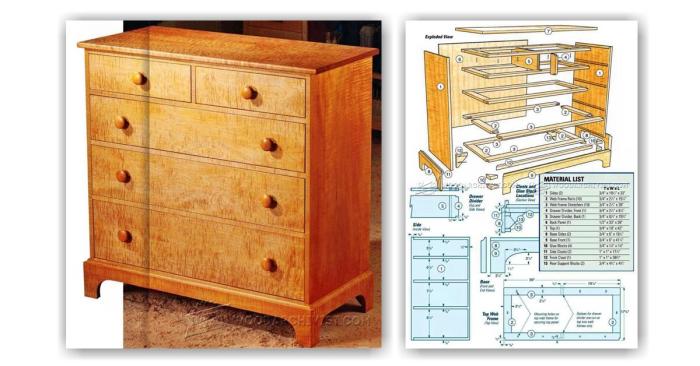
Shaker furniture plans offer a gateway to crafting timeless pieces that blend simplicity with functionality. The beauty of Shaker designs lies in their understated elegance, highlighting the natural beauty of wood and the craftsmanship involved. Let’s explore some inspiring projects that showcase the versatility of Shaker furniture.
Examples of Shaker Furniture Projects
These projects demonstrate the wide range of possibilities with Shaker furniture plans. Each project features unique design elements and construction techniques that showcase the versatility of Shaker design.
- Shaker Blanket Chest: This iconic piece is a testament to Shaker craftsmanship. The simple, rectangular form features dovetail joints and a hinged lid, providing ample storage for blankets and linens. The chest is typically made from pine or maple, finished with a natural oil or wax. The construction involves precise joinery and meticulous attention to detail. The estimated time for completion is around 30-40 hours, depending on your experience level.
- Shaker Drop-Leaf Table: This versatile table is perfect for small spaces, as the drop leaves can be folded down when not in use. The table features a simple, rectangular top with a sturdy base. The drop leaves are supported by hinges and brackets. The construction involves using mortise-and-tenon joints for the legs and rails, and the table can be made from a variety of woods, such as cherry, maple, or walnut. The estimated time for completion is around 20-30 hours.
- Shaker Ladder-Back Chair: This classic chair is known for its simple, elegant design and comfortable seating. The chair features a ladder-back design with horizontal rungs and a woven seat. The construction involves using mortise-and-tenon joints for the legs and back, and the chair can be made from a variety of woods, such as maple, cherry, or oak. The estimated time for completion is around 15-20 hours.
Table of Shaker Furniture Projects
This table provides a comprehensive overview of popular Shaker furniture projects, including the materials used, construction techniques, and estimated time for completion.
| Project | Materials | Construction Techniques | Estimated Time (Hours) |
|---|---|---|---|
| Shaker Blanket Chest | Pine, Maple | Dovetail joints, Hinged lid | 30-40 |
| Shaker Drop-Leaf Table | Cherry, Maple, Walnut | Mortise-and-tenon joints, Hinges, Brackets | 20-30 |
| Shaker Ladder-Back Chair | Maple, Cherry, Oak | Mortise-and-tenon joints, Woven seat | 15-20 |
| Shaker Bookcase | Pine, Maple, Cherry | Dovetail joints, Shelf supports | 40-50 |
| Shaker Workbench | Oak, Maple | Mortise-and-tenon joints, Vise | 50-60 |
Ultimate Conclusion
With the right plans and a little dedication, you can embark on a rewarding journey of building Shaker furniture. The process of bringing these plans to life is not only a practical endeavor but also a creative outlet that allows you to connect with the rich history and timeless appeal of Shaker design. Whether you choose to replicate a classic piece or create a unique design inspired by Shaker principles, the journey of building Shaker furniture is sure to be a fulfilling one.
FAQ
Where can I find free Shaker furniture plans?
There are numerous online resources offering free Shaker furniture plans. Websites like Ana White, Woodworking for Mere Mortals, and The Wood Whisperer often feature free plans for various Shaker-inspired projects.
What kind of wood is best for Shaker furniture?
Shaker furniture is traditionally made from hardwoods like maple, cherry, and walnut. These woods are known for their durability, strength, and beautiful grain patterns. Pine and oak are also popular choices for Shaker furniture.
What tools do I need to build Shaker furniture?
The tools required depend on the specific project. However, basic woodworking tools like a saw, drill, sander, and clamps are essential. Depending on the complexity of the plan, you might also need specialized tools like a router, jointer, or planer.
Shaker furniture plans are known for their simple elegance, and you can find plans for everything from chairs to tables to even a rocking horse. If you’re looking to make something special for a little one, check out these woodworking plans for baby furniture.
Once you’ve mastered the basics, you can even try your hand at some more complex Shaker furniture projects.
