Shutter woodworking plans offer a fantastic opportunity to create beautiful and functional window treatments for your home. Whether you’re a seasoned woodworker or just starting out, these plans provide a detailed roadmap for crafting custom shutters that perfectly complement your décor. Building your own shutters allows you to personalize their style, size, and finish, ensuring they seamlessly integrate with your existing design aesthetic.
From choosing the right wood to mastering essential techniques like cutting, shaping, and assembling, these plans guide you through every step of the process. You’ll discover the satisfaction of creating something unique and durable, adding a touch of handmade charm to your home.
Introduction to Shutter Woodworking
Shutter woodworking is a rewarding and fulfilling craft that allows you to create custom window treatments for your home, adding style, privacy, and energy efficiency. Building your own shutters gives you complete control over the design, materials, and finish, ensuring a perfect match for your décor and needs. This guide will provide you with a comprehensive overview of shutter woodworking, covering the basics of shutter types, benefits, and essential tools and materials.
Shutter Types and Uses
Shutters come in a variety of styles, each offering unique advantages and aesthetics. Understanding the different types will help you choose the best option for your home.
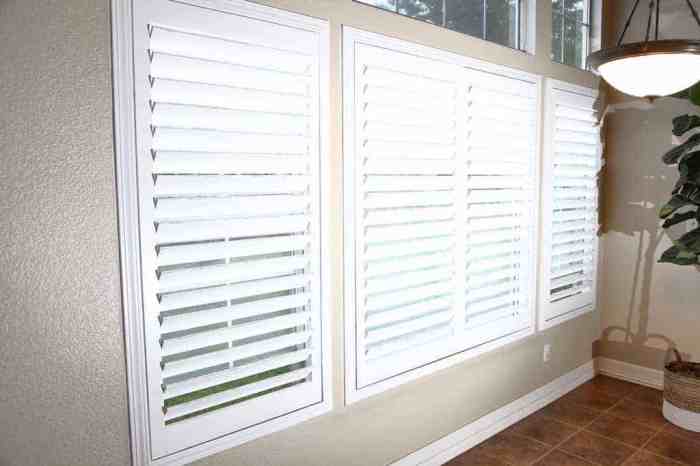
- Louvered Shutters: These classic shutters feature horizontal slats, or louvers, that can be adjusted to control light and privacy. They are versatile and suitable for various window sizes and styles.
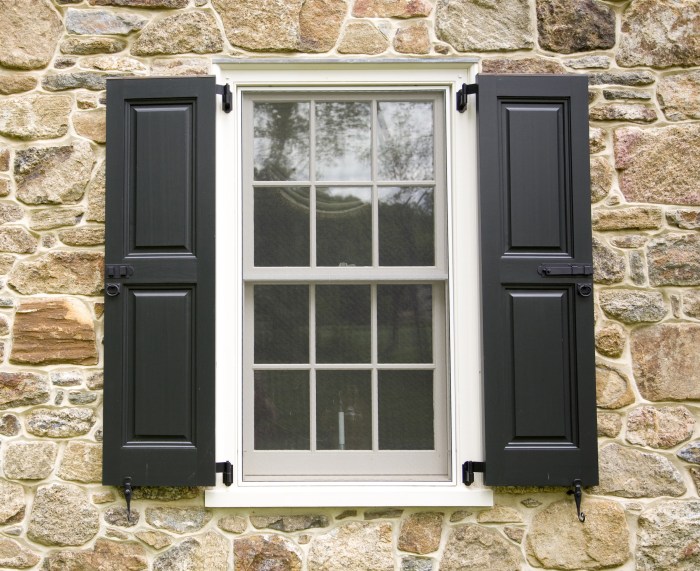
- Panel Shutters: Solid, flat panels, often with raised or recessed designs, offer a clean and modern look. They provide excellent light blocking and privacy, making them ideal for bedrooms or living rooms.
- Cafe Shutters: These shutters cover the lower portion of a window, leaving the upper part open. They are often used in kitchens or dining areas to offer privacy without obstructing natural light.
- Bahama Shutters: These shutters are hinged at the top and fold down to provide shade from the sun. They are commonly used in tropical climates or on exterior windows.
Benefits of Building Your Own Shutters
Building your own shutters offers several advantages over purchasing pre-made options:
- Customization: You have complete control over the design, size, materials, and finish, ensuring a perfect match for your home’s style.
- Cost Savings: Building your own shutters can be significantly cheaper than purchasing pre-made ones, especially for custom sizes or unique designs.
- Sense of Accomplishment: Creating your own shutters is a rewarding experience, allowing you to showcase your woodworking skills and create a unique piece for your home.
Essential Tools and Materials
To begin your shutter woodworking project, you will need a basic set of tools and materials.
- Power Tools:
- Circular Saw: For cutting wood to size.
- Table Saw: For precise cuts and creating mitered joints.
- Router: For shaping edges and creating decorative details.
- Drill: For drilling pilot holes and attaching hardware.
- Sanding Tools: For smoothing surfaces and creating a polished finish.
- Hand Tools:
- Tape Measure: For accurate measurements.
- Level: For ensuring straight lines and even surfaces.
- Chisels: For carving and shaping wood.
- Clamps: For securing pieces of wood during assembly.
- Screwdriver: For attaching hardware and securing components.
- Materials:
- Wood: Choose a sturdy and durable wood like pine, oak, or maple, depending on your budget and desired aesthetic.
- Hardware: This includes hinges, latches, and fasteners, which will be specific to the shutter design you choose.
- Finish: You will need paint, stain, or sealant to protect and enhance the appearance of your shutters.
Shutter Design and Planning: Shutter Woodworking Plans
Shutter design and planning are crucial aspects of your woodworking project. They involve choosing the right style, considering your needs, and creating a detailed plan for construction. This section explores different shutter styles, factors to consider for design selection, and provides a simple plan for a basic shutter.
Shutter Styles and Designs
Shutter styles vary widely, offering a range of aesthetic options and functionalities. Here are some popular shutter styles:
- Louvered Shutters: These shutters feature horizontal slats that can be adjusted to control light and privacy. Louvered shutters are classic and versatile, suitable for both traditional and modern homes.
- Panel Shutters: Panel shutters consist of solid panels that provide complete light blockage and privacy. They are often used for a more contemporary look and can be designed with various panel configurations.
- Raised Panel Shutters: Raised panel shutters feature raised panels that add depth and texture. They offer a more traditional and elegant appearance and are commonly used in classic homes.
- Bahama Shutters: Bahama shutters are hinged at the top and fold outward, providing shade and protection from the elements. They are often used in tropical climates and add a unique architectural touch.
- Cafe Shutters: Cafe shutters cover only the lower portion of a window, leaving the top half open. They are ideal for adding privacy and a touch of charm to kitchens, bathrooms, or other rooms where partial light blockage is desired.
Factors to Consider When Choosing a Shutter Design
Choosing the right shutter design involves several factors, including:
- Window Size and Shape: The dimensions and shape of your windows will influence the size and configuration of your shutters. Consider the window’s height, width, and any architectural details.
- Room Style and Decor: The style of your room and the overall decor will determine the appropriate shutter style. Consider the existing furniture, wall colors, and architectural features.
- Light Control and Privacy Needs: Determine how much light control and privacy you require. Louvered shutters offer adjustable light control, while panel shutters provide complete privacy.
- Budget: Shutter materials and construction methods can vary in cost. Set a budget for your project and explore different options within your price range.
Simple Plan for a Basic Shutter
This section provides a basic plan for a simple louvered shutter. The dimensions and materials can be adjusted based on your specific needs.
Shutter Dimensions:
Width: 24 inches
Height: 36 inches
Louver Width: 2.5 inches
Louver Spacing: 1 inch
Materials:
– 1/2 inch thick plywood for the shutter frame and louvers
– 1/4 inch thick plywood for the back panel (optional)
– Wood glue
– Wood screws
– Hinges
– Paint or stain (optional)
Construction Steps:
1. Cut the shutter frame pieces to size.
2. Cut the louvers to size and shape.
3. Glue and screw the louvers to the frame.
4. Attach the back panel (optional).
5. Install the hinges.
6. Paint or stain the shutter (optional).
Cutting and Shaping the Wood

Now that you have your materials ready, it’s time to start cutting and shaping the wood for your shutters. This is a crucial step, as it will determine the final look and functionality of your shutters. We’ll explore the process of cutting wood for shutter panels and rails, along with techniques for shaping wood for decorative elements.
Cutting Wood for Shutter Panels and Rails
Cutting wood for shutter panels and rails requires precision and accuracy. Here’s a step-by-step guide:
- Measure and Mark: Carefully measure the dimensions of your shutter panels and rails according to your design plans. Use a pencil or marking tool to clearly mark the cutting lines on the wood.
- Choose the Right Cutting Tool: Depending on the thickness and type of wood you are using, you can choose from various cutting tools. A table saw is a popular choice for precise and straight cuts, while a circular saw offers more mobility for larger projects. For intricate cuts, a jigsaw or band saw can be used.
- Secure the Wood: Ensure that the wood is securely clamped or held in place to prevent movement during cutting. Use a workbench or a sturdy cutting surface.
- Make the Cuts: Slowly and carefully guide the cutting tool along the marked lines, ensuring that the cut is straight and smooth. If using a table saw, adjust the blade height to the desired depth of cut.
- Sand the Edges: After cutting, sand the edges of the wood to remove any rough edges or splinters. This will create a smooth finish and prevent any potential injuries.
Shaping Wood for Decorative Elements
To add a decorative touch to your shutters, you can shape the wood using various techniques. Here are some popular methods:
- Hand Carving: This technique involves using hand tools like chisels, gouges, and carving knives to create intricate designs and patterns on the wood. It requires patience, skill, and a steady hand.
- Router: A router is a powerful tool that can be used to create various shapes and profiles on the wood. It’s ideal for creating decorative edges, moldings, and grooves.
- Sanding: You can use sandpaper or a sanding block to create rounded edges, smooth surfaces, and subtle curves on the wood.
- Milling: This technique involves using a milling machine to create precise and complex shapes on the wood. It’s often used for creating decorative elements like raised panels or intricate moldings.
Creating Smooth and Accurate Cuts
To ensure smooth and accurate cuts, it’s important to follow these tips:
Use a sharp blade or cutting tool: A dull blade will create rough and uneven cuts.
Maintain a consistent cutting speed: Avoid rushing the cut, as this can lead to inaccuracies.
Use a guide or fence: A guide or fence will help you maintain a straight and consistent cut.
Make test cuts: Before cutting the final piece, make a few test cuts on a scrap piece of wood to ensure that the tool is set up correctly.
Assembling the Shutter Frame

The shutter frame is the foundation of your shutter, so it’s crucial to assemble it securely and accurately. You’ll be joining the rails and stiles to create a sturdy rectangle that will hold the louvers and support the weight of the shutter.
Joining the Rails and Stiles, Shutter woodworking plans
This step involves connecting the vertical stiles to the horizontal rails to form the shutter frame. The method you choose will depend on your desired look and the strength required.
- Mortise and Tenon Joints: This traditional joinery technique offers exceptional strength and a clean, elegant appearance. A mortise, a rectangular hole, is cut into the stile, while a tenon, a protruding tongue, is crafted on the rail. The tenon fits snugly into the mortise, creating a strong, interlocking joint.
- Pocket Hole Joinery: This method uses a specialized jig to create angled holes for screws, allowing you to join the pieces securely while keeping the screw heads hidden. Pocket holes are a faster and easier option compared to mortise and tenon joints.
- Butt Joints with Glue and Screws: This straightforward approach involves simply butting the rails and stiles together and securing them with glue and screws. While not as strong as other methods, it’s a simple and effective solution for basic shutter frames.
Using Strong Adhesives and Fasteners
Using high-quality adhesives and fasteners is essential for ensuring a strong and durable shutter frame. The glue will bond the wood pieces together, while the fasteners will provide additional strength and stability.
- Wood Glue: Select a strong, water-resistant wood glue specifically designed for woodworking projects. Apply the glue liberally to all surfaces that will be joined.
- Screws: Use screws that are long enough to penetrate both pieces of wood and create a secure hold. Choose screws made from a material that will resist rust and corrosion.
- Clamps: Clamps are essential for holding the pieces together while the glue dries. Use enough clamps to apply even pressure across the entire joint.
Remember to use clamps to hold the pieces together while the glue dries. Allow the glue to cure completely before proceeding to the next step.
Adding Shutter Louvers
Now that you have a sturdy frame, it’s time to add the louvers – the slats that give your shutters their distinctive look and functionality. There are several methods to create louvers, each with its own advantages and disadvantages.
Creating Louvers
Creating louvers involves cutting and shaping the wood to create the desired angle and size. Here are some popular methods:
- Using a Table Saw: A table saw is a powerful tool for creating louvers. You can create a series of parallel cuts to form the louver shape. This method is best for creating precise and uniform louvers.
- Using a Router: A router can be used to create a variety of louver shapes, including curved and angled louvers. This method is more versatile than using a table saw.
- Using a Miter Saw: A miter saw can be used to cut the louvers to length and angle. This method is quick and easy, but it may not be as precise as using a table saw or router.
Attaching Louvers to the Frame
Once you have created the louvers, you need to attach them to the frame. Here are some common methods:
- Using Wood Glue and Screws: This method is strong and durable. It involves applying wood glue to the edges of the louvers and then securing them to the frame with screws.
- Using Pocket Holes: Pocket holes are small holes drilled into the edges of the louvers. These holes allow you to attach the louvers to the frame using screws. This method is less visible than using screws directly into the surface of the louvers.
- Using a Rabbet Joint: A rabbet joint is a groove cut into the edge of the frame. The louvers are then fitted into the groove. This method is very strong and creates a clean and professional look.
Achieving Consistent Spacing and Alignment
To ensure that your louvers are evenly spaced and aligned, follow these tips:
- Use a Spacing Jig: A spacing jig is a tool that helps you maintain consistent spacing between louvers.
- Use a Clamping System: A clamping system can help you hold the louvers in place while you attach them to the frame. This helps prevent the louvers from shifting out of alignment.
- Use a Level: A level can help you ensure that the louvers are straight and parallel to each other.
Finishing and Painting the Shutter
The final step in your shutter project is finishing and painting. This step will not only enhance the look of your shutters but also protect them from the elements.
Finishing Techniques
Finishing techniques for shutters involve a variety of methods to create different looks and levels of protection.
- Staining: Stain provides a natural look and allows the wood grain to show through. Choose a stain that complements the wood type and your desired color. Apply stain evenly with a brush or cloth, following the manufacturer’s instructions.
- Varnishing: Varnish provides a clear, protective coating that enhances the natural beauty of the wood. It comes in different finishes, such as gloss, semi-gloss, and matte. Apply varnish with a brush or sprayer, ensuring even coverage and following the manufacturer’s instructions.
- Painting: Painting is the most versatile finishing technique, allowing you to choose any color you desire. It also provides a durable, weather-resistant coating. Choose a high-quality paint specifically designed for exterior use. Apply paint with a brush, roller, or sprayer, ensuring even coverage and following the manufacturer’s instructions.
Sanding and Priming
Sanding and priming are essential steps before painting or staining your shutters.
- Sanding: Sanding smooths the wood surface and removes any imperfections. Start with a coarse grit sandpaper (80-100 grit) and gradually work your way to a finer grit (120-150 grit). Sand with the grain of the wood to avoid scratches.
- Priming: Primer creates a smooth, even surface for the paint or stain to adhere to. It also helps to seal the wood and prevent the paint from soaking in. Apply primer with a brush or roller, ensuring even coverage and following the manufacturer’s instructions.
Paint Types and Application Methods
Paint types and application methods play a crucial role in achieving a durable and aesthetically pleasing finish.
- Paint Types:
- Acrylic Latex Paint: Acrylic latex paint is a popular choice for exterior shutters due to its durability, water resistance, and easy application. It dries quickly and cleans up with water.
- Oil-Based Paint: Oil-based paint offers excellent durability and weather resistance. However, it takes longer to dry and requires mineral spirits for cleanup.
- Epoxy Paint: Epoxy paint is a highly durable and weather-resistant option, often used for high-traffic areas. It provides a smooth, glossy finish.
- Application Methods:
- Brush: A brush is a versatile tool for applying paint, especially for detailed areas and corners. Choose a brush with bristles suitable for the paint type.
- Roller: A roller is ideal for applying paint to large, flat surfaces. Choose a roller with a nap length suitable for the paint type and surface texture.
- Sprayer: A sprayer provides a smooth, even finish and is ideal for large projects. Choose a sprayer that is compatible with the paint type.
Installing the Shutter

Installing the shutter is the final step in creating a beautiful and functional window covering. This process requires careful measurement, marking, and securing the shutter to the window frame.
Securing the Shutter to the Window Frame
There are several methods for securing the shutter to the window frame, each with its own advantages and disadvantages. Here’s a look at some common options:
- Screws: This is the most common and straightforward method. Screws are typically driven into the window frame through pre-drilled holes in the shutter. This provides a strong and secure attachment.
- Hinges: Hinges are ideal for shutters that need to be opened and closed frequently. They allow the shutter to swing open, providing access to the window. Hinges are usually mounted on the shutter and secured to the window frame with screws.
- Brackets: Brackets are often used for shutters that are mounted on the exterior of the window frame. They provide a sturdy support and can be adjusted to accommodate different window sizes. Brackets are typically secured to the window frame with screws.
- Magnetic catches: Magnetic catches offer a convenient and secure way to attach the shutter to the window frame. They are ideal for shutters that are not frequently opened and closed. Magnetic catches are usually attached to the shutter and window frame with screws.
Closing Notes

With these shutter woodworking plans, you can transform your windows into stunning focal points. Not only will you have beautiful, functional shutters, but you’ll also gain valuable woodworking skills and a sense of accomplishment. So, grab your tools, gather your materials, and embark on a rewarding woodworking journey!
Q&A
How difficult are shutter woodworking plans to follow?
The plans are designed for a range of skill levels. While some projects might be more challenging than others, there are beginner-friendly options available. The detailed instructions and diagrams make the process easier to understand.
What type of wood is best for shutters?
Hardwoods like oak, maple, and cherry are popular choices for shutters due to their durability and resistance to warping. Softwoods like pine and cedar can also be used, but they may require more care and attention.
Do I need special tools for shutter woodworking?
You’ll need basic woodworking tools such as a saw, drill, sander, and measuring tape. Additional tools like a router and table saw can be helpful for more intricate designs.
Shutter woodworking plans can be a great way to add a touch of style and privacy to your home. If you’re looking for some inspiration or want to learn some new woodworking techniques, check out plans woodwork for a wide variety of plans.
You’ll find everything from basic window shutters to more elaborate designs that can be customized to fit your own style.
