Wood for woodworking projects is the foundation of every creation, from simple crafts to intricate furniture. Understanding the properties of different wood species, their preparation, and proper techniques are essential for achieving stunning results. This guide will delve into the world of wood, covering everything from selecting the right type to mastering essential woodworking skills.
Whether you’re a seasoned woodworker or just starting out, this guide will provide valuable insights into the diverse world of wood and its application in woodworking projects. We’ll explore the characteristics of various wood types, from hardwoods to softwoods, and guide you through the process of preparing wood for optimal results. Additionally, we’ll cover essential woodworking techniques, tools, and safety practices, empowering you to create beautiful and functional projects.
Understanding Wood Types for Woodworking
Woodworking is a craft that involves working with various types of wood to create beautiful and functional objects. Understanding the characteristics of different wood species is crucial for selecting the right material for a project. This knowledge helps you make informed decisions about wood’s suitability for specific applications, ensuring the final product meets your expectations.
Hardwoods and Softwoods
The terms “hardwood” and “softwood” are often used to categorize wood types. However, these terms are not entirely accurate, as they don’t always reflect the actual hardness of the wood.
- Hardwoods are generally denser and stronger than softwoods. They come from deciduous trees, which lose their leaves in the fall. Examples include oak, maple, cherry, walnut, and mahogany.
- Softwoods are typically lighter and softer than hardwoods. They come from coniferous trees, which have needles and cones. Examples include pine, fir, cedar, spruce, and redwood.
Wood Preparation for Woodworking Projects
Preparing wood for woodworking is a crucial step that ensures a successful project with minimal waste. It involves a series of processes that condition the wood, making it suitable for shaping, cutting, and finishing. Proper wood preparation is essential for achieving desired results, minimizing waste, and creating a lasting and beautiful finished product.
Drying Wood
Drying wood is a critical step in wood preparation, as it removes excess moisture and prevents warping, cracking, and other issues that can occur during woodworking. The process involves reducing the moisture content of the wood to a level suitable for woodworking.
There are two main methods of drying wood:
- Air drying: This method involves exposing the wood to natural air circulation, allowing it to slowly dry over several months or even years. Air drying is generally suitable for smaller pieces of wood, but it requires a well-ventilated space with consistent humidity levels.
- Kiln drying: This method involves drying wood in a controlled environment using a kiln, which accelerates the drying process. Kiln drying is faster than air drying, typically taking several days to weeks, and it provides more consistent results.
The specific drying method chosen depends on the type of wood, the size of the pieces, and the desired level of moisture content. Properly dried wood is essential for achieving a stable and durable finished product.
Planing Wood
Planing wood is the process of smoothing and flattening the surface of the wood using a hand plane or a power planer. Planing helps to remove imperfections, such as knots, unevenness, and surface irregularities, creating a smooth and even surface for further woodworking.
Planing wood is essential for:
- Creating a flat and smooth surface for gluing and joining.
- Preparing the wood for sanding and finishing.
- Achieving precise dimensions for woodworking projects.
Sanding Wood
Sanding wood is the process of smoothing and refining the surface of the wood using sandpaper. Sanding helps to remove any remaining imperfections, such as tool marks, scratches, and surface irregularities, creating a smooth and polished finish.
The sanding process involves using a series of sandpaper grits, starting with a coarser grit to remove larger imperfections and finishing with a finer grit to create a smooth and polished surface. The choice of sandpaper grit depends on the desired level of smoothness and the type of wood being sanded.
Preparing Specific Wood Types
Different wood types require different preparation methods depending on their characteristics. Here are some examples of how to prepare specific wood types for woodworking:
Softwoods
Softwoods are generally easier to work with than hardwoods and are commonly used for furniture, construction, and other woodworking projects. Softwoods, such as pine, fir, and cedar, are often prepared by:
- Air drying or kiln drying, depending on the desired level of moisture content.
- Planing to remove surface irregularities and create a smooth surface.
- Sanding with a series of sandpaper grits to achieve the desired level of smoothness.
Hardwoods
Hardwoods are denser and more durable than softwoods and are often used for furniture, flooring, and other high-quality woodworking projects. Hardwoods, such as oak, maple, and cherry, are often prepared by:
- Air drying or kiln drying, depending on the desired level of moisture content.
- Planing to remove surface irregularities and create a smooth surface.
- Sanding with a series of sandpaper grits to achieve the desired level of smoothness.
Exotic Woods
Exotic woods are often prized for their unique colors, patterns, and durability. Exotic woods, such as mahogany, rosewood, and ebony, are often prepared by:
- Air drying or kiln drying, depending on the desired level of moisture content.
- Planing to remove surface irregularities and create a smooth surface.
- Sanding with a series of sandpaper grits to achieve the desired level of smoothness.
Woodworking Techniques and Tools: Wood For Woodworking Projects
Woodworking involves a wide range of techniques and tools, from basic hand tools to specialized power equipment. Understanding these techniques and tools is crucial for successful woodworking projects, ensuring both quality and safety.
Essential Woodworking Tools
Essential woodworking tools can be categorized into hand tools, power tools, and specialized equipment. These tools are essential for cutting, shaping, joining, and finishing wood.
- Hand Tools: Hand tools are versatile and often used for precise work. Common hand tools include:
- Measuring Tools:
- Tape Measure: For measuring lengths and distances.
- Ruler: For measuring smaller distances and marking lines.
- Combination Square: For measuring angles and marking lines perpendicular to a surface.
- Try Square: For checking right angles.
- Marking Tools:
- Pencil: For marking lines and measurements.
- Scriber: For marking lines along the edge of a piece of wood.
- Marking Gauge: For marking lines parallel to an edge.
- Cutting Tools:
- Hand Saw: For cutting wood along the grain.
- Crosscut Saw: For cutting wood across the grain.
- Backsaw: For making precise cuts.
- Chisel: For carving and shaping wood.
- Plane: For smoothing and shaping wood surfaces.
- Joining Tools:
- Clamps: For holding pieces of wood together while joining.
- Screwdriver: For driving screws.
- Hammer: For driving nails and pounding wood.
- Finishing Tools:
- Sandpaper: For smoothing wood surfaces.
- Brushes: For applying finishes.
- Scrapers: For removing imperfections from wood surfaces.
- Power Tools: Power tools offer greater speed and efficiency for various woodworking tasks. Some common power tools include:
- Circular Saw: For making straight cuts in wood.
- Jigsaw: For making curved cuts in wood.
- Router: For shaping and cutting edges.
- Belt Sander: For sanding large surfaces.
- Drill Press: For drilling holes in wood.
- Table Saw: For making precise and accurate cuts.
- Specialized Equipment: Specialized equipment can enhance woodworking projects. Some examples include:
- Band Saw: For cutting intricate shapes and curves.
- Lathe: For turning wood into round shapes.
- Planer: For flattening and smoothing wood surfaces.
- Jointer: For creating straight and flat edges.
- Cutting Techniques:
- Hand Sawing: Hand sawing involves using a hand saw to cut wood along the grain or across the grain. It requires steady hand movements and proper saw angle for accurate cuts.
- Power Sawing: Power sawing uses electric saws like circular saws, jigsaws, and table saws for faster and more efficient cutting. Safety precautions, including using appropriate blades and guards, are crucial.
- Shaping Techniques:
- Hand Planing: Hand planing involves using a plane to smooth and shape wood surfaces. It requires proper technique and blade adjustment for desired results.
- Chiseling: Chiseling uses a chisel to carve and shape wood. It requires careful hand movements and precise angle control for accurate shaping.
- Routing: Routing uses a router to create various shapes and profiles on wood. It involves using different router bits and guides for desired results.
- Joining Techniques:
- Gluing: Gluing involves using wood glue to join pieces of wood together. It requires proper surface preparation and clamping for a strong bond.
- Screwing: Screwing involves using screws to join pieces of wood together. It requires using the right size and type of screws and a screwdriver for secure fastening.
- Doweling: Doweling involves using dowels to join pieces of wood together. It requires drilling holes for dowels and using glue for a strong bond.
- Finishing Techniques:
- Sanding: Sanding involves using sandpaper to smooth wood surfaces. It requires using different grit sandpaper and proper technique for a smooth finish.
- Painting: Painting involves applying paint to wood surfaces for protection and aesthetics. It requires proper surface preparation and paint application for a smooth and even finish.
- Staining: Staining involves applying stain to wood surfaces to enhance its natural color and grain. It requires using the right type of stain and proper application for desired results.
- Wear safety glasses: Protect your eyes from flying debris.
- Use ear protection: Protect your hearing from loud noises.
- Wear a dust mask: Protect your lungs from wood dust.
- Use proper hand tools: Ensure tools are sharp and in good condition.
- Follow power tool safety instructions: Always read and understand the instructions for each power tool before using it.
- Keep work area clean and organized: A clean and organized workspace reduces the risk of accidents.
- Never use power tools while tired or under the influence of drugs or alcohol: This can lead to mistakes and accidents.
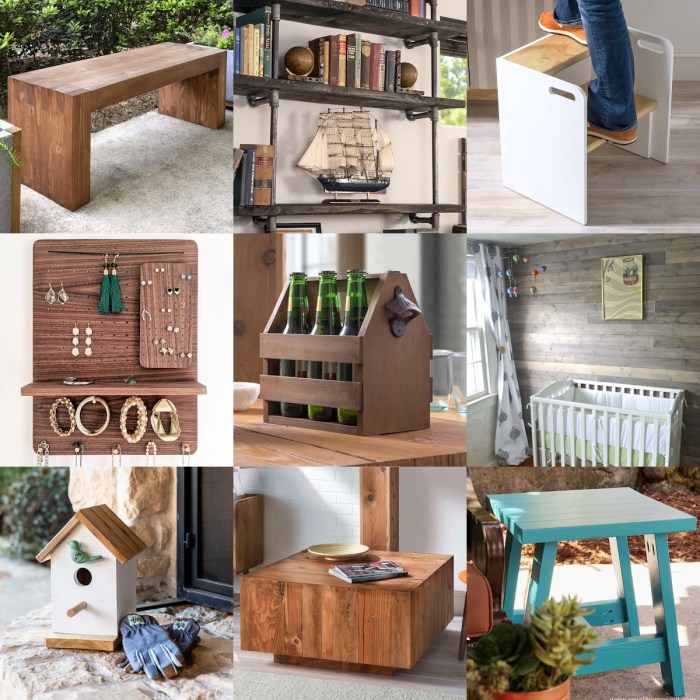
- Cutting Board: A cutting board is a practical and useful item that can be made from a variety of woods. Choose a hardwood like maple or walnut for durability. You can create a simple rectangular shape or get creative with rounded edges or decorative inlays.
- Birdhouse: Birdhouses are a fun and rewarding project for beginners. They can be made from various wood types and require basic woodworking skills. You can find numerous online resources and plans for different birdhouse designs.
- Wooden Box: A wooden box is a versatile project that can be used for storage, gifts, or decoration. Simple box designs can be made using basic joinery techniques like butt joints or rabbet joints.
- Wooden Shelf: Wooden shelves are a practical and stylish addition to any home. They can be made from a variety of woods and styles, and you can personalize them with paint, stain, or decorative hardware.
- Coffee Table: A coffee table is a statement piece in any living room. It can be made from various woods and styles, and you can personalize it with unique features like a glass top or decorative legs.
- End Table: End tables are a practical and stylish addition to any living room or bedroom. They can be made from various woods and styles, and you can personalize them with unique features like a drawer or a shelf.
- Wooden Chair: Building a wooden chair is a challenging but rewarding project. It requires a good understanding of joinery techniques and the ability to work with complex shapes.
- Wooden Bench: A wooden bench is a versatile piece of furniture that can be used indoors or outdoors. It can be made from various woods and styles, and you can personalize it with unique features like a backrest or armrests.
- Wooden Desk: A wooden desk is a statement piece in any home office. It can be made from various woods and styles, and you can personalize it with unique features like drawers, shelves, or a built-in computer monitor stand.
- Wooden Bed Frame: Building a wooden bed frame is a challenging but rewarding project. It requires a good understanding of joinery techniques and the ability to work with complex shapes.
- Wooden Cabinet: A wooden cabinet is a versatile piece of furniture that can be used for storage or display. It can be made from various woods and styles, and you can personalize it with unique features like doors, drawers, or shelves.
- Wooden Dresser: A wooden dresser is a stylish and functional piece of furniture for any bedroom. It can be made from various woods and styles, and you can personalize it with unique features like drawers, mirrors, or decorative hardware.
- Hardness: Hardwoods are generally more durable and resistant to scratches and dents than softwoods.
- Grain: The grain of wood can add visual interest and texture to your project.
- Color: Different wood species have unique colors and patterns.
- Availability: Some wood species are more readily available than others.
- Cost: Wood prices can vary significantly depending on the species and quality.
- Cutting: Cutting wood is a fundamental woodworking technique that involves using tools like saws, chisels, and routers to shape and size wood.
- Joining: Joining wood involves connecting pieces of wood together using techniques like glue, screws, nails, or dowels.
- Finishing: Finishing wood involves applying a protective coating to the surface of the wood to enhance its appearance and durability.
- Water-based stains are environmentally friendly and dry quickly. However, they can raise the wood grain, requiring sanding before applying a topcoat.
- Oil-based stains penetrate deeper into the wood, resulting in a richer color. They also tend to be more durable and provide better water resistance.
- Gel stains are thicker than other stains, making them ideal for projects with intricate details. They provide a more even color application and minimize blotching.
- Oil-based paints offer excellent durability and water resistance, making them suitable for outdoor projects. They provide a smooth and glossy finish, but they take longer to dry.
- Latex paints are water-based, making them easier to clean up and less toxic. They dry quickly and offer good durability, making them a popular choice for indoor projects.
- Acrylic paints are a versatile option that can be used for both indoor and outdoor projects. They are water-based, easy to clean up, and dry quickly. They offer a wide range of colors and finishes.
- Polyurethane varnishes are known for their durability and water resistance. They come in both oil-based and water-based formulas, offering a range of gloss levels.
- Lacquer varnishes are fast-drying and offer a hard, durable finish. They are typically used for furniture and other projects where a high-gloss finish is desired.
- Epoxy varnishes are extremely durable and water-resistant, making them ideal for projects exposed to harsh conditions. They provide a high-gloss finish that can be tinted.
- Paste wax is a traditional wax that is applied by hand. It provides a durable and protective finish that enhances the wood’s natural sheen.
- Liquid wax is a more modern wax that is applied with a cloth or sponge. It dries quickly and provides a protective finish that enhances the wood’s natural beauty.
- Spray wax is a convenient option that is applied with a spray bottle. It dries quickly and provides a protective finish that enhances the wood’s natural beauty.
- Dust Inhalation: Woodworking generates dust, which can contain harmful substances like silica and allergens. Inhaling wood dust can cause respiratory problems, including lung irritation, asthma, and even cancer.
- Tool-Related Injuries: Woodworking tools, from saws to power drills, can cause serious injuries if not used correctly. Cuts, punctures, and amputations are potential risks.
- Fire Risks: Wood is flammable, and woodworking activities can create fire hazards. Sparks from tools, sawdust accumulation, and improper use of flammable liquids like finishes can lead to fires.
- Personal Protective Equipment (PPE): Always wear appropriate PPE, including safety glasses, hearing protection, dust masks, gloves, and a respirator when necessary.
- Workshop Organization: Maintain a clean and organized workspace to prevent tripping hazards and clutter.
- Tool Safety: Use tools according to manufacturer instructions, ensure they are in good working order, and always unplug tools when not in use.
- Fire Safety: Keep a fire extinguisher readily available, avoid using flammable liquids in enclosed spaces, and dispose of sawdust properly.
- First Aid: Have a first aid kit readily available and know how to handle common woodworking injuries.
- Work Area Lighting: Ensure adequate lighting in your workshop to avoid eye strain and potential accidents.
- Workbenches: Sturdy workbenches provide a stable surface for projects, ideally with a vise for securing workpieces.
- Tool Storage: Organize tools and keep them readily accessible, but stored securely when not in use.
- Dust Collection System: Install a dust collection system to capture and remove wood dust from the air.
- Fire Extinguisher: Place a fire extinguisher in a visible and easily accessible location.
- First Aid Kit: Keep a well-stocked first aid kit readily available.
- Emergency Exit: Ensure a clear and easily accessible emergency exit.
Woodworking Techniques
Woodworking techniques are the methods and processes used to shape, join, and finish wood. Mastering these techniques is essential for creating quality woodworking projects.
Safety Precautions for Woodworking
Safety is paramount in woodworking. Always prioritize safety by following these precautions:
Woodworking Project Ideas

Woodworking offers a vast array of projects for all skill levels, from simple beginner-friendly crafts to intricate masterpieces. Whether you’re a seasoned woodworker or just starting out, exploring different project ideas can ignite your creativity and inspire you to bring your woodworking dreams to life.
Project Ideas for Beginners
Here are some woodworking projects that are perfect for beginners. These projects are relatively simple to make and require minimal tools and materials.
Project Ideas for Intermediate Skill Levels
These projects require a bit more experience and skill than beginner projects. They often involve more complex joinery techniques and may require specialized tools.
Project Ideas for Advanced Skill Levels
These projects require a high level of skill and experience. They often involve intricate joinery techniques, complex shapes, and may require specialized tools.
Choosing the Right Wood
The type of wood you choose for your project will have a significant impact on the final result. Consider the following factors when selecting wood:
Woodworking Techniques
Woodworking techniques are the methods and skills used to create woodworking projects. Some common woodworking techniques include:
Wood Finishing Techniques

The final step in any woodworking project is finishing. This involves applying a protective coating to the wood that enhances its appearance, durability, and longevity. Choosing the right finish depends on the type of wood, the desired aesthetic, and the intended use of the project.
Staining
Staining is a technique that alters the color of the wood without obscuring its natural grain. It’s primarily used to enhance the wood’s natural beauty or to create a specific color tone.
Applying stain involves wiping it onto the wood surface with a brush, cloth, or sponge. The amount of time the stain is allowed to sit on the wood determines the intensity of the color. Once the stain has dried, a topcoat such as varnish or polyurethane is applied to protect the color and provide a smooth finish.
Painting
Painting is a more versatile finishing technique that allows you to completely change the color of the wood. It provides a durable and opaque finish that hides the wood’s natural grain.
Painting involves applying the paint to the wood surface with a brush, roller, or sprayer. Multiple coats may be required to achieve a smooth and even finish. Sanding between coats can help create a smoother surface and improve the final appearance.
Varnishing
Varnishing is a technique that involves applying a clear, protective coating to the wood surface. Varnish provides a durable finish that enhances the wood’s natural beauty and protects it from scratches, moisture, and UV damage.
Varnish is applied in thin coats using a brush, roller, or sprayer. Allow each coat to dry completely before applying the next. The number of coats needed will depend on the desired level of protection and the type of varnish used.
Waxing
Waxing is a finishing technique that involves applying a thin layer of wax to the wood surface. Wax provides a protective finish that enhances the wood’s natural beauty and provides a smooth, satin-like feel.
Wax is applied in thin coats, rubbing it into the wood with a cloth or sponge. Allow each coat to dry completely before applying the next. Wax can be applied to bare wood or over a stain or varnish to enhance its appearance and provide additional protection.
Woodworking Safety

Woodworking is a rewarding hobby, but it’s crucial to prioritize safety to prevent injuries and ensure a positive experience. This section will guide you through common woodworking hazards and provide essential safety guidelines and practices.
Common Woodworking Hazards
Woodworking involves various hazards that require awareness and appropriate precautions.
Safety Guidelines and Practices
Here are some essential safety guidelines and practices to follow in your woodworking workshop:
Woodworking Workshop Layout, Wood for woodworking projects
Imagine a woodworking workshop with safety features and equipment.
Final Summary

With a solid understanding of wood types, preparation, and woodworking techniques, you’ll be well-equipped to embark on any woodworking project. Remember, patience, practice, and a keen eye for detail are key to success. Whether you’re crafting a simple birdhouse or a complex cabinet, the joy of creating with wood is a rewarding experience. So, grab your tools, choose your wood, and let your creativity flow!
FAQ Guide
What are the best wood types for beginners?
Softwoods like pine and fir are great for beginners due to their affordability and ease of working with. They are also forgiving for mistakes.
How do I prevent wood from warping?
Proper drying and acclimation of wood is crucial. Store wood in a dry, well-ventilated area and allow it to adjust to the room’s humidity before using.
What safety precautions should I take when woodworking?
Always wear safety glasses, hearing protection, and a dust mask. Use sharp tools properly and be mindful of your surroundings.
Choosing the right wood for your woodworking projects can feel overwhelming, but it doesn’t have to be! There are so many types of wood out there, each with its own unique characteristics and uses. If you’re just starting out, it’s helpful to check out some beginning woodworking plans to get a sense of what you’ll be working with.
Once you have a project in mind, you can then start to think about the best type of wood for the job. Whether you’re looking for a sturdy hardwood like oak or a softer wood like pine, there’s a perfect wood out there for your next woodworking masterpiece.
