Wood working furniture plans – Woodworking furniture plans are your blueprint to crafting beautiful and functional pieces for your home. Whether you’re a seasoned woodworker or just starting out, these plans provide detailed instructions and diagrams, guiding you through every step of the process. From simple shelves to intricate cabinets, the possibilities are endless, allowing you to unleash your creativity and build something truly unique.
These plans often come in various formats, including digital downloads, printed books, and even online courses. Each plan typically includes a materials list, cutting diagrams, assembly instructions, and finishing techniques. The level of detail can vary depending on the complexity of the project, ensuring there’s a plan for every skill level.
Introduction to Woodworking Furniture Plans

Woodworking furniture plans are detailed blueprints that guide you through the process of building furniture from scratch. They provide step-by-step instructions, diagrams, and material lists, making woodworking projects more accessible, even for beginners.
Benefits of Using Woodworking Furniture Plans
Using woodworking furniture plans offers several advantages:
- Clear and Concise Instructions: Woodworking furniture plans provide detailed instructions that break down complex projects into manageable steps, minimizing the risk of errors and ensuring a successful outcome.
- Accurate Material Lists: Plans specify the exact materials needed, including dimensions and quantities, eliminating guesswork and ensuring you have everything you need before starting.
- Detailed Diagrams and Drawings: Plans often include detailed diagrams and drawings that visually illustrate the construction process, making it easier to understand the assembly process.
- Time and Cost Savings: By following plans, you can avoid costly mistakes and time-consuming trial and error, saving both time and money.
- Confidence and Satisfaction: Successfully completing a woodworking project using plans can boost your confidence and provide a sense of accomplishment.
Types of Woodworking Furniture Plans
Woodworking furniture plans are available in various formats and levels of complexity, catering to different skill levels and preferences.
- Digital Plans: Digital plans are available online as downloadable PDFs, allowing for easy access and printing. They are often accompanied by detailed instructions, material lists, and 3D models.
- Printed Plans: Printed plans are physical copies of digital plans, often available in woodworking magazines or online stores. They provide a tangible reference for the construction process.
- Plan Books: Plan books offer collections of woodworking furniture plans, covering various styles and designs. They are a valuable resource for woodworkers seeking inspiration and project ideas.
- Custom Plans: Custom plans are designed specifically for individual needs and preferences. They are often created by professional designers or experienced woodworkers and can incorporate unique features and dimensions.
Examples of Popular Woodworking Furniture Plans
There are numerous popular woodworking furniture plans available, covering a wide range of styles and functionalities. Some examples include:
- Coffee Tables: Coffee tables are a staple in living rooms and offer a versatile surface for drinks, snacks, and decorative items. Popular coffee table plans include modern, rustic, and farmhouse styles.
- Bookshelves: Bookshelves are essential for organizing and displaying books, creating a dedicated reading nook or adding storage space. Popular bookshelf plans include freestanding, wall-mounted, and corner designs.
- Dining Tables: Dining tables are the heart of the dining room, providing a gathering space for family and friends. Popular dining table plans include traditional, contemporary, and extendable designs.
- Beds: Beds are a fundamental piece of furniture, offering comfort and rest. Popular bed plans include platform beds, headboard designs, and custom-sized beds.
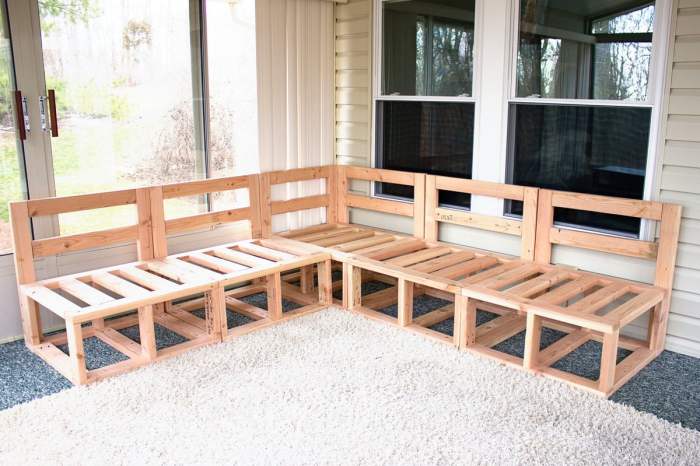
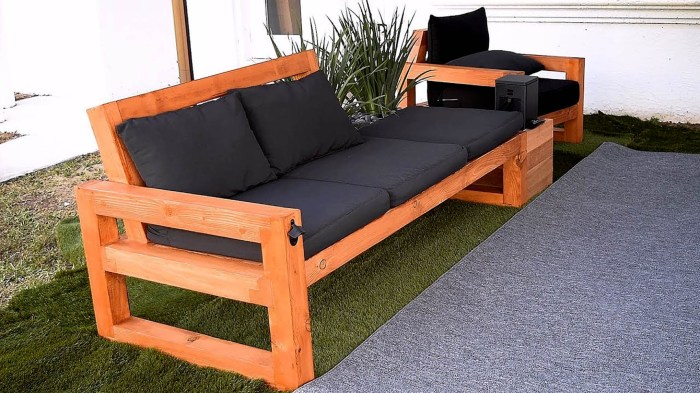
- Outdoor Furniture: Outdoor furniture enhances outdoor living spaces, providing seating, dining, and relaxation options. Popular outdoor furniture plans include benches, chairs, tables, and swing sets.
Choosing the Right Woodworking Furniture Plan
Picking the right woodworking furniture plan is crucial for a successful project. A well-chosen plan will be enjoyable to build and result in a beautiful and functional piece of furniture.
Factors to Consider When Choosing a Plan
Several factors come into play when selecting a woodworking furniture plan. These factors can help you determine the best plan based on your skill level, available tools, and desired outcome.
- Complexity: Evaluate the complexity of the plan. Consider the number of steps, joinery techniques, and overall design. Choose a plan that aligns with your woodworking experience. Beginners should start with simpler projects, while experienced woodworkers can tackle more complex designs.
- Materials: Check the materials required for the project. Consider the type of wood, hardware, and finishes. Ensure that you have access to these materials or can easily obtain them. Consider the cost of materials, as some woods and finishes can be expensive.
- Tools: Analyze the tools needed for the project. Ensure you have the necessary tools or can acquire them. If you lack certain tools, you might need to consider a simpler plan or make adjustments to the project.
- Time Commitment: Estimate the time required to complete the project. Consider the complexity of the plan, your available time, and any potential delays. Choosing a project that fits your schedule is important for avoiding frustration and ensuring completion.
- Style and Design: Select a plan that matches your personal style and design preferences. Consider the overall aesthetic of the furniture piece and how it will fit into your home or workspace. Choose a plan that reflects your taste and creates a piece you will enjoy.
Reading and Understanding Woodworking Furniture Plans
Woodworking furniture plans are detailed blueprints that guide you through the construction process. Understanding these plans is crucial for a successful project. Here’s a step-by-step guide:
- Materials List: The materials list Artikels the specific types and quantities of wood, hardware, and finishes required for the project. Carefully review the list and ensure you have all the necessary materials before starting.
- Cutting Diagram: The cutting diagram illustrates the dimensions and angles of each piece of wood required for the project. Use this diagram to accurately cut the wood according to the specified measurements.
- Assembly Instructions: The assembly instructions provide a step-by-step guide to assembling the furniture piece. Follow the instructions carefully, paying close attention to the order of assembly and any specific techniques required.
- Joinery Details: The joinery details show how the different pieces of wood are joined together. These details may include diagrams of specific joinery techniques like mortise and tenon, dovetail, or biscuit joints. Carefully study the joinery details to understand how to create strong and durable connections.
- Finishing Instructions: The finishing instructions Artikel the steps for sanding, staining, and applying a protective finish to the furniture piece. Follow the instructions carefully to achieve a beautiful and durable finish.
Essential Tools and Materials for Woodworking Furniture Projects
Having a solid grasp of the essential tools and materials is crucial for embarking on woodworking furniture projects. This knowledge empowers you to select the appropriate tools for specific tasks and choose the right wood for your desired furniture piece.
Essential Tools for Woodworking Furniture Projects, Wood working furniture plans
A well-equipped woodworking workshop is essential for successful furniture projects. Here are some essential tools, categorized by their primary function:
Cutting Tools
- Handsaw: Used for making rough cuts and shaping wood. Choose a handsaw with a fine-toothed blade for smoother cuts.
- Circular Saw: A powerful tool for making precise cuts in wood, ideal for ripping and crosscutting. Ensure you have a safety guard in place.
- Jigsaw: Offers flexibility for making curved cuts and intricate shapes in wood.
- Table Saw: Provides precise cuts for straight lines and accurate joinery. Safety is paramount, so use a push stick and ensure the blade is properly aligned.
- Mitre Saw: Specifically designed for making accurate mitre cuts, crucial for creating frames and joining pieces at precise angles.
Shaping Tools
- Chisel: Used for shaping, carving, and creating intricate details in wood. Different sizes and types of chisels cater to various tasks.
- Plane: Used to smooth and flatten wood surfaces, removing irregularities and achieving a consistent finish.
- Router: A versatile tool for shaping edges, creating decorative profiles, and carving intricate designs in wood. Use with safety in mind.
- Sandpaper: Used for smoothing surfaces and removing imperfections, available in various grits to achieve desired finishes.
Joining Tools
- Clamps: Essential for holding wood pieces together securely during gluing or assembly.
- Screwdriver: Used for driving screws into wood, available in various sizes and types.
- Drill: A versatile tool for creating holes, driving screws, and using drill bits for various tasks. Use safety precautions and ensure proper drill bit selection.
- Dowel Jig: A handy tool for creating precise dowel holes for joining wood pieces, ensuring strong and accurate connections.
- Pocket Hole Jig: A modern tool for creating concealed joints, allowing for strong and visually appealing connections.
Finishing Tools
- Paintbrushes: Used for applying paint, stain, or varnish to wood surfaces.
- Roller: Efficiently applies paint or stain to large surfaces, providing even coverage.
- Sanding Block: Used for sanding wood surfaces by hand, achieving smooth and consistent finishes.
- Spray Gun: Provides even and controlled application of paint, stain, or varnish, especially for large projects.
Common Wood Types for Furniture Projects
Selecting the right wood for your furniture project is crucial. Different wood types have unique characteristics, influencing their suitability for specific applications. Here are some commonly used wood types for furniture projects:
Hardwoods
- Oak: Strong, durable, and aesthetically pleasing. It’s commonly used for furniture frames, tabletops, and flooring.
- Maple: Known for its strength, hardness, and beautiful grain patterns. It’s popular for furniture, cabinets, and musical instruments.
- Cherry: A rich reddish-brown wood with a fine grain, often used for furniture, cabinets, and trim work.
- Walnut: Highly prized for its rich brown color and distinctive grain patterns. It’s often used for high-end furniture, cabinets, and gunstocks.
- Mahogany: A durable and beautiful wood with a reddish-brown hue. It’s often used for furniture, boat building, and musical instruments.
Softwoods
- Pine: A soft, affordable, and lightweight wood. It’s commonly used for furniture, construction, and crafting projects.
- Cedar: Known for its aromatic fragrance and resistance to insects. It’s often used for outdoor furniture, closets, and chests.
- Redwood: A durable and weather-resistant wood, commonly used for outdoor furniture, decking, and siding.
- Fir: A strong and lightweight wood with a distinctive grain pattern. It’s often used for furniture, construction, and flooring.
Woodworking Techniques and Procedures
Woodworking techniques and procedures are the foundation of any successful furniture project. Mastering these techniques will allow you to create beautiful and functional pieces that you’ll cherish for years to come. This section delves into some of the most common woodworking techniques used in furniture construction, including cutting, joining, and finishing.
Cutting Techniques
Cutting is a fundamental woodworking technique that involves removing material from a workpiece to achieve the desired shape or size. Various cutting tools are used in woodworking, each suited for specific tasks.
- Hand Saws: Hand saws are versatile tools used for cutting wood to rough dimensions. They come in various sizes and tooth configurations, depending on the material being cut and the desired cut quality. Examples include rip saws for cutting wood along the grain, crosscut saws for cutting across the grain, and backsaws for making precise cuts.
- Power Saws: Power saws offer greater speed and efficiency compared to hand saws. They are commonly used for cutting large pieces of wood and achieving precise cuts. Some common power saws used in woodworking include circular saws, table saws, miter saws, and jigsaw.
- Chisels: Chisels are hand tools used for shaping and removing wood in small increments. They are often used in conjunction with a mallet or hammer to create intricate details, moldings, and grooves.
- Planes: Planes are hand tools used for smoothing and flattening wood surfaces. They consist of a blade mounted in a wooden or metal body. They are used to remove small amounts of wood to create a smooth, even surface.
Joining Techniques
Joining techniques are used to connect different pieces of wood to form a larger structure. Various methods are employed, each with its unique strengths and applications.
- Butt Joints: Butt joints are the simplest form of wood joint, where two pieces of wood are joined end-to-end. They are often used for basic construction, but they are not as strong as other joint types.
- Dado Joints: Dado joints involve cutting a groove (dado) in one piece of wood and fitting a corresponding tongue on the other piece. This creates a strong and stable joint, commonly used for shelf construction.
- Mortise and Tenon Joints: Mortise and tenon joints are traditional joinery techniques where a rectangular hole (mortise) is cut into one piece of wood and a corresponding projection (tenon) is cut into the other piece. These joints are known for their strength and durability, often used in furniture construction.
- Dovetail Joints: Dovetail joints are intricate joints where a series of interlocking wedges (tails) are cut on one piece of wood and corresponding slots (pins) are cut on the other. They are known for their exceptional strength and are often used in drawer construction and furniture frames.
- Glue: Glue is an essential component in most woodworking projects. It is used to bond pieces of wood together, creating a strong and durable joint. Various types of glue are available, each suited for specific applications. Wood glue is a common choice for general woodworking, while epoxy glue is used for stronger bonds and filling gaps.
- Screws: Screws are used to fasten pieces of wood together. They offer a strong and secure joint, especially when used in conjunction with glue. Screws come in various sizes and materials, depending on the application.
- Nails: Nails are another method for fastening wood. They are typically used for temporary or less-critical joints. They are available in various sizes and finishes.
Finishing Techniques
Finishing techniques are used to protect and enhance the appearance of wood surfaces. They involve applying coatings that provide durability, color, and sheen.
- Sanding: Sanding is a crucial step in woodworking that smoothes and levels wood surfaces, preparing them for finishing. Different grits of sandpaper are used for various stages of sanding, from coarse sanding to fine sanding.
- Staining: Staining is used to color wood without hiding its grain pattern. It penetrates the wood, enhancing its natural beauty. Various types of stains are available, including oil-based, water-based, and gel stains.
- Varnishing: Varnishing involves applying a clear coating that protects the wood from scratches, water damage, and UV rays. Varnish adds a glossy finish to the wood, enhancing its natural beauty.
- Painting: Painting is used to cover the wood surface with a solid color. It can be used to change the appearance of wood or create a specific look. Various types of paint are available, including oil-based, latex, and acrylic paints.
- Waxing: Waxing involves applying a thin layer of wax to the wood surface, providing protection and a subtle sheen. Wax can be used on bare wood or over a finish, adding a layer of protection and enhancing the wood’s natural beauty.
Examples of Furniture Projects
These woodworking techniques are used in a wide range of furniture projects.
- Cutting Techniques:
- A table saw is used to cut the boards to size for a table top.
- A jigsaw is used to cut intricate curves for a chair back.
- A chisel is used to create a decorative groove on a cabinet door.
- A plane is used to smooth the surface of a wooden table leg.
- Joining Techniques:
- Butt joints are used to assemble the frame of a simple bookshelf.
- Dado joints are used to create the shelves for a bookcase.
- Mortise and tenon joints are used to construct the legs and frame of a sturdy table.
- Dovetail joints are used to create the drawers for a dresser.
- Glue is used to bond the pieces of wood together in all of these projects.
- Finishing Techniques:
- Sanding is used to smooth the surfaces of a wooden chair before applying a finish.
- A stain is used to color a wooden desk, highlighting its grain pattern.
- Varnish is applied to a wooden coffee table to protect it from scratches and water damage.
- Paint is used to create a colorful finish on a wooden nightstand.
- Wax is applied to a wooden chest to provide a protective layer and enhance its natural beauty.
Building Your First Woodworking Furniture Project
Now that you have a good understanding of woodworking basics, it’s time to put your knowledge into practice by building your first furniture project. This will give you a hands-on experience and build your confidence in woodworking. For your first project, we’ll focus on a simple and manageable project – a small shelf.
Preparing the Materials and Tools
Before you start building your shelf, it’s essential to gather all the necessary materials and tools. This will ensure a smooth and efficient woodworking process.
- Wood: Choose a wood that is suitable for your shelf. Pine is a good option for beginners as it is relatively affordable and easy to work with. You’ll need two pieces of wood for the shelf’s top and bottom, and two pieces for the sides.
- Screws: You’ll need screws to attach the shelf’s sides to the top and bottom pieces. Choose screws that are long enough to go through the wood and into the side pieces.
- Wood glue: Wood glue will help to strengthen the joints of your shelf.
- Measuring tape: You’ll need a measuring tape to accurately measure the wood for your shelf.
- Saw: You’ll need a saw to cut the wood to the correct size. A handsaw or a circular saw will work well.
- Drill: You’ll need a drill to pre-drill holes for the screws. This will prevent the wood from splitting when you screw it together.
- Screwdriver: You’ll need a screwdriver to drive the screws into the wood.
- Sandpaper: You’ll need sandpaper to smooth out the edges of your shelf and give it a nice finish.
- Safety glasses: Safety glasses are essential to protect your eyes from wood chips and dust.
- Dust mask: A dust mask will help to protect your lungs from sawdust.
Cutting the Wood
Now that you have all your materials and tools ready, you can start cutting the wood for your shelf.
- Measure the wood: Use your measuring tape to measure the wood for your shelf. You’ll need two pieces of wood for the shelf’s top and bottom, and two pieces for the sides. The length and width of the shelf will depend on your preference.
- Mark the wood: Once you have measured the wood, use a pencil to mark the cutting lines. Be sure to mark the wood clearly and accurately.
- Cut the wood: Use your saw to cut the wood along the marked lines. Be careful when using the saw and make sure to keep your fingers away from the blade.
Assembling the Shelf
With all the pieces cut, you’re ready to assemble your shelf.
- Prepare the pieces: Lay out the pieces of wood for your shelf. You’ll need two pieces for the shelf’s top and bottom, and two pieces for the sides.
- Apply wood glue: Apply wood glue to the edges of the shelf’s sides where they will meet the top and bottom pieces. Be sure to spread the glue evenly.
- Attach the sides: Align the sides with the top and bottom pieces of the shelf and clamp them together. Make sure the sides are flush with the top and bottom pieces.
- Pre-drill holes: Use your drill to pre-drill holes for the screws. This will prevent the wood from splitting when you screw it together.
- Screw the pieces together: Use your screwdriver to screw the sides to the top and bottom pieces of the shelf. Be sure to screw the screws in straight and tight.
Finishing the Shelf
Once your shelf is assembled, you can finish it by sanding it and applying a sealant.
- Sand the shelf: Use sandpaper to smooth out the edges of your shelf and give it a nice finish. Start with coarse-grit sandpaper and gradually work your way to fine-grit sandpaper.
- Apply a sealant: Apply a sealant to the shelf to protect it from water damage and scratches. You can use a clear sealant or a colored sealant to give your shelf a specific look.
Final Summary: Wood Working Furniture Plans
With the right woodworking furniture plans, you can transform your woodworking dreams into reality. From choosing the perfect plan to mastering essential techniques, the journey is both rewarding and enriching. As you build your furniture, you’ll not only gain valuable skills but also create pieces that will be cherished for years to come. So, grab your tools, select a plan, and let your woodworking journey begin!
FAQ
Where can I find woodworking furniture plans?
You can find woodworking furniture plans online, in woodworking magazines, at local craft stores, and even through specialized woodworking plan websites.
What are the best woods for furniture projects?
Commonly used woods for furniture include oak, maple, cherry, walnut, and pine. The choice depends on the project, desired aesthetics, and budget.
What safety precautions should I take when woodworking?
Always wear safety glasses, use appropriate hearing protection, and follow the manufacturer’s instructions for all power tools. Work in a well-ventilated area and keep your workspace clean and organized.
Woodworking furniture plans are a great way to build your own custom pieces, and there are tons of styles to choose from. If you’re looking for something with a classic, elegant feel, you might want to check out campaign furniture plans.
These plans often feature intricate details and sturdy construction, making them perfect for heirloom-quality pieces. No matter what style you’re after, woodworking plans can help you bring your furniture dreams to life.
