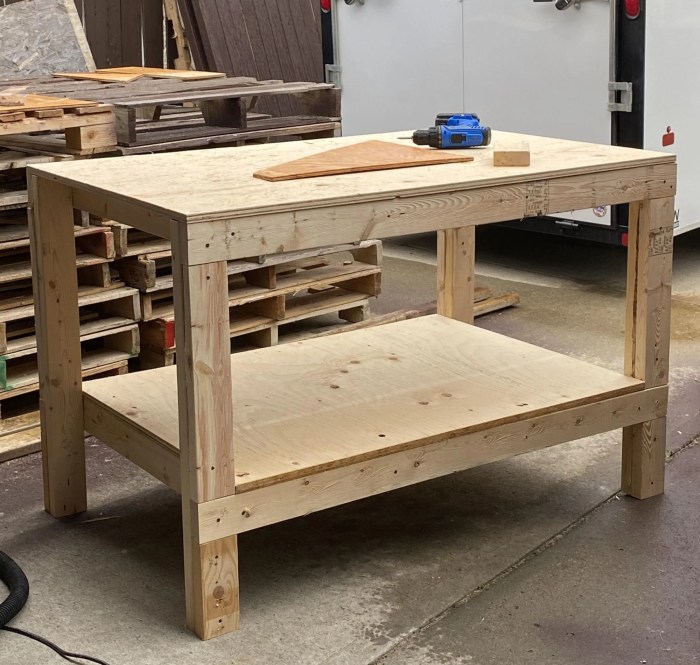
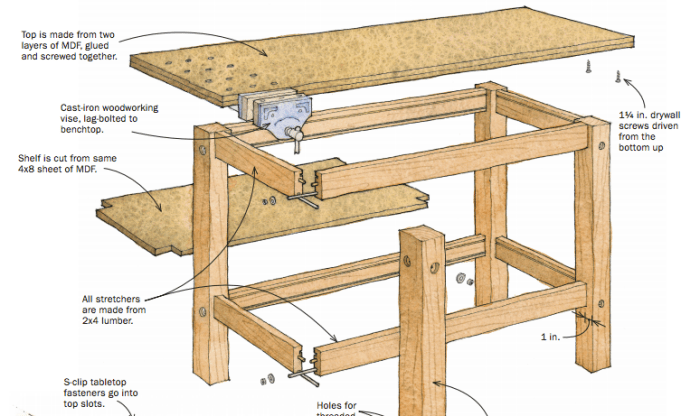
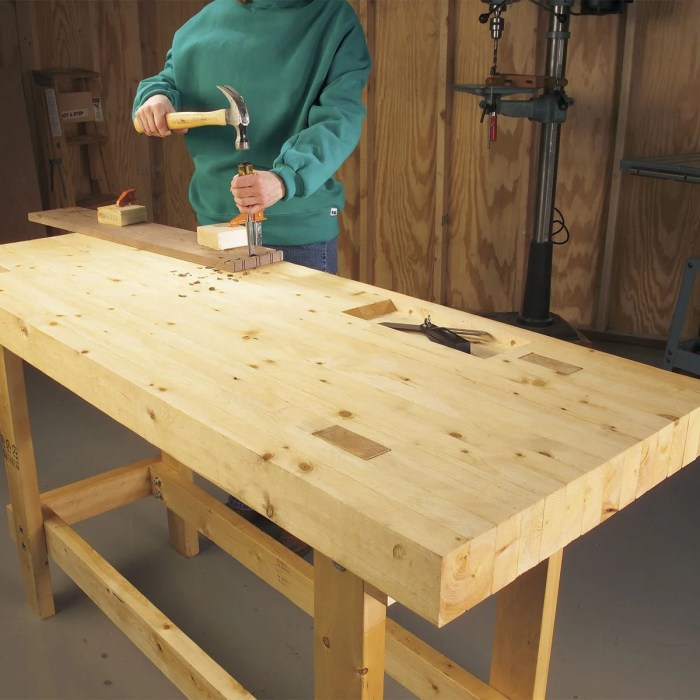
Woodwork bench plans are the blueprint to crafting a sturdy and functional workspace, essential for any woodworking enthusiast. Whether you’re a seasoned craftsman or a beginner, having a dedicated bench elevates your projects and provides a dedicated space for your tools and materials.
From traditional designs to modern innovations, the world of woodworking benches offers a variety of options to suit your needs and style. These plans guide you through every step, from selecting the right materials to assembling the bench, ensuring a successful build.
Essential Components of a Woodworking Bench

A well-designed woodworking bench is a crucial tool for any woodworker, providing a stable platform for cutting, shaping, and assembling projects. It is a sturdy and versatile work surface that is essential for both beginners and experienced woodworkers. The bench’s design should be tailored to the specific needs of the user, and the choice of materials can greatly impact its durability and functionality. Let’s delve into the essential components of a woodworking bench and explore the design considerations for each.
Bench Top
The bench top is the primary working surface of the bench and must be sturdy and durable enough to withstand the rigors of woodworking. The top should be flat and smooth, with a suitable thickness to prevent flexing and sagging. It should be resistant to scratches, dents, and moisture.
- Materials: Common materials for bench tops include:
- Hardwoods: Maple, oak, and cherry are popular choices for bench tops due to their hardness, durability, and attractive grain patterns. However, they can be expensive.
- Softwoods: Pine and fir are more affordable alternatives to hardwoods but are less resistant to scratches and dents.
- Plywood: Plywood offers a cost-effective and durable option. It is typically made from layers of wood veneer, which are glued together with alternating grain directions, making it strong and stable.
- MDF (Medium-density fiberboard): MDF is a cost-effective option that is smooth and easy to work with. However, it is not as durable as hardwoods or plywood.
- Design Considerations:
- Thickness: A thicker bench top will be more stable and less prone to flexing. A 1.5-inch thick top is a good starting point.
- Width: A wider bench top provides more working space. A width of 24 inches or more is ideal for most woodworking tasks.
- Length: The length of the bench top depends on the size of projects you plan to work on. A minimum length of 4 feet is recommended.
- Edge Treatment: Rounded edges on the bench top help prevent injuries and make it more comfortable to work on.
Legs
The legs of the bench provide support and stability. They should be sturdy enough to support the weight of the bench top, tools, and materials.
- Materials: Common materials for bench legs include:
- Hardwoods: Hardwoods like oak, maple, and cherry offer excellent strength and durability.
- Softwoods: Pine and fir are more affordable alternatives to hardwoods but may not be as strong.
- Metal: Steel and aluminum are durable and can provide a modern aesthetic.
- Design Considerations:
- Shape: The shape of the legs can influence the bench’s stability and aesthetic appeal. Common shapes include square, rectangular, and tapered.
- Spacing: The spacing of the legs should be wide enough to provide stability but not so wide that it hinders movement around the bench.
- Height: The ideal height for a woodworking bench is typically between 30 and 36 inches, depending on the user’s height.
- Reinforcement: Adding braces or cross-members to the legs can enhance stability and prevent racking.
Vise
A vise is an essential component of a woodworking bench, providing a secure way to hold workpieces for cutting, shaping, and assembly.
- Types: There are two main types of vises:
- Front Vise: A front vise is mounted on the front edge of the bench top and is typically used for clamping workpieces horizontally.
- Tail Vise: A tail vise is mounted on the back edge of the bench top and is typically used for clamping workpieces vertically.
- Materials: Vise jaws can be made from:
- Hardwood: Hardwoods like maple and oak are durable and provide a good grip on workpieces.
- Metal: Steel and aluminum are strong and resistant to wear.
- Design Considerations:
- Jaw Size: The size of the vise jaws should be appropriate for the size of workpieces you plan to clamp.
- Jaw Opening: The opening of the vise jaws should be wide enough to accommodate a variety of workpieces.
- Clamping Mechanism: The clamping mechanism should be strong and reliable.
- Quick-Release Mechanism: A quick-release mechanism can make it easier to adjust the vise.
Storage, Woodwork bench plans
Storage space is essential for keeping tools and materials organized and accessible.
- Types: Storage options for woodworking benches include:
- Drawers: Drawers are ideal for storing small tools and materials.
- Shelves: Shelves can be used to store larger tools and materials.
- Pegboard: Pegboard can be used to hang tools and organize them.
- Design Considerations:
- Accessibility: Storage should be easily accessible and organized.
- Durability: Storage components should be durable and able to withstand the weight of tools and materials.
- Traditional Workbench: This is the classic workbench design, typically featuring a sturdy top, a sturdy base, and a vise. It’s versatile and suitable for a wide range of woodworking tasks.
- Roubo Workbench: Named after the 18th-century French cabinetmaker André Roubo, this design emphasizes strength and durability. It typically features a thick top, a robust base, and a complex system of vises and holdfasts.
- Mobile Workbench: Designed for portability, this type of bench features wheels or casters, allowing you to move it around your workshop easily. It’s a good option for smaller spaces or for those who need to transport their bench frequently.
- Folding Workbench: This space-saving option folds down when not in use, making it ideal for workshops with limited space. It often features a smaller work surface but is still suitable for basic woodworking tasks.
- Woodworking for Mere Mortals: This website offers free plans for various woodworking projects, including several bench designs. They provide detailed instructions and illustrations, making them beginner-friendly.
- Popular Woodworking Magazine: This magazine offers both free and paid plans for woodworking projects, including bench plans. They feature high-quality plans with detailed instructions and illustrations.
- Fine Woodworking Magazine: This magazine offers a wide range of plans for advanced woodworkers, including bench plans. They feature complex designs and innovative techniques.
- Ana White: This website offers free plans for various woodworking projects, including bench plans. They focus on simple and practical designs, making them a good option for beginners.
- The Wood Whisperer: This website offers both free and paid plans for woodworking projects, including bench plans. They feature detailed instructions and videos, making them easy to follow.
- Clear a large, flat area in your garage or workshop, ensuring ample space for working on the bench.
- Lay down a drop cloth or protective covering to prevent damage to your floor.
- Gather all the necessary materials and tools according to your woodworking bench plans.
- Ensure proper ventilation and lighting in your workspace.
- Wear safety glasses, a dust mask, and hearing protection to protect yourself from flying debris and noise.
- Use a table saw or circular saw to cut the lumber for the benchtop to the specified dimensions in your plans.
- For added strength and stability, consider using a dado blade to create grooves for the benchtop support rails.
- Use wood glue and screws to assemble the benchtop, ensuring the pieces are aligned and clamped securely.
- Allow the glue to dry completely before proceeding to the next step.
- Cut the lumber for the legs and supports to the specified lengths in your plans.
- Use a drill press or hand drill to create pilot holes for the screws, preventing wood splitting.
- Attach the legs to the benchtop using wood glue and screws, ensuring they are square and level.
- For added support, consider using cross braces or stretchers between the legs.
- Choose a bench vise that is appropriate for the size and weight of your projects.
- Mount the bench vise to the benchtop using the provided hardware, ensuring it is securely attached and aligned correctly.
- Install any other accessories, such as tool holders, storage shelves, or a dog hole system, according to your plans.
- Sand the entire bench, starting with coarse grit sandpaper and progressing to finer grits for a smooth finish.
- Apply a wood finish, such as oil, varnish, or paint, according to your preference.
- Allow the finish to dry completely before using the bench.
- Periodically refinish the bench as needed to maintain its appearance and protection.
- Tool Holders: Tool holders are essential for keeping your tools organized and readily accessible. You can install them on the bench’s sides, front, or even on a dedicated tool panel. Popular options include magnetic strips for holding metal tools, pegboards for hanging tools, and specialized holders for specific tools like chisels, planes, and screwdrivers.
- Storage Drawers: Storage drawers provide a convenient place to keep your woodworking supplies organized and out of sight. You can add drawers underneath the bench, within the bench’s frame, or even build a separate cabinet to complement your bench.
- Work Surfaces: Different work surfaces can be incorporated into your bench design to cater to specific tasks. For example, you might add a dedicated area for sanding, a cutting board for precise work, or a vise-equipped surface for holding large pieces.
- Outfeed Table: An outfeed table positioned alongside your bench provides a stable surface for supporting long boards during cutting and planing operations, improving safety and accuracy.
- Mobile Base: A mobile base with casters allows you to easily move your bench around your workshop, making it more versatile and convenient.
- Lighting: Adequate lighting is crucial for woodworking. You can integrate lighting into your bench design by adding LED strips underneath the work surface or by incorporating a dedicated task light.
- Placement: Choose a location for your bench that allows for ample working space and convenient access to tools and materials. Ensure it’s positioned near natural light sources or adequate artificial lighting.
- Flow: Consider the natural flow of your workflow when placing your bench. It should be positioned so that you can move easily between different work areas and tools.
- Ergonomics: Make sure the bench’s height is comfortable for your stature and working position. You may need to adjust the bench height or add a footrest to achieve optimal ergonomics.
- Clean the bench surface regularly. Use a damp cloth or brush to remove dust and debris. Avoid using harsh chemicals that could damage the wood or finish. For stubborn stains, consider using a mild soap solution.
- Lubricate moving parts. Apply a light coat of oil or wax to sliding surfaces, such as the vise jaws and bench dogs. This will reduce friction and prevent rust.
- Inspect for loose screws and bolts. Tighten any loose fasteners to ensure the bench remains structurally sound.
- Loose or damaged bench dogs. Replace or repair any damaged bench dogs. If they are simply loose, tighten the screws or bolts securing them to the bench top.
- Worn vise jaws. Worn vise jaws can slip and damage your workpieces. Replace them with new jaws or consider resurfacing the existing ones.
- Cracked or damaged bench top. If the bench top has a minor crack, you can try to repair it with wood filler. For more severe damage, consider replacing the bench top.
- Add a new vise. Consider adding a quick-release vise or a second vise to the bench for increased versatility.
- Install a workbench extension. A workbench extension can provide extra working space for larger projects.
- Incorporate a power tool station. A dedicated station for your power tools can make your workflow more efficient and organized.
Woodworking Bench Plans and Resources
Finding the right woodworking bench plans can be overwhelming, with countless options available online and in books. To help you navigate this landscape, we’ll explore reputable websites and resources that offer a wide range of plans, categorized by type, skill level, and features. This will provide you with the information needed to make an informed decision and build a bench that perfectly suits your needs.
Types of Woodworking Benches
The first step in finding the right plans is understanding the different types of woodworking benches. Each type offers unique advantages and caters to specific woodworking needs. Here are a few common types:
Skill Levels and Bench Complexity
Woodworking bench plans cater to different skill levels, from beginners to advanced woodworkers. Beginner plans often feature simpler designs and fewer components, making them easier to construct. Advanced plans, on the other hand, might involve more complex joinery and intricate details.
Reputable Websites and Resources
Here are some reputable websites and resources that offer woodworking bench plans:
Comparing Woodworking Bench Plans
To help you choose the right plan, it’s helpful to compare different options based on their features, materials, and cost. Here’s a table comparing some popular bench plans:
| Plan Name | Type | Skill Level | Materials | Cost (Approximate) |
|---|---|---|---|---|
| The Wood Whisperer’s “Workbench” | Traditional | Intermediate | Hardwood, plywood, hardware | $500-$700 |
| Ana White’s “Simple Workbench” | Traditional | Beginner | Pine, plywood, hardware | $200-$300 |
| Popular Woodworking’s “Roubo Workbench” | Roubo | Advanced | Hardwood, plywood, hardware | $1000-$1500 |
| Fine Woodworking’s “Modern Workbench” | Modern | Advanced | Hardwood, plywood, hardware | $800-$1200 |
Building a Woodworking Bench from Plans: Woodwork Bench Plans

Building a woodworking bench from plans can be a rewarding experience, providing you with a sturdy and functional workspace for your projects. With careful planning and execution, you can create a bench that will last for years to come.
Preparing the Work Area and Materials
Before you begin construction, it is crucial to have a well-organized and safe workspace.
Cutting and Assembling the Benchtop
The benchtop is the foundation of your woodworking bench, providing a stable and sturdy surface for working on.
Building the Bench Legs and Supports
The legs and supports provide the structural integrity and stability for your bench.
Adding the Bench Vise and Accessories
A bench vise is a crucial tool for woodworking, providing a secure grip for clamping and working on materials.
Finishing and Refinishing
The final step is to finish your woodworking bench to protect it from wear and tear.
Customizing and Enhancing Your Woodworking Bench
A well-designed woodworking bench is a valuable asset, but you can take it a step further by customizing it to fit your specific needs and preferences. This allows you to create a truly personalized workspace that optimizes your workflow and makes woodworking more enjoyable.
Optional Features and Accessories
Adding optional features and accessories can significantly enhance the functionality and versatility of your woodworking bench.
Integrating Woodworking Bench Designs with Existing Workshop Layouts
Consider the layout of your existing workshop when designing or customizing your bench.
Maintaining and Upgrading Your Woodworking Bench

Just like any valuable tool, your woodworking bench requires regular care and attention to ensure its longevity and performance. Maintaining your bench involves a combination of cleaning, lubrication, and occasional repairs. Upgrading your bench over time allows you to adapt it to your changing needs and enhance its functionality.
Cleaning and Lubrication
Regular cleaning and lubrication are essential for maintaining your woodworking bench. Dust, sawdust, and wood chips can accumulate over time, hindering the bench’s smooth operation and potentially causing damage.
Common Woodworking Bench Problems and Solutions
While woodworking benches are designed to withstand heavy use, they can experience wear and tear over time. Here are some common problems and their solutions:
Upgrading Your Woodworking Bench
As your woodworking skills and projects evolve, you may find that your bench needs an upgrade. Here are some ways to enhance your bench:
Closure
Building a woodworking bench from plans is a rewarding journey, allowing you to create a customized workspace that perfectly complements your skills and aspirations. With the right plan, tools, and a little dedication, you can craft a bench that will stand the test of time and become a cornerstone of your workshop.
Detailed FAQs
What are the most common types of woodworking benches?
Traditional, modern, and specialized benches cater to different needs and styles. Traditional benches often feature a heavy-duty construction with a robust vise, while modern designs prioritize versatility and portability. Specialized benches, like those designed for specific tasks like joinery or metalworking, offer unique features and functionalities.
How do I choose the right woodworking bench plan for my needs?
Consider your workspace size, project types, skill level, and budget. Choose a plan that offers the features and dimensions that best suit your requirements.
What are the essential components of a woodworking bench?
The top, legs, vise, and storage are essential components. The top provides a stable work surface, legs provide support, the vise secures workpieces, and storage keeps tools and materials organized.
Are there free woodworking bench plans available?
Yes, many reputable websites offer free woodworking bench plans. These plans can be a great starting point for beginners or those on a budget.
Woodwork bench plans are great for beginners, and they can help you build a sturdy and functional workbench for your workshop. If you’re looking for a more relaxed project, you might want to try building some garden furniture, like a cozy bench or a charming table.
You can find some great garden furniture plans online, and many of them are easy to follow. Once you’ve mastered the basics of woodworking, you can move on to more challenging projects like building a bench for your garden.
