Woodworkers plan – Woodworkers’ plans are the blueprints to crafting your dream projects, guiding you through every step from initial design to final finish. Whether you’re a seasoned woodworker or just starting out, having a well-structured plan is crucial for success. Imagine the satisfaction of building a beautiful piece of furniture, a unique toy for your child, or a stunning home decor element, all thanks to a detailed and well-organized plan.
This guide delves into the world of woodworking plans, exploring different types, essential tools, and techniques, and even providing inspiration for your next project. We’ll cover everything from understanding the basics of woodworking plans to mastering advanced techniques, all with the goal of helping you bring your woodworking dreams to life.
Understanding Woodworkers’ Plans
Woodworking plans are essential for creating successful projects. They provide a visual guide and detailed instructions, helping you to build your project accurately and efficiently. Whether you’re a seasoned woodworker or just starting out, understanding woodworking plans is crucial.
Types of Woodworking Plans
Woodworking plans come in various formats, each offering unique advantages.
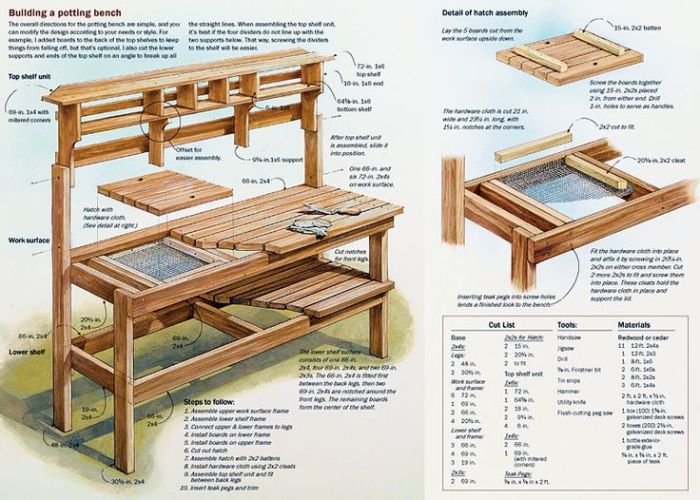
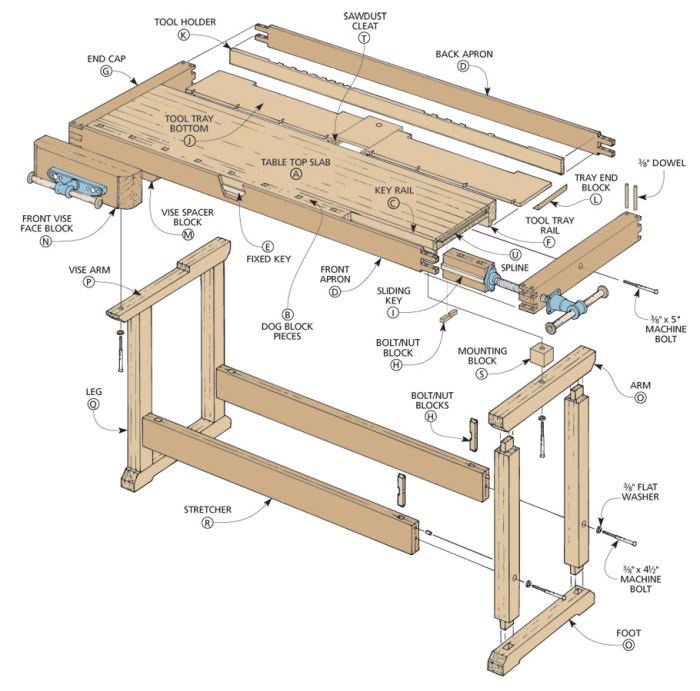
- Blueprints: These traditional plans use a 2D representation of the project, showing the dimensions, layout, and construction details. They are often printed on paper and can be scaled for different project sizes.
- Diagrams: Diagrams use illustrations and symbols to represent the project’s assembly and construction. They are often simpler than blueprints and can be easier to understand for beginners.
- 3D Models: These plans use computer-generated models to provide a realistic view of the project from all angles. They can be helpful for visualizing the final product and understanding complex shapes and angles.
Importance of Clear and Detailed Plans
Clear and detailed woodworking plans are essential for successful projects. They ensure that you understand the project’s design, dimensions, and construction methods. Well-written plans will:
- Reduce errors: Detailed plans minimize mistakes by providing precise measurements, cut lists, and assembly instructions.
- Save time: Plans help you to organize your work and avoid unnecessary steps, leading to a more efficient workflow.
- Improve accuracy: Plans provide visual guidance, ensuring that your project is built to the correct specifications.
- Enhance confidence: Knowing that you have a solid plan to follow can boost your confidence and make the project more enjoyable.
Popular Woodworking Plans
Woodworking plans are available for a wide range of projects, from simple toys to complex furniture. Some popular categories include:
- Furniture: Plans for tables, chairs, beds, cabinets, and other furniture pieces.
- Toys: Plans for wooden toys like cars, trains, puzzles, and dollhouses.
- Home Decor: Plans for decorative items like shelves, wall art, and storage solutions.
- Outdoor Projects: Plans for garden furniture, birdhouses, and other outdoor structures.
Planning a Woodworking Project
Planning a woodworking project is a crucial step in ensuring a successful outcome. It involves carefully considering all aspects of the project, from design to materials to tools. A well-planned project will minimize errors, save time and resources, and increase your chances of creating a beautiful and functional piece.
Project Design
Designing a woodworking project involves translating your vision into a tangible plan. This step involves defining the project’s purpose, determining its dimensions, and sketching or creating a digital model. Consider the following aspects:
* Purpose: What will the project be used for? Will it be a functional piece of furniture, a decorative item, or a combination of both?
* Dimensions: What are the desired dimensions of the project? Consider the space it will occupy and the materials you plan to use.
* Style: What aesthetic style do you want to achieve? Consider the overall look and feel you are aiming for.
* Functionality: Will the project have any specific functions? Think about features like drawers, doors, or hinges.
* Materials: What materials will you use for the project? Consider the wood species, thickness, and finish.
* Tools: What tools will you need to complete the project? Ensure you have the necessary tools before you begin.
* Budget: Set a budget for the project. Consider the cost of materials, tools, and any additional expenses.
Project Plan
Once you have a clear design in mind, you can create a detailed project plan. This plan will serve as a roadmap for your project, outlining each step and ensuring a smooth workflow. A well-structured project plan includes the following:
* Parts List: A comprehensive list of all the parts needed for the project, including dimensions, quantity, and material type.
* Cutting List: A list of all the cuts needed for the project, specifying the dimensions and quantities of each cut.
* Assembly Instructions: Step-by-step instructions for assembling the project, including detailed descriptions of each step and any special techniques.
* Finishing Instructions: Instructions for finishing the project, including sanding, staining, and applying a protective coating.
Parts List and Cutting List
A detailed parts list and cutting list are essential for efficient project execution. They help you determine the required materials and ensure accurate cutting. Here’s an example of a parts list and cutting list for a simple wooden shelf:
Parts List
- Shelf boards (2) – 12″ x 10″ x 1″ (pine)
- Shelf supports (2) – 8″ x 2″ x 1″ (pine)
- Shelf brackets (2) – 3″ x 2″ x 1″ (pine)
- Screws (12) – 1.5″ (wood screws)
- Wood glue (1 bottle)
- Sandpaper (various grits)
- Wood stain (optional)
- Polyurethane finish (optional)
Cutting List
- Shelf boards (2) – Cut to 12″ x 10″
- Shelf supports (2) – Cut to 8″ x 2″
- Shelf brackets (2) – Cut to 3″ x 2″
Assembly Instructions
The assembly instructions should provide a clear and concise guide for putting together the project. Here’s an example of assembly instructions for the wooden shelf:
1. Prepare the wood: Sand all the pieces of wood to smooth out any rough edges.
2. Assemble the shelf supports: Glue and screw the shelf supports to the bottom of the shelf boards, ensuring they are centered and flush.
3. Attach the shelf brackets: Glue and screw the shelf brackets to the sides of the shelf supports, making sure they are positioned evenly.
4. Sand and finish: Sand the entire shelf to smooth out any rough edges and prepare for finishing. Apply a wood stain (optional) and then a polyurethane finish (optional) to protect the wood.
Essential Tools and Techniques: Woodworkers Plan
Woodworking is a craft that requires a variety of tools and techniques to create beautiful and functional pieces. Understanding the essential tools and mastering the fundamental techniques is crucial for any aspiring woodworker. This section will delve into the world of woodworking tools, from hand tools to power tools, and explore common techniques like measuring, cutting, joining, and finishing.
Hand Tools
Hand tools are the foundation of woodworking, providing precise control and versatility. These tools are essential for a wide range of tasks, from marking and shaping wood to assembling and finishing projects.
- Measuring Tools: Accuracy is paramount in woodworking, and measuring tools ensure precise dimensions.
- Measuring Tape: A basic but indispensable tool for measuring length and distance.
- Ruler: Used for precise measurements, especially for smaller dimensions.
- Try Square: A tool with a 90-degree angle used to ensure accurate right angles in cutting and joining.
- Combination Square: A versatile tool that combines a try square with a protractor and a depth gauge.
- Marking Tools: Clearly marking the wood before cutting is essential for accurate results.
- Pencil: Used for marking lines and dimensions on wood.
- Marking Gauge: A tool for marking parallel lines at a specific distance from the edge of the wood.
- Scriber: Used for marking precise lines, especially for curved shapes.
- Cutting Tools: Cutting wood accurately and safely is a fundamental woodworking skill.
- Hand Saw: Used for cutting wood to length and shaping.
- Crosscut Saw: Designed for cutting across the grain of wood.
- Rip Saw: Designed for cutting with the grain of wood.
- Chisel: Used for carving and shaping wood, as well as for removing waste material.
- Plane: Used to smooth and flatten surfaces of wood.
- Block Plane: A small plane used for planing small surfaces.
- Jack Plane: A medium-sized plane used for general planing.
- Jointer Plane: A large plane used for planing long, flat surfaces.
- Hand Saw: Used for cutting wood to length and shaping.
- Joining Tools: Joining wood pieces together securely is essential for creating sturdy and durable structures.
- Hammer: Used for driving nails and other fasteners.
- Screwdriver: Used for driving screws.
- Clamps: Used to hold pieces of wood together while gluing or joining.
- Mallet: Used for striking chisels and other tools.
- Finishing Tools: Finishing touches enhance the appearance and durability of woodworking projects.
- Sandpaper: Used for smoothing surfaces and removing imperfections.
- Brushes: Used for applying finishes, such as paint, stain, and varnish.
- Scrapers: Used for removing paint, varnish, and other coatings.
Power Tools
Power tools provide efficiency and speed for various woodworking tasks, but safety is paramount when using them.
- Power Saw: Electric saws offer faster and more precise cutting than hand saws.
- Circular Saw: A versatile saw used for cutting wood to length, ripping, and crosscutting.
- Jigsaw: Used for cutting curved and intricate shapes in wood.
- Table Saw: A stationary saw used for precise crosscuts, rips, and bevel cuts.
- Miter Saw: A specialized saw designed for making precise angled cuts.
- Power Sander: Sanding surfaces quickly and efficiently is essential for a smooth finish.
- Belt Sander: Used for sanding large, flat surfaces.
- Orbital Sander: Used for sanding curves and contoured surfaces.
- Router: Used for creating grooves, edges, and other decorative features in wood.
- Drill: Used for drilling holes in wood.
- Planer: Used for planing large surfaces of wood to a consistent thickness.
Safety Equipment
Safety should always be a top priority when working with woodworking tools.
- Safety Glasses: Protect your eyes from flying debris.
- Hearing Protection: Protect your ears from loud noises.
- Dust Mask: Protect your lungs from wood dust.
- Work Gloves: Protect your hands from cuts, splinters, and burns.
Measuring and Marking
Measuring and marking are fundamental skills in woodworking.
- Accurate Measurement: Use appropriate measuring tools and techniques to ensure precise dimensions.
- Marking Lines: Clearly mark the wood with a pencil, marking gauge, or scriber before cutting.
- Transferring Dimensions: Use a combination square or other tools to transfer measurements from one piece of wood to another.
Cutting
Cutting wood accurately and safely is essential for successful woodworking projects.
- Hand Saw Techniques: Use a firm grip, a steady sawing motion, and a consistent pace.
- Power Saw Safety: Always use safety glasses, hearing protection, and a dust mask.
- Cutting Techniques: Choose the appropriate saw and cutting technique for the desired result.
Joining
Joining wood pieces together securely is crucial for creating sturdy and durable structures.
- Types of Joints: Different joints are used for different purposes, such as strength, appearance, or ease of construction.
- Butt Joint: The simplest joint, where two pieces of wood are joined end to end.
- Lap Joint: A joint where one piece of wood overlaps another.
- Dado Joint: A groove cut into one piece of wood to receive the edge of another.
- Mortise and Tenon Joint: A strong joint where a tenon (projection) is cut on one piece of wood and fits into a mortise (hole) cut in another.
- Dovetail Joint: A decorative and strong joint used for joining two pieces of wood at a right angle.
- Joining Techniques: Different methods are used for joining wood pieces together, such as glue, nails, screws, or dowels.
- Clamping: Use clamps to hold pieces of wood together while glue dries or while joining with other methods.
Finishing
Finishing touches enhance the appearance and durability of woodworking projects.
- Sanding: Sanding smooths surfaces and removes imperfections.
- Finishing Options: Choose the appropriate finish for the desired look and protection.
- Paint: Provides color and protection.
- Stain: Enhances the natural grain of the wood.
- Varnish: Provides a clear, protective coating.
- Polyurethane: A durable, water-resistant finish.
- Application Techniques: Use brushes, rollers, or sprayers to apply finishes evenly.
Woodworking Materials
Wood is the heart and soul of woodworking, and understanding its characteristics is essential for creating beautiful and durable projects. Choosing the right wood for your project depends on various factors, including its properties, availability, and cost.
Types of Wood
The vast array of wood species available offers a unique set of properties for different woodworking applications. Here are some common types of wood used in woodworking:
- Hardwoods: Hardwoods are generally denser and stronger than softwoods, making them ideal for furniture, flooring, and structural applications. They often have a more intricate grain pattern and are known for their durability and longevity. Popular hardwoods include:
- Oak: Strong, durable, and beautiful, oak is a popular choice for furniture, flooring, and cabinetry. It comes in various colors, from light to dark, and is known for its distinctive grain pattern.
- Maple: Maple is known for its smooth, hard surface, making it suitable for furniture, flooring, and musical instruments. Its light color and tight grain pattern create a clean and elegant look.
- Cherry: Cherry is a beautiful wood with a rich reddish-brown color and a distinctive grain pattern. It is often used for furniture, cabinetry, and other decorative projects.
- Walnut: Walnut is a highly prized wood known for its rich brown color, beautiful grain pattern, and strength. It is commonly used for furniture, veneers, and gunstocks.
- Softwoods: Softwoods are typically lighter and less dense than hardwoods, making them easier to work with. They are often used for construction, framing, and less demanding projects. Common softwoods include:
- Pine: Pine is a softwood known for its affordability, light weight, and distinctive knotty grain pattern. It is commonly used for construction, framing, and furniture.
- Cedar: Cedar is known for its natural aroma and resistance to rot and insects, making it a popular choice for outdoor projects like decks and fences. It also has a distinctive reddish-brown color and a beautiful grain pattern.
- Fir: Fir is a strong and durable softwood that is often used for construction, framing, and furniture. It has a light color and a straight grain pattern.
- Spruce: Spruce is a lightweight and resonant softwood often used for musical instruments, framing, and construction. It has a light color and a straight grain pattern.
Selecting the Right Wood
The selection of wood is crucial for the success of any woodworking project. It is essential to consider factors such as:
- Strength: The strength of wood is determined by its density and grain pattern. Hardwoods are generally stronger than softwoods and are suitable for projects requiring durability and structural integrity.
- Grain: The grain pattern of wood refers to the arrangement of wood fibers, which can affect its appearance, strength, and workability. Straight grain wood is typically stronger and easier to work with than wood with knots or other irregularities.
- Cost: The cost of wood varies significantly depending on the species, availability, and quality. Rare and exotic woods are often more expensive than common woods.
- Availability: Consider the availability of the wood in your area. Some species may be more readily available than others, affecting your project’s feasibility.
Wood Preparation
Before starting any woodworking project, it is essential to prepare the wood properly to ensure optimal results. This involves:
- Drying: Wood must be dried to a specific moisture content to prevent warping, cracking, and other problems. This process can take weeks or even months depending on the species and thickness of the wood.
- Sanding: Sanding is crucial for smoothing the wood surface and removing imperfections. It helps to create a uniform finish and prepares the wood for staining or painting.
- Staining: Staining is a process that adds color and enhances the natural beauty of the wood. It can be used to create a variety of finishes, from light and subtle to dark and dramatic.
“Selecting the right wood is like choosing the right canvas for a painting. It sets the stage for your creativity and ultimately affects the final outcome.”
Woodworking Projects for Beginners
Starting your woodworking journey can be exciting! You can create functional and beautiful pieces with a little guidance and practice. This section explores beginner-friendly woodworking projects, providing step-by-step plans, safety tips, and essential techniques.
Simple Woodworking Projects for Beginners
Choosing the right project is crucial for a successful woodworking experience. Here are a few simple projects ideal for beginners:
- Cutting Board: A cutting board is a practical and visually appealing project that allows you to practice basic cutting and sanding techniques.
- Wooden Coasters: Coasters are small projects that can be made with scrap wood. They offer an excellent opportunity to experiment with different wood types and finishes.
- Birdhouse: A birdhouse is a fun and rewarding project that involves assembling simple shapes and learning about wood joints.
- Picture Frame: A picture frame is a great way to showcase your favorite photos and practice miter cuts.
- Small Shelf: A small shelf can be used in various areas of your home and allows you to learn about basic woodworking techniques.
Safety Precautions for Beginners
Safety is paramount when working with woodworking tools. Here are some essential safety precautions:
- Wear Safety Glasses: Always wear safety glasses to protect your eyes from flying debris.
- Use Hearing Protection: Woodworking tools can generate loud noises. Protect your hearing by wearing earplugs or earmuffs.
- Keep Work Area Clean: A clean work area reduces the risk of accidents. Remove clutter and sawdust regularly.
- Use Sharp Tools: Dull tools are more dangerous than sharp ones. Always sharpen your tools before use.
- Avoid Distractions: Focus on your work and avoid distractions that could lead to accidents.
- Use Proper Lifting Techniques: Avoid lifting heavy objects improperly. Use your legs to lift, and keep your back straight.
Step-by-Step Guide for a Simple Woodworking Project: Wooden Coasters
This section provides a detailed step-by-step guide for creating wooden coasters, a perfect project for beginners.
Materials
- Wood (1/2 inch thick)
- Saw (hand saw or circular saw)
- Sandpaper (various grits)
- Wood glue
- Clamps
- Finish (polyurethane or oil)
Steps
- Cut the Wood: Cut the wood into squares or circles, depending on your desired coaster shape. Use a saw to make precise cuts.
- Sand the Wood: Sand the edges and surfaces of the wood to create a smooth finish. Start with a coarse grit sandpaper and progressively move to finer grits.
- Apply Finish: Apply a finish to protect the wood and enhance its appearance. Follow the manufacturer’s instructions for application and drying time.
- Let Dry: Allow the finish to dry completely before handling the coasters.
Essential Tools and Techniques
Mastering essential woodworking tools and techniques is crucial for successful woodworking. Here are some fundamental tools and techniques:
Tools
- Hand Saw: A hand saw is used for making straight cuts in wood.
- Circular Saw: A circular saw is a power tool that provides more precise and faster cuts than a hand saw.
- Sandpaper: Sandpaper is used to smooth the surface of wood and remove imperfections.
- Clamps: Clamps are used to hold pieces of wood together while glue dries.
- Measuring Tape: A measuring tape is essential for accurately measuring and cutting wood.
Techniques
- Cutting: Cutting wood requires precision and safety. Use a saw to make straight cuts, following a marked line.
- Sanding: Sanding smooths the surface of wood and removes imperfections. Start with a coarse grit sandpaper and progressively move to finer grits.
- Gluing: Gluing is used to join pieces of wood together. Apply a thin layer of glue to the surfaces to be joined, and clamp the pieces together until the glue dries.
- Finishing: Finishing protects the wood from damage and enhances its appearance. Apply a finish, such as polyurethane or oil, to the wood following the manufacturer’s instructions.
Advanced Woodworking Techniques
As you gain experience and confidence in woodworking, you may want to explore more intricate and challenging techniques. Advanced woodworking techniques offer a world of possibilities for creating unique and stunning pieces. These techniques often involve specialized tools and require a higher level of skill and precision.
Carving
Carving is a time-honored woodworking technique that involves shaping wood using hand tools. It allows for intricate details and three-dimensional designs. Carving is used in various applications, including creating decorative elements for furniture, sculptures, and even functional items like wooden spoons.
- Relief carving: This technique involves carving a design into the surface of the wood, creating a raised image. It’s commonly used for decorative elements on furniture, picture frames, and other objects.
- Round carving: Round carving involves shaping wood in three dimensions, creating sculptures or figures. This technique requires a high level of skill and patience.
- Chip carving: This technique involves using a small knife to remove chips of wood, creating geometric patterns. Chip carving is often used for decorative accents on furniture and other objects.
Turning, Woodworkers plan
Woodturning is a technique that involves shaping wood on a lathe, a machine that rotates the wood while a tool cuts and shapes it. Turning allows for creating symmetrical and functional objects, such as bowls, vases, and table legs.
- Spindle turning: Spindle turning involves shaping long, slender pieces of wood, such as table legs or spindles for chairs. This technique requires precision and control to create consistent shapes.
- Bowl turning: Bowl turning involves shaping hollow, round objects like bowls, platters, and cups. This technique requires a keen eye for symmetry and a steady hand to create smooth, even surfaces.
Inlay
Inlay is a technique that involves embedding materials like wood, metal, or stone into a surface of a different material, typically wood. Inlay is used to create decorative patterns, images, or even intricate designs on furniture, boxes, and other objects.
- Wood inlay: This technique involves embedding pieces of different woods into a surface of a different wood. It creates stunning patterns and textures using the natural beauty of wood.
- Metal inlay: This technique involves embedding metal pieces into a wooden surface. Metal inlay is often used to create accents, borders, or intricate designs.
Wood Finishing Techniques
Wood finishing is an essential part of woodworking, as it protects the wood and enhances its appearance. There are various wood finishing techniques available, each with its own advantages and disadvantages.
- Painting: Painting is a versatile finishing technique that provides a durable and opaque finish. It’s ideal for covering imperfections or adding color to wood.
- Staining: Staining is a technique that adds color to wood without obscuring its grain pattern. It enhances the natural beauty of the wood and creates a more subtle finish than painting.
- Varnishing: Varnishing involves applying a clear, protective coating to wood, enhancing its shine and protecting it from scratches and moisture. Varnish comes in different finishes, from gloss to matte.
- Waxing: Waxing is a technique that applies a thin layer of wax to wood, providing a protective and water-resistant finish. Waxing enhances the natural sheen of wood and can be used to create a rustic or antique look.
Specialized Tools and Equipment
Advanced woodworking techniques often require specialized tools and equipment. These tools provide the precision and control needed to execute intricate designs and achieve high-quality results.
- Carving tools: Carving tools include chisels, gouges, and knives, each designed for specific carving tasks. Choosing the right carving tool is essential for achieving the desired results.
- Lathe: A lathe is a machine that rotates wood, allowing for precise shaping and turning. It’s essential for creating symmetrical and functional objects.
- Inlay tools: Inlay tools include specialized knives, saws, and punches, used for cutting and embedding materials into wood surfaces.
- Sanding equipment: Sanding equipment, including sanders and sanding blocks, is essential for achieving smooth and polished surfaces on wood.
Woodworking Inspiration and Resources
Woodworking is a craft that can be both challenging and rewarding. It takes time, patience, and skill to create beautiful and functional pieces. But it’s also a craft that can be incredibly inspiring. There are countless woodworkers out there who are pushing the boundaries of what’s possible with wood. Their work can be a source of motivation and inspiration for anyone who loves woodworking.
Inspiring Woodworking Projects
There are many talented woodworkers and artists who create inspiring projects. Here are some examples:
- Sam Maloof was a renowned American woodworker known for his unique and organic style. His furniture, particularly his rocking chairs, are characterized by their flowing lines and natural curves, showcasing the beauty of wood grain.
- George Nakashima was another influential American woodworker who embraced the natural beauty of wood. He is known for his minimalist furniture designs, often incorporating live edges and imperfections, celebrating the unique character of each piece of wood.
- Chris Schwarz is a modern woodworker known for his traditional techniques and innovative designs. His work often features intricate joinery and a focus on functionality, demonstrating the versatility of woodworking.
Online Resources and Communities
The internet has become a valuable resource for woodworkers, providing access to a vast array of information, inspiration, and community.
- Woodworking Forums: Online forums like Lumberjocks and Woodworking Talk offer platforms for woodworkers to connect, share their projects, ask questions, and learn from others.
- Social Media: Platforms like Instagram and Pinterest showcase stunning woodworking projects from around the world, inspiring and connecting woodworkers.
- Online Courses and Tutorials: Websites like Skillshare, Udemy, and YouTube offer a wide range of woodworking courses and tutorials, covering various techniques, styles, and projects.
Continuous Learning and Development
Woodworking is a craft that requires continuous learning and development.
- Experimentation: Trying new techniques, exploring different woods, and pushing your creative boundaries are essential for growth as a woodworker.
- Seeking Feedback: Sharing your work with other woodworkers and receiving constructive criticism can help you identify areas for improvement.
- Staying Updated: The woodworking world is constantly evolving, with new tools, techniques, and materials emerging. Staying informed about the latest trends and advancements is crucial for staying ahead of the curve.
Concluding Remarks

The journey of woodworking is an exciting one, filled with endless possibilities and creative expression. By embracing the power of woodworking plans, you unlock a world of potential, enabling you to build anything you can imagine. Whether you’re a seasoned woodworker or just starting out, remember that with the right plan, dedication, and a little bit of passion, you can create beautiful and functional pieces that will be cherished for years to come. So, grab your tools, choose your plan, and let the journey begin!
Quick FAQs
What are the different types of woodworking plans available?
Woodworking plans come in various formats, including blueprints, diagrams, 3D models, and even video tutorials. Each format has its own advantages and disadvantages, so choose the one that best suits your needs and skill level.
How do I choose the right woodworking plan for my project?
Consider the complexity of the project, your skill level, and the tools you have available. Look for plans that provide clear instructions, detailed diagrams, and accurate measurements. It’s also helpful to read reviews from other woodworkers who have used the plan.
What are some essential woodworking tools for beginners?
Essential tools for beginners include a measuring tape, a pencil, a saw, a hammer, a screwdriver, clamps, sandpaper, and safety glasses. As you progress, you can gradually expand your tool collection to include power tools like a drill, a sander, and a table saw.
Woodworkers plans are a great way to get started with woodworking, whether you’re a beginner or a seasoned pro. If you’re looking for a more rustic style, check out rustic woodworking plans. These plans often feature reclaimed wood and simple designs, perfect for creating a cozy and welcoming atmosphere.
Once you’ve mastered the basics, you can use your woodworkers plan to create your own unique rustic pieces.
