Woodworking plans shelves – Woodworking plans for shelves are your gateway to creating custom storage solutions that perfectly match your style and needs. Whether you’re dreaming of a rustic bookshelf for your living room, sleek floating shelves for your kitchen, or a sturdy set of storage shelves for your workshop, these plans offer step-by-step guidance and design inspiration to help you bring your vision to life.
These plans empower you to create shelves that not only serve a practical purpose but also add a touch of personal flair to your space. From choosing the right wood and tools to mastering basic woodworking techniques, you’ll gain valuable skills and a sense of accomplishment with each project.
Introduction to Woodworking Plans for Shelves
Shelves are a versatile addition to any home, providing a functional and stylish way to organize and display your belongings. From showcasing cherished books and decorative items to creating a dedicated space for your tools or craft supplies, shelves offer endless possibilities for enhancing your living space. Building your own shelves allows you to customize them to fit your specific needs and preferences, adding a personal touch to your home décor.
Woodworking plans provide detailed instructions and diagrams, guiding you through the process of building shelves from start to finish. These plans are an invaluable resource for both novice and experienced woodworkers, offering step-by-step guidance and ensuring a successful outcome.
Choosing the Right Woodworking Plan
Selecting the right woodworking plan is crucial for a successful project. The plan should align with your skill level, available tools, and desired outcome. It should clearly Artikel the materials, tools, and steps involved in the construction process.
Types of Woodworking Plans for Shelves

The world of woodworking plans for shelves is diverse, offering a range of options to suit your style, space, and skill level. From simple floating shelves to intricate corner designs, there’s a plan out there for every project.
Types of Shelf Plans
Shelf plans can be categorized based on their installation method, style, and intended use. Understanding these categories can help you narrow down your choices and find the perfect plan for your needs.
- Floating Shelves: These shelves appear to float on the wall, creating a minimalist and modern aesthetic. They are typically mounted using hidden brackets or supports, giving the illusion of weightlessness.
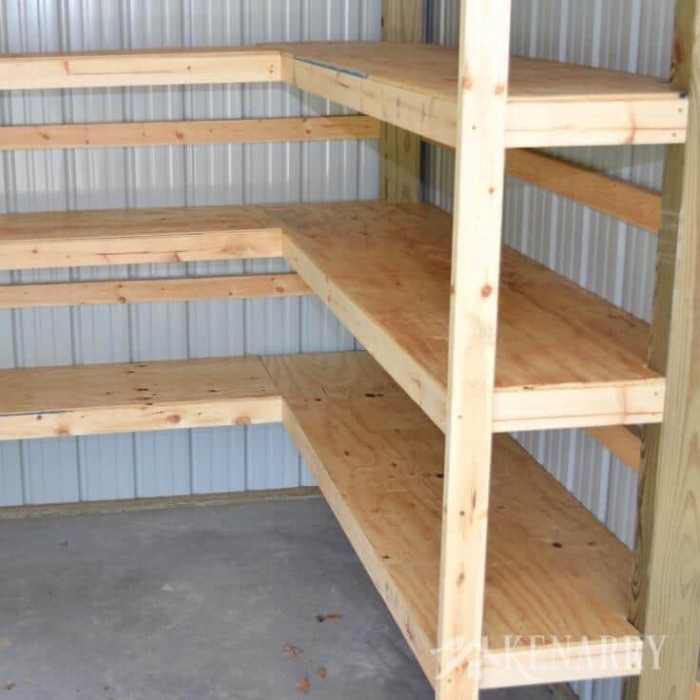
- Corner Shelves: Ideal for maximizing space in tight corners, corner shelves add functionality and visual interest to any room. They come in various shapes and sizes, from simple triangular shelves to elaborate curved designs.
- Wall-Mounted Shelves: The most common type of shelf, wall-mounted shelves are supported by visible brackets or supports. They offer versatility in design and can be customized to fit any space.
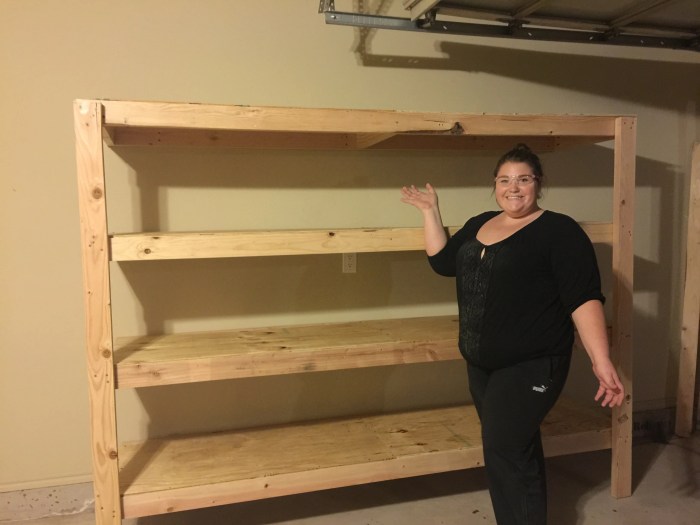
- Freestanding Shelves: These shelves are not attached to the wall and stand independently. They are often used as room dividers, storage units, or display pieces.
Examples of Shelf Styles
The style of your shelves can significantly impact the overall look and feel of your space. Here are some popular shelf styles and their characteristics:
- Rustic Shelves: These shelves often feature reclaimed wood, natural finishes, and distressed details, adding a touch of warmth and character to any room.
- Modern Shelves: Modern shelves prioritize clean lines, minimalist designs, and sleek materials like metal or high-gloss wood. They create a contemporary and sophisticated ambiance.
- Minimalist Shelves: Minimalist shelves focus on simplicity and functionality. They are typically made from simple materials and have a clean, uncluttered design.
- Industrial Shelves: Industrial shelves often feature exposed metal brackets, pipes, or reclaimed wood, creating a raw and edgy aesthetic. They are perfect for adding a touch of urban chic to any space.
Pros and Cons of Different Shelf Plan Designs
Each shelf plan design comes with its own set of advantages and disadvantages. Consider these factors when choosing the right plan for your project:
- Floating Shelves:
- Pros: Minimalist and modern look, visually appealing, can create a sense of spaciousness.
- Cons: Can be challenging to install, may not be suitable for heavy items, limited storage capacity.
- Corner Shelves:
- Pros: Maximize space in corners, add visual interest, can be customized to fit any angle.
- Cons: Can be difficult to access, may not be suitable for large items, can be challenging to install.
- Wall-Mounted Shelves:
- Pros: Versatile, easy to install, can be customized to fit any space, suitable for various items.
- Cons: Can be visually distracting, may not be suitable for heavy items, can take up wall space.
- Freestanding Shelves:
- Pros: Versatile, can be moved easily, suitable for large items, can be used as room dividers.
- Cons: Can take up floor space, may not be suitable for small spaces, can be unstable if not properly constructed.
Essential Materials and Tools for Shelf Construction
Building shelves requires a careful selection of materials and tools to ensure a sturdy and aesthetically pleasing outcome. The right materials will determine the durability, appearance, and overall functionality of your shelves, while the tools will help you cut, shape, and assemble the pieces with precision. This section will guide you through the essential materials and tools, providing insights into their selection based on your project needs.
Wood Types
The type of wood you choose will significantly influence the strength, appearance, and cost of your shelves.
- Hardwoods: These woods are known for their durability and resistance to scratches and dents, making them suitable for shelves that will be heavily used. Examples include oak, maple, cherry, walnut, and mahogany.
- Softwoods: These woods are typically lighter and less expensive than hardwoods. While they may not be as durable, they are still suitable for many shelf projects, especially those that are less prone to heavy use. Common softwoods include pine, fir, and cedar.
- Plywood: Plywood is a versatile material made from thin layers of wood veneer glued together. It is a cost-effective option that is strong and stable, making it suitable for shelves that require a large surface area.
- Medium-density fiberboard (MDF): MDF is a wood-based panel product made from wood fibers and resin. It is a smooth and dense material that is often used for shelves that require a finished look.
Fasteners, Woodworking plans shelves
Fasteners play a crucial role in holding the shelf components together.
- Screws: Screws are a common and reliable fastener for shelves. They provide a strong and secure connection. Choose screws that are appropriate for the thickness of the wood and the weight they will be supporting.
- Nails: Nails can be used for a quick and easy way to fasten shelves, but they may not be as strong as screws.
- Wood glue: Wood glue is often used in conjunction with screws or nails to provide additional strength and stability.
- Brackets: Brackets are metal supports that are attached to the wall and used to support shelves. They come in various sizes and styles to match your project’s aesthetic.
Finishes
Finishes protect the wood and enhance its appearance.
- Paint: Paint is a versatile finish that can be used to cover the wood and provide a decorative touch.
- Stain: Stain is used to color the wood without hiding its natural grain. It can be applied in various shades and tones to achieve the desired look.
- Varnish: Varnish provides a clear protective coating that enhances the natural beauty of the wood and protects it from scratches and spills.
- Polyurethane: Polyurethane is a durable and water-resistant finish that is often used for shelves that will be exposed to moisture.
Tools
The right tools will make your shelf construction process more efficient and accurate.
- Saw: A saw is essential for cutting wood to size. There are various types of saws available, including hand saws, circular saws, and miter saws. The type of saw you choose will depend on the size and complexity of your project.
- Drill: A drill is used to create holes for screws or other fasteners. A cordless drill provides greater mobility and convenience.
- Sandpaper: Sandpaper is used to smooth the surface of the wood and prepare it for finishing.
- Measuring tape: A measuring tape is essential for accurate measurements and ensuring all pieces are cut to the correct size.
- Level: A level is used to ensure that shelves are installed horizontally and that the brackets are aligned properly.
- Clamps: Clamps are used to hold pieces of wood together while they are being glued or screwed.
- Safety glasses: Safety glasses are important for protecting your eyes from wood chips and debris.
Selecting the Right Materials and Tools
The selection of materials and tools should be based on your project needs and budget.
- Consider the weight of the items you will be storing: If you plan to store heavy objects, you will need to choose strong and durable materials, such as hardwoods or plywood.
- Think about the desired look and style: The type of wood and finish you choose will influence the overall appearance of your shelves.
- Determine your budget: Materials and tools can range in price, so it is important to set a budget and choose options that fit your financial constraints.
Step-by-Step Guide to Building Shelves from Plans
Building shelves from woodworking plans is a rewarding project that can enhance your home’s organization and aesthetics. This guide will walk you through each step, ensuring you create sturdy and attractive shelves.
Preparing the Work Area and Materials
Before you begin, set up a safe and organized workspace. This step involves gathering all necessary materials and tools, ensuring they are in good working condition and readily accessible. A well-prepared workspace promotes efficiency and minimizes potential accidents.
- Clear a spacious work area: Choose a well-lit and ventilated area, free from clutter and distractions. Ensure adequate floor space for moving materials and tools comfortably.
- Gather all necessary materials: Review your woodworking plans carefully and gather all materials, including lumber, fasteners, glue, and finishing materials. Ensure the quantities are sufficient to avoid delays.
- Prepare tools: Gather all tools required for the project, including saws, drills, measuring tools, clamps, and safety equipment. Check their functionality and sharpen blades if necessary.
Cutting the Wood
Precise cutting is crucial for building shelves. Use a saw that provides accurate cuts and minimizes waste. Safety precautions should be prioritized throughout this step.
- Measure twice, cut once: Accurately measure and mark the wood according to your woodworking plans. Double-check your measurements before making each cut.
- Use a saw appropriate for the task: Choose a saw suitable for the type of wood and cut required. A circular saw is generally used for straight cuts, while a jigsaw is ideal for curves and intricate shapes.
- Safety first: Always wear safety glasses and hearing protection when using power tools. Ensure the work area is clear of obstructions and distractions.
Assembling the Shelves
This step involves joining the cut pieces of wood to form the shelf structure. Use appropriate fasteners and glue for a strong and durable bond.
- Pre-drill holes for screws: Pre-drilling holes slightly smaller than the screw diameter helps prevent wood splitting and ensures a clean finish.
- Apply wood glue: Use wood glue to enhance the bond between the wood pieces. Apply a thin layer of glue to the surfaces that will be joined.
- Secure the pieces with screws: Drive screws through the pre-drilled holes, ensuring they are long enough to provide sufficient holding power.
- Clamp the pieces together: Use clamps to hold the pieces together while the glue dries. Ensure the clamps are applied evenly to prevent warping.
Finishing the Shelves
This step involves sanding, staining, or painting the shelves to achieve the desired look.
- Sand the shelves: Sand the shelves with progressively finer grits of sandpaper to create a smooth surface. Start with a coarser grit to remove any rough edges and finish with a fine grit for a smooth finish.
- Apply stain or paint: If desired, stain or paint the shelves. Apply the stain or paint evenly in thin coats, allowing each coat to dry completely before applying the next.
- Apply a sealant: A sealant helps protect the finish and makes cleaning easier. Apply a sealant according to the manufacturer’s instructions.
Installing the Shelves
The final step involves attaching the shelves to the wall or desired location.
- Determine the shelf placement: Mark the desired location for the shelves on the wall using a level.
- Install shelf brackets: Install shelf brackets securely to the wall, using appropriate fasteners for the wall material.
- Place the shelves on the brackets: Carefully place the shelves on the brackets, ensuring they are level and secure.
Design Considerations for Shelves

Designing shelves involves more than just choosing a style. It’s about understanding the purpose, the weight it needs to hold, and how it will integrate into your space. This section will explore key design considerations for creating shelves that are both functional and visually appealing.
Shelf Size and Weight Capacity
The size of your shelves will depend on what you plan to store. For bookshelves, you’ll need shelves wide enough to accommodate the average book size, while display shelves might be smaller for showcasing smaller items.
Consider the weight of the items you’ll be placing on the shelves. For heavy items like books or tools, you’ll need to use strong materials and sturdy supports.
Here are some tips for determining shelf size and weight capacity:
- Measure the space: Before designing shelves, carefully measure the space where they will be installed. Consider the height, width, and depth.
- Estimate the weight: If you’re storing heavy items, consider using thicker materials and reinforcing the shelves with brackets or supports.
- Consult weight capacity charts: Many lumberyards and hardware stores have weight capacity charts for different types of wood and shelving materials. This can help you determine the appropriate thickness and support for your shelves.
Aesthetics and Style
The aesthetic of your shelves is just as important as their functionality. Consider the overall style of your room and choose materials and finishes that complement the existing décor.
Here are some tips for creating visually appealing shelves:
- Choose the right materials: Wood is a classic choice for shelves, but you can also use metal, glass, or even acrylic. The material you choose will impact the overall look and feel of the shelves.
- Consider the finish: The finish of your shelves will also affect their appearance. You can choose from a variety of stains, paints, and varnishes to create the desired look.
- Think about the shape: Shelves don’t have to be straight. You can create curved shelves, angled shelves, or even shelves with unique shapes to add interest to your space.
- Add decorative elements: You can add decorative elements to your shelves, such as moldings, trim, or even lighting to enhance their appearance.
Types of Shelves
Shelves come in a wide variety of styles and designs, each suited for a specific purpose. Here are some common types of shelves:
- Bookshelves: These shelves are specifically designed for storing books. They often have adjustable shelves and are typically made of wood.
- Display shelves: These shelves are designed to showcase items, such as collectibles, artwork, or plants. They often have a more decorative design and are typically made of wood or metal.
- Storage shelves: These shelves are designed for storing a variety of items, such as tools, supplies, or clothing. They are often made of sturdy materials and have a simple design.
Functional Considerations
Beyond aesthetics, consider the practical aspects of your shelves:
- Accessibility: Ensure the shelves are easy to access, especially if you’ll be storing heavy or frequently used items. Consider the height and depth of the shelves.
- Organization: Plan how you will organize the items on your shelves. Consider using bins, baskets, or dividers to keep things tidy.
- Safety: If you are storing heavy items, ensure the shelves are securely attached to the wall. Use strong brackets and screws to prevent the shelves from collapsing.
Finishing Touches for Shelves

Giving your shelves a final touch of elegance and protection is crucial. Choosing the right finish can dramatically impact the look and longevity of your shelves. This step is where you can truly personalize your project, adding a touch of your own style and enhancing the natural beauty of the wood.
Types of Finishes
Different finishes serve different purposes. Some enhance the natural wood grain, while others provide a more robust protective layer.
- Staining: Staining adds color and depth to the wood, highlighting its natural grain patterns. It comes in various colors and finishes, from light washes to rich, deep hues.
- Painting: Painting offers complete color control and can be used to create a bold statement or a subtle, minimalist look. You can choose from a wide range of colors and finishes, including gloss, matte, and semi-gloss.
- Varnishing: Varnish provides a clear, protective coating that enhances the wood’s natural beauty while safeguarding it from scratches, spills, and moisture. It comes in various finishes, including gloss, satin, and matte, to suit your preference.
- Polyurethane: Polyurethane is a durable, water-resistant finish that provides excellent protection against wear and tear. It’s a popular choice for high-traffic areas and outdoor projects.
- Wax: Wax offers a natural, low-gloss finish that enhances the wood’s texture and provides a protective layer. It’s a good choice for delicate woods or projects where a subtle finish is desired.
Choosing the Right Finish
The right finish depends on several factors:
- Wood Type: Some woods, like cherry or walnut, have beautiful natural grain patterns that are enhanced by staining. Others, like pine or maple, may benefit from a clear varnish or polyurethane to protect their softer surfaces.
- Project Location: If your shelves will be placed in a high-traffic area or exposed to moisture, a durable finish like polyurethane or varnish is recommended. For less demanding locations, a wax or stain may suffice.
- Desired Look: Consider the overall aesthetic you’re aiming for. Do you want to highlight the natural wood grain, create a bold color statement, or achieve a subtle, matte finish? Your choice of finish should align with your vision.
Applying Finishes
- Preparation: Ensure your shelves are clean, dust-free, and sanded smooth. This will ensure the finish adheres evenly and provides a professional look.
- Application: Apply the finish according to the manufacturer’s instructions. Use a brush, roller, or spray gun, depending on the finish and your preference. Work in thin, even coats, allowing each coat to dry completely before applying the next.
- Finishing Touches: Once the final coat is dry, you can apply a sealant or topcoat to further protect the finish. For a more polished look, you can also use a buffing pad to smooth out any imperfections.
Inspiration and Resources for Woodworking Plans: Woodworking Plans Shelves

The internet is a treasure trove of inspiration and resources for woodworking projects. From free plans to detailed tutorials, you can find everything you need to build beautiful and functional shelves. This section will explore some of the best websites, online platforms, and resources to ignite your creativity and guide you through the process of creating your own shelves.
Free and Paid Woodworking Plans
Free and paid woodworking plans offer a diverse range of designs and complexity levels, catering to both beginners and experienced woodworkers. You can find plans for simple floating shelves to intricate built-in units, allowing you to choose a project that aligns with your skills and preferences.
- Ana White: This popular website offers a vast collection of free woodworking plans, including many options for shelves. Ana White’s plans are known for their clear instructions and detailed diagrams, making them beginner-friendly.
- Woodworking for Mere Mortals: This website features a wide array of free woodworking plans, covering various projects, including shelves. The plans are well-organized and easy to navigate, with helpful tips and tricks for each project.
- The Wood Whisperer: This website, run by Marc Spagnuolo, offers both free and paid woodworking plans. Marc’s plans are known for their high-quality instructions and detailed explanations, making them suitable for woodworkers of all skill levels.
- Popular Mechanics: This website offers a variety of woodworking plans, including shelves, that are free and easy to follow. Popular Mechanics’ plans are designed to be accessible to DIY enthusiasts of all skill levels.
- Woodworking.org: This website offers a comprehensive collection of woodworking plans, including a dedicated section for shelves. You can find both free and paid plans, ranging from simple to complex designs.
Inspiration for Shelf Designs
Inspiration for shelf designs can come from various sources, including books, magazines, websites, and social media. By exploring different styles, materials, and construction techniques, you can develop a unique vision for your shelves.
- Pinterest: This popular social media platform is a great source of inspiration for woodworking projects, including shelves. You can search for specific styles, materials, or construction techniques to find ideas that spark your creativity.
- Instagram: Another popular social media platform, Instagram is home to a vibrant community of woodworkers who share their projects and techniques. You can follow your favorite woodworkers to stay updated on the latest trends and find inspiration for your own shelves.
- Woodworking Blogs: Many woodworking blogs feature articles, tutorials, and project plans that can inspire your own shelf designs. These blogs often offer insights into different woodworking techniques, materials, and finishing options.
- Home Decor Magazines: Home decor magazines often feature beautiful examples of shelves in various styles and settings. These magazines can provide inspiration for the overall design and aesthetic of your shelves.
Woodworking Techniques for Shelves
Understanding common woodworking techniques for shelves is crucial for successful construction. From cutting and joining wood to applying finishes, mastering these techniques will enhance your woodworking skills and ensure your shelves are sturdy and aesthetically pleasing.
- Cutting Wood: Cutting wood accurately and safely is a fundamental woodworking skill. Use a variety of tools, including hand saws, power saws, and table saws, to achieve precise cuts for your shelf components.
- Joining Wood: Joining wood pieces together securely is essential for creating sturdy shelves. Explore various joining techniques, including dowel joints, mortise and tenon joints, and pocket hole joinery, to find the most suitable method for your project.
- Finishing Wood: Finishing wood protects it from wear and tear and enhances its appearance. Learn about different finishing techniques, including sanding, staining, and varnishing, to achieve the desired look and durability for your shelves.
Last Point
Building shelves from woodworking plans is a rewarding journey that combines creativity with practical skills. With the right plan, tools, and a little bit of patience, you can craft shelves that enhance your home, organize your belongings, and reflect your unique style. So, grab your tools, gather your materials, and embark on a woodworking adventure that will leave you with shelves you’ll cherish for years to come.
Quick FAQs
What type of wood is best for shelves?
The best wood for shelves depends on your project needs and aesthetic preferences. Hardwoods like oak, maple, and cherry are durable and beautiful, while softwoods like pine and cedar are more affordable and work well for lighter-duty shelves.
How do I choose the right shelf plan?
Consider the size and weight capacity you need, the style you want to achieve, and your woodworking experience level when choosing a plan. Start with simpler plans if you’re new to woodworking.
What are some common mistakes to avoid when building shelves?
Common mistakes include not measuring accurately, using the wrong tools, and not properly securing the shelves. Always double-check your measurements, use the right tools for the job, and follow the instructions carefully.
Woodworking plans for shelves are a great way to add storage and style to your home. If you’re looking for a more challenging project, you might consider tackling some chair woodworking plans. Once you’ve mastered building chairs, you can return to your shelf projects with a newfound confidence and skill.
